Configuring anti-spam settings in webmail
Please use the “Print” function at the bottom of the page to create a PDF.
For Mail Basic and Mail Business
How to deactivate the spam report is explained in the following article:
Deactivating the spam report and configuring custom spam protection settings
When you set up a Mail Basic or Mail Business email account, Anti-Spam is automatically enabled. With Anti-Spam, you can prevent or limit the delivery of spam emails. Anti-Spam automatically scans all incoming emails in your mailbox. Depending on the selected configuration, spam emails are either moved to the Spam folder or they are sorted into the Inbox with the note [SPAM?] appended to the subject of the message.
This article explains how to:
- open the anti-spam settings
- define user-defined spam protection settings
- open and move emails classified as spam
- automatically move emails from wanted senders to the inbox
- treat emails from certain senders as spam in IONOS Webmail
- access the Spam folder with an email program
- have spam emails sorted into the inbox when you retrieve your emails via POP3
- deactivate the spam report
- activate the spam report
Note
Disabling Anti-Spam is not recommended. If you still want to disable Anti-Spam, see the following article for instructions:
Opening the Anti-Spam Settings
Log in to Webmail.
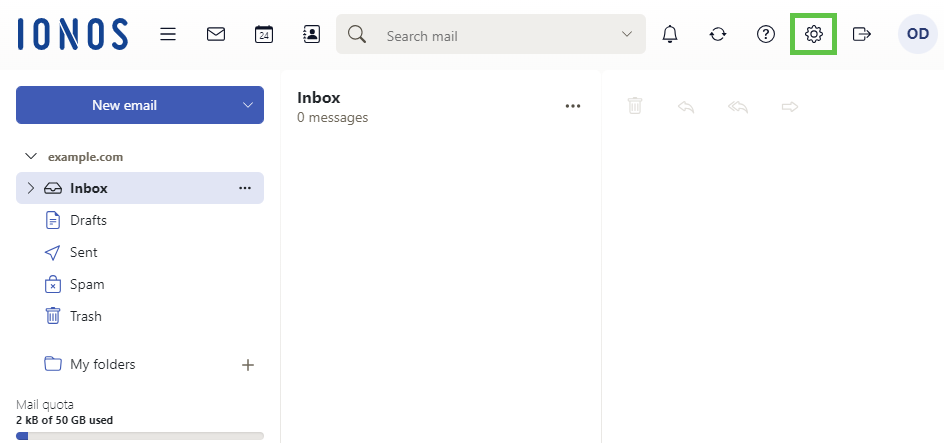
- In the main navigation bar, click on the gear icon in the top-right corner.

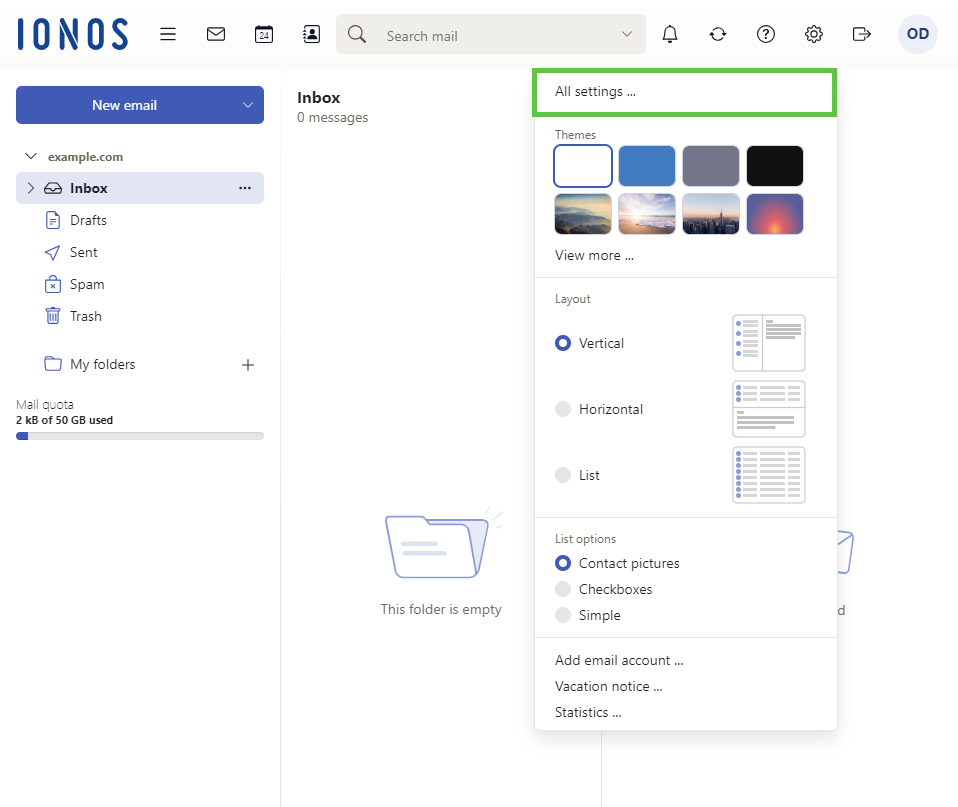
Click on All settings …

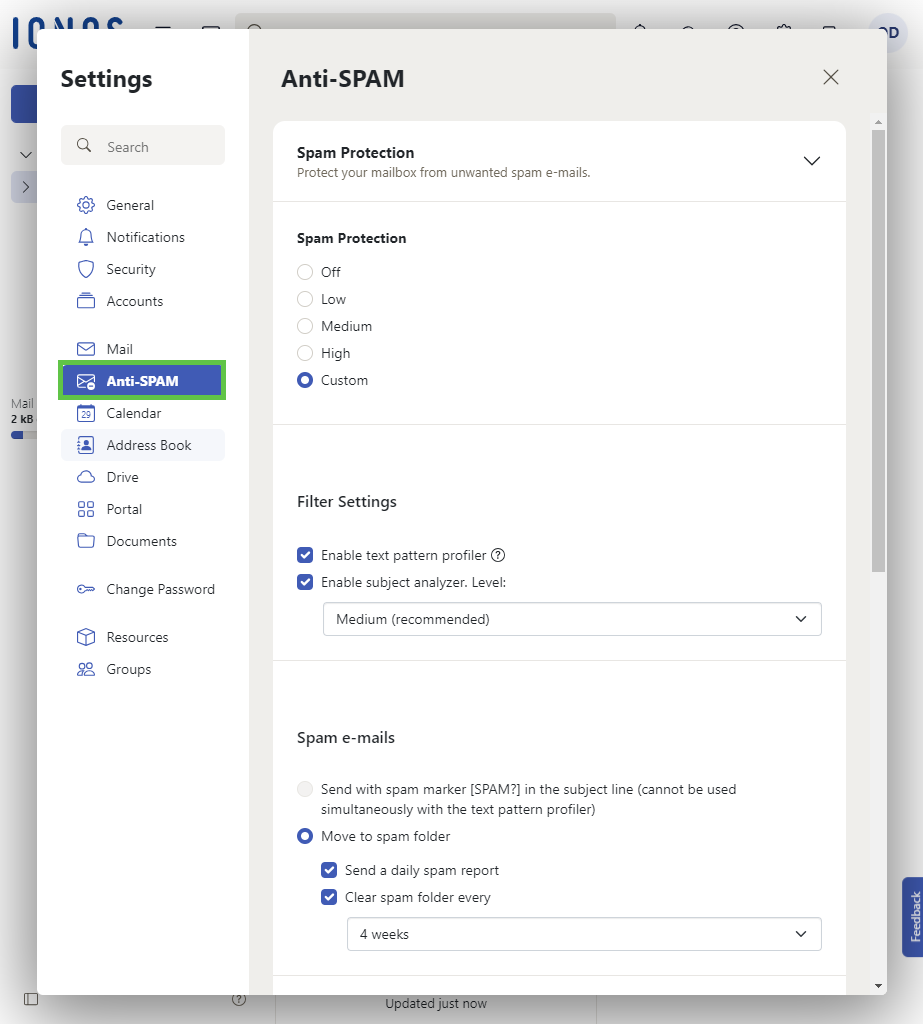
- Click on Anti-Spam in the navigation bar on the left.

Now you have the possibility to choose predefined spam protection levels or set a custom spam protection.
Setting Custom Spam Protection Settings
When you set custom spam protection settings, you should enable the following options to ensure maximum protection from spam emails:
Text pattern profiler: The text pattern profiler analyses emails in the spam folder and can thus improve the spam detection rate.
Letterhead analysis: This allows you to choose the sensitivity of spam detection according to your needs.
The detection mechanism checks the headers of the received emails. If a received email contains flags that indicate spam, points are assigned to the message. These points form the SpamScore. Based on the SpamScore tallied, your received emails are classified as spam or not spam. The criteria for the SpamScore includes the message containing certain words, an incorrect date/time, or an IP address known for sending spam.
You can choose between Low, Medium and High settings.
Low: Emails sent or forwarded from IP addresses that are known for spam activity are marked as SPAM.
Medium: In addition to the Low level criteria, the Medium level applies static rules, queries additional block lists, and checksums.
High: In addition to the Low and Medium level criteria, a lower threshold is set to classify spam.
Enable Anti-SPAM for known spam servers: If you enable this option, typical spam servers will be detected. In addition, all emails sent to your mailbox from these spam servers will be moved to the Spam folder.
Enable Anti-SPAM for bulk mails: If you enable this option, bulk emails with identical content will be detected and moved to the Spam folder.
Safe senders: In this section, you can specify the email addresses of the senders you want to receive emails from.
Blocked senders: in this section, you can specify the email addresses of the senders from whom you do not want to receive emails.
Opening and Moving Emails Classified as Spam
How to open and move emails classified as spam by Spam Protection is explained in the following article:
Automatically Moving Emails from Wanted Senders to Your Inbox
You can find out how to set email addresses of specific senders to be automatically sorted to the inbox in the following article:
Treating Emails from Specific Senders as Spam in IONOS Webmail
If you keep getting unwanted spam or promotional emails from a certain sender, then you can set up a list of blocked senders in IONOS Webmail. You can find instructions on how to do this in the following article:
Accessing the Spam Folder with an Email Program
If you retrieve your emails via IMAP, the Spam folder is automatically displayed in your email client.
If you retrieve your emails via POP3, you can only access the Spam folder in Webmail. In this case, access is not possible via an email program such as Microsoft Outlook.
Having Spam Emails Sorted into Your Inbox (POP3)
If you check your email using POP3 and want to access your spam emails in your email program, you can have the received spam emails sorted into your inbox. To enable this feature, select the Spam Protection setting Custom in the Anti-Spam settings in Webmail and enable the option Send with note [SPAM?] in subject in the Spam Mails section (Note: This does not work at the same time as the Text Pattern Profiler).
Disabling the Spam Report
To disable the spam report, you need to configure the spam protection settings manually. How to do this is explained in the following article:
Disabling Spam Report and Configuring Custom Spam Protection Settings
Enabling the Spam Report
If you enable the Spam Protection setting Low, Medium or High, you will receive a daily spam report by email. If you select the Custom option, you can select this option after enabling the Move to Spam Folder setting. To receive the spam report, enable the Send spam report daily option.
Maximum Number of Emails that are Summarised in the Spam Report
The Spam Report lists a summary of a maximum of 20 emails delivered to your mailbox within the last 24 hours.
Content
- Opening the Anti-Spam Settings
- Setting Custom Spam Protection Settings
- Opening and Moving Emails Classified as Spam
- Automatically Moving Emails from Wanted Senders to Your Inbox
- Treating Emails from Specific Senders as Spam in IONOS Webmail
- Accessing the Spam Folder with an Email Program
- Having Spam Emails Sorted into Your Inbox (POP3)
- Disabling the Spam Report
- Enabling the Spam Report
- Maximum Number of Emails that are Summarised in the Spam Report
- To top