Please use the “Print” function at the bottom of the page to create a PDF.
In some cases, you may need to forward an email as an email attachment. In contrast to simply forwarding an email, the headers of the original email are preserved, which can be necessary for troubleshooting issues such as blacklisting and bounced emails.
Please Note
Emails that you forward to IONOS Customer Service for phishing/spam checks in the .eml or .msg formats must be compressed before sending.
If you are unsure about how to compress files, please see the instructions below:
Do you have questions about forwarding emails as an attachment, or do you need support on another topic?
Email Programs: Converting Emails to Attachments
Thunderbird
Open Thunderbird.
Open or highlight the email that you want to forward.
Select Message > Forward as > Attachment from the menu bar. A new email is created. If the menu bar is not displayed, press the Alt key.
Enter the new recipient and change the subject if necessary before sending the email.
Outlook 365 and 2016/2019/2021
Open the email that is to be forwarded.
In the Start tab of the ribbon, select More > Forward as attachment. A new email is created.
Enter the new recipient and change the subject (if necessary) before sending the email.
Apple Mail in macOS
Open the email you want to forward as an attachment.
Select Mail > Forward as attachment from the menu bar. A new email is created.
Enter the new recipient and change the subject (if necessary) before sending the email.
Webmail Services: Converting Emails to Attachments
IONOS Webmail
- Log in to Webmail.
Click on the gear icon in the top-right corner.

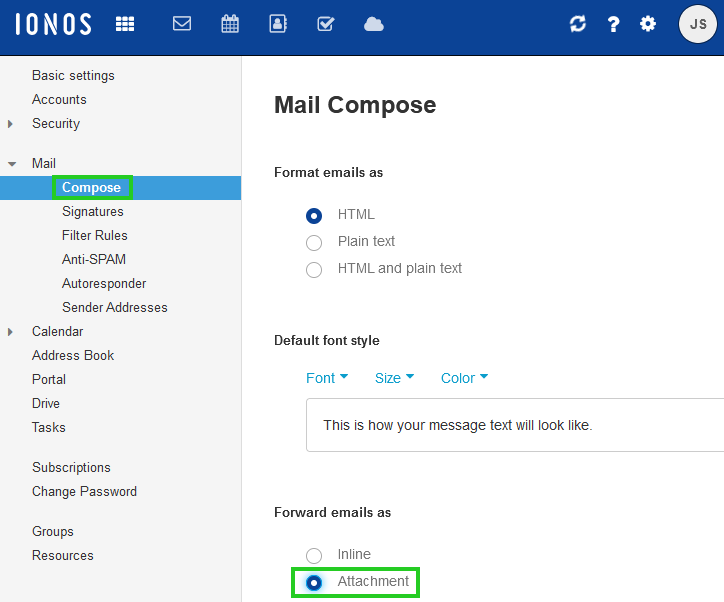
In the navigation bar on the left, click Mail > Compose.
In the Forward Emails As section, enable the Attachment option.

Keep in mind that this setting remains active until it is changed back.
Gmail
Open Gmail.
Right-click the email you want to forward.
Click Forward as Attachment.
A new email is created.Enter the new recipient and add a subject (if necessary) before sending the email.
Outlook Web App
Open the Outlook Web App.
Click New Message.
A new window opens.Drag the desired email from the email overview of the Outlook Web App into the editing window of the new email.
The email is automatically inserted as an attachment.
Saving Email Locally
With some email programs and webmail services, emails cannot be forwarded as attachments at all - or only with some effort. In this case, you can save the email locally and send the resulting file as an attachment.
IONOS Webmail
- Log in to Webmail.
Select the desired email.
Click on the icon with three horizontal lines in the white bar at the top right.
Click Save as file.
The email will be saved.
Gmail
Open Gmail.
Open the desired email.
Click on the three dots in the email.
Click on Download message.
Outlook 365 and 2016/2019/2021
Open Outlook.
Click on the desired message.
Click File at the top of the menu bar.
Click Save as.
Select the desired storage location.
In the File name field, type the desired file name.
Click Save.
Apple Mail on macOS
Open Apple Mail.
Click on the desired message.
Click on File.
Click on Save as.
In the Save as: field, type the desired file name.
In the Location: field, select the desired location.
Click Save.
Compressing Emails as a ZIP File
Optionally, you can compress the saved email(s) into a ZIP file, making it easier to send multiple downloaded emails at once:
Windows
- Open Windows Explorer and navigate to the folder where you saved the email.
- Right-click on the file. A context menu will open.
- Select Send To > ZIP Compressed Folder. A packed version of the source file is created with the ZIP extension.
macOS
- Open the Finder and navigate to the file.
- Highlight the file and click the gear icon in the menu bar.
- Click on "Compress filename" to pack the file. "Filename" will be the same as the name you gave it when you saved the email.