How to create a sitemap.xml file
If you care about where your web project is placed in the search engine result pages (SERPs), you will know exactly how many different factors influence the fight for the top places. For example, the list of factors that affect Google’s ranking includes over 200 criteria, some of which have been officially confirmed by the company, but some have only been assumed by experts. It’s no secret that search engine optimization has been the standard for every webmaster wanting their website to be visible and accessible. While factors such as relevant keywords, high-quality content, or a high level of mobility are well-known factors, the value of a good XML sitemap is often underestimated.
What is an XML sitemap?
An XML-Sitemap (sitemap.xml) is a text file in XML format (extensible markup language) that contains a list of all a website’s subpages in link form. As such, it can be uploaded to Google Search Console or Bing Webmaster Tools to notify search engine crawlers of all available and relevant pages to speed up and optimize the indexing process. XML sitemaps must meet the requirements of the sitemap protocol, which was agreed as standard by Google, Yahoo, and Microsoft in 2006 – with the aim being to improve the quality of search results delivered in the long term. For this, the encoding in UTF-8 (among other things) and the markup language XML, as well as the use of entity codes for certain characters (such as “>” instead of “>”), are required.
XML sitemaps are different from the sitemaps that many CMS automatically display in the frontend. This is the table of the website’s contents, which is intended to make navigation easier for visitors. By default, sitemaps are not visible to users, even though it is technically possible to make them accessible via a URL.
The advantages of a XML sitemap
Even if there is no guarantee that Google and other search engines’ indexing will be optimized due to XML sitemaps being used, the structured link directories increase the chance of this being the case. The crawler-friendly table of contents can also pay off, especially for sites with dynamic content that are subject to constant change. The same applies to larger web projects that have many subpages but not a big backlink structure (yet). Sites like these tend to be checked too irregularly for changes to be noticed or aren’t even picked up by the search engines’ radars. Thanks to sitemap.xmp, you can help them get noticed by indexing bots more quickly.
An additional advantage: as well as listing URLs of subpages, XML sitemaps can also list media files such as videos or images. For these, there are even extra tags that tell the crawler what content type is being used (e.g. <image>, <video>). In addition, attributes can be used that describe the content in more detail or specify the duration, so that search engines can optimally identify it. There is also a special version of the XML sitemap for news portals, which promises articles will be optimally indexed thanks to specific attributes such as genre, publication date, or title.
The effort involved in manually creating an XML sitemap, for simply ensuring your website has a structural directory, can be seen as a disadvantage. Thanks to XML sitemap generators like the online generator of XML-Sitemaps.com, there is no need to generate the practical XML sites by yourself. In addition, there are plugins for most content management systems that create XML sitemaps automatically.
Structure of an XML sitemap: the most important components
The formatting of an XML sitemap works with XML tags, just like every document in the extensible markup language. According to the current standard “Sitemaps 0.9,” three tags are required for it to be considered an XML sitemap.
| sitemap.xml: compulsory tags | |
| <urlset>, </urlset> | Each sitemap XML file must begin with an opening <urlset> tag and end with a closing </urlset> tag. The tag’s function is to summarize the file and link to the current protocol standard. |
| <url>, </url> | The opening and closing <url> tags are subordinate to the individual URL entries and indicate the beginning and end of a listed subpage. |
| <loc>, </loc> | The <loc> tag identifies the individual pages of the web project or their URLs. The URL must always begin with the protocol (e.g. “http”) and end with a closing slash (if required by the web server). A maximum length of 2.048 characters is also defined. |
Apart from these mandatory XML attributes, the sitemap tags <priority>, <lastmod>, and <changefreq> provide three additional tags for specifying the individual URL entries. However, the extent to which these optional tags are supported depends on the respective search engine. For example, the Google crawler primarily uses <lastmod> markups for indexing, while it largely ignores the other two attributes or only allows them to flow minimally into the crawling process.
| sitemap.xml: optional tags | |
| <lastmod>, </lastmod> | Via the <lastmod> tag, the date (in W3C format) of the page’s last modification can be specified. The tag is independent of the “if modified since” header that the web server can return as part of an HTTP 304 response. |
| <changefreq>, </changefreq> | The <changefreq> tag provides the crawler with general information on how often a page is expected to be updated (hourly, daily, monthly, and so on). Documents that are modified every time they are accessed are marked with the value “always,” and archived URLs are marked with “never.” |
| <priority>, </priority> | This tag enables a URL’s priority within an entire web project to be expressed on a scale of 0.0 to 1.0 (default priority: 0.5). This way, crawlers can be made aware of pages whose indexing is particularly important. |
Since an XML sitemap file may contain a maximum of 50,000 URLs and may not be larger than 50 MB, the URL collection of larger web projects can also be distributed across several documents. In this case, however, each sitemap document should be listed in an additional index file whose structure is similar to that of the sitemap files: The tags <sitemapindex> and <sitemap> must be used instead of <urlset> and <url>.
It is possible to compress sitemap files (e.g. with gzip), but only to reduce bandwidth requirements. The maximum size of an XML sitemap cannot be increased this way, as the limit always applies to the unpacked version of the file.
XML sitemap example
The easiest way to understand the structure of an XML sitemap is to use a concrete example:
In this case, the example XML sitemap lists the main URL one-test.website and the URLs of two subpages (page1 and page2). Search engine crawlers can see from the document that the main page has been given the highest priority by the webmaster and that modifications are made approximately once a month. The last adjustment was made on January 1, 2018. Page1 has the default priority value (0.5), but unlike the main page, it has been estimated that it will be adjusted weekly, with the last modification having taken place on March 5, 2018. If the crawler works with the sitemap priority attribute, it knows that it must pay the least attention to page2 during indexing (<priority> value: 0.3). The subpage is modified weekly (last modified on March 8, 2018).
Creating and submitting an XML sitemap – how it works
Given the huge amount of work involved in manually creating XML sitemaps, choosing plugins or online tools is a good idea – provided that you use them correctly. Reasonable XML sitemaps can be generated without specific configurations, but the structure directories will only be able to have the desired form when the appropriate, individual settings are correct. For our example, we present the possibilities offered by XML-sitemaps.com’s online generator and the WordPress plugin Google XML sitemaps for the creation and integration of XML sitemaps.
How to generate XML sitemaps using the XML-sitemap.com’s online generator
The online generator from XML-sitemaps.com offers users a convenient solution for creating their own XML sitemaps. The web service is free for web projects with up to 500 subpages – sitemaps for larger projects can also be created, but this user will need to pay for the Pro subscription. The procedure is very simple: After accessing the web application, insert the URL of your website into the address field provided:
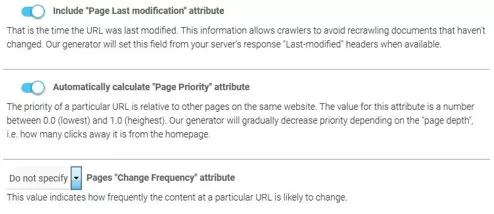
Use the “More options” button to determine whether or to what extent sitemap entries should be specified via the lastmod>, <priority> or <changefreq> attribute. The former can either be switched on or off, and for the latter you can set the desired update frequency (hourly, daily, weekly, etc.) if you want to make use of this labeling option. Otherwise, simply keep the default setting: “Do not specify.”
By clicking on “START” you will begin the generation process, the duration of which depends on the size of your web project. Once the process is complete, you can display the result under “VIEW SITE MAP” -> “VIEW FULL XML SITEMAP.”
Download the generated XML sitemap file and upload it to your website’s route directory. To inform the Google crawler about the file, for example, simply submit the file in the Google Search Console. Alternatively, you can specify the path where the sitemap can be found anywhere in the robots.txt file:
Google XML Sitemaps: how to create XML sitemaps with the WordPress plugin
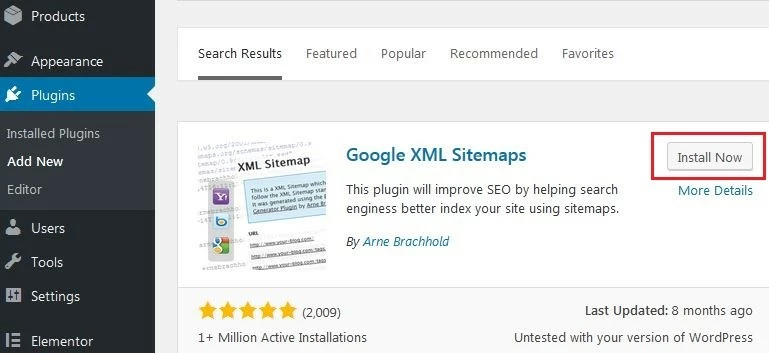
For over a decade, the WordPress plugin Google XML Sitemaps, developed by Arne Brachhold, has made creating XML sitemaps child’s play. To use the popular plugin (over 2 million active installations worldwide) for your WordPress website, you first have to install it via the content management system’s plugin center. Select the menu item “Plugins” and then “Install” and enter “Google XML Sitemaps” into the search field. By clicking on “Install now” you start the installation process of the extension, which should appear at the top of the presented results:
You can also download Google XML Sitemaps manually and place it in your WordPress’ plugin directory. If you activate the extension, you can access it directly in WordPress via “XML Sitemap” in the “Settings” menu. Compared to XML-Sitemaps.com, a significantly larger number of configuration options are available in the following seven areas:
- Basic options: here you define the basic settings and determine, for example, whether Google and Bing should be informed automatically about changes or whether the sitemap should be automatically compressed
- Additional pages: here you can add files or URLs that do not belong to the WordPress project but run on the same domain
- Post priority: adjustments in this menu are particularly interesting for blogs and news portals – if you work with the <priority> tag for your sitemap, you can define here whether and how the plugin should calculate the priority of a post</priority>
- Sitemap content: use this menu to select the categories of pages to be included in the XML sitemap (e.g. homepage, static pages, archive pages, etc.)
- Excluded items: if you want to exclude categories or individual posts from being indexed, you can do so here
- Change frequencies: Google XML Sitemaps offers the possibility of presetting the <changefreq> tag, and the update frequency can even be set separately for the different page types</changefreq>
- Priorities: beneath this, you can make the same settings for the <priority> attribute</priority>
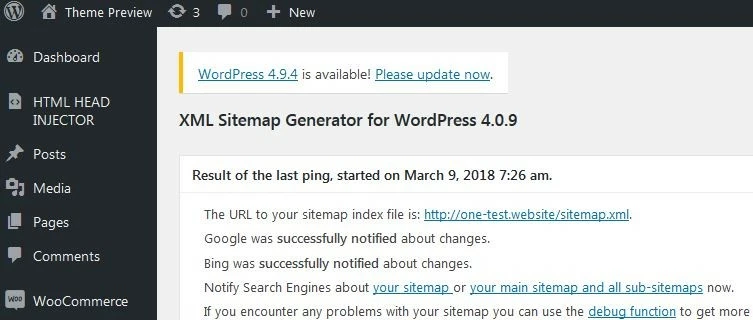
Once you have designed the XML sitemap setup according to your wishes, save the changes using the corresponding button. By clicking on the link “Your sitemap” after saving, you transmit your XML sitemap to the selected search engine crawlers.


