How to Import Bookmarks in Google Chrome
Favorites and bookmarks are the easiest way to save links to websites you’ve visited. Over time, you can build up an extensive collection of your favorite sites, frequently used sources, and important business websites directly in the browser—available at any time. To keep this collection when switching web client or device, Chrome allows you to import your bookmarks from other browsers or other installations of Google’s browser. We explain in the following how exactly you can import bookmarks to Chrome.
Importing Bookmarks to Chrome: Brief Guide
Only a few steps are necessary to import bookmarks in Chrome. The fastest way is as follows:
- Open Chrome.
- Click on the three-dot icon (top right of the menu bar).
- Click on “Bookmarks” and then on “Import bookmarks and settings”.
- Select “Mozilla Firefox”, “Internet Explorer” or “Microsoft Edge”, place a checkmark for “Favorites/Bookmarks”, and then press “Import” if you’d like to integrate bookmarks from one of these three browsers to Chrome.
- If you want to import saved Google Chrome bookmarks or use another favorite HTML document, select “Bookmark HTML file” and then “Select file” instead.
- Specify the storage location of the file and press “Open”.
To find out how to create a HTML file of your Chrome bookmarks, read our extensive tutorial on “Exporting Chrome Bookmarks”.
Step-by-Step Tutorial: How to Import Bookmarks to Chrome
The quick summary has already shown that the steps for importing bookmarks vary slightly depending on the source you use. If you have Firefox, Microsoft Edge or Internet Explorer installed on the same device, you won’t need a bookmark HTML file for the import process, for instance. But if these browsers are installed on a different device, you’ll need this file—just like when importing saved Chrome bookmarks or bookmarks from other web browsers. To illustrate the differences, we provide a detailed step-by-step guide below to explain the various import options.
How to Import Favorites to Chrome from Firefox, Microsoft Edge, and Internet Explorer
The simplest way to import bookmarks to Chrome is to automatically carry over all marked favorites. However, this option is only available for the browsers Firefox, Microsoft Edge, and Internet Explorer—provided they’re installed on the same device as Chrome.
After launching Chrome, the first step is to access the main menu of the browser via the three-dot icon:
Next, click on “Bookmarks” and then “Import bookmarks and settings”:
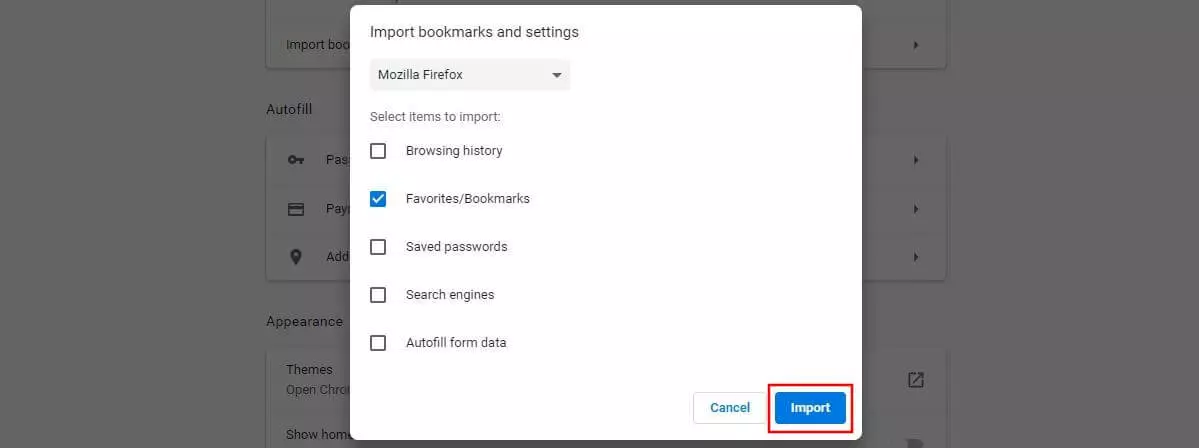
In the new dialog window, you should now select the browser from which you wish to import your bookmarks to Google Chrome. Make sure that a checkmark is placed in the box for “Favorites/Bookmarks”. Firefox and Internet Explorer users can also select the browser history, search engine settings, and saved passwords for importing (as well as auto-fill form data for Firefox). Once you’ve done this, click on “Import”:
As soon as Chrome has imported the bookmarks, you’ll see a corresponding confirmation message:
Adopting bookmarks from Firefox, Edge, and Internet Explorer only works if these browsers are not open during the import process!
Importing Your Favorites to Chrome via Bookmark HTML File
If you have a HTML file containing your bookmarks, you can import them to Chrome as follows:
First, you should also open the import menu as explained earlier. To do so, click on the three-dot icon, then on “Bookmarks”, and finally on “Import bookmarks and settings”:
In the following menu window, select the entry “Bookmarks HTML File” and then press on the button “Choose File”:
Now you should enter the storage location of the HTML document and start the import process by clicking on “Open”:
Importing Chrome Bookmarks: How to Retrieve Your Favorites on a Smartphone and Tablet
You can also transfer your favorites if you usually use Chrome on your PC, but have the browser installed on your mobile device as well. However, the mobile version of the Google browser does not offer the import option described above. Instead, you’ll need to activate cross-device synchronization. This in turn requires an active Google account. If you’ve created such an account, the approach is as follows:
Click on the little portrait icon next to the three-dot symbol and then on the button “Turn on sync...”:
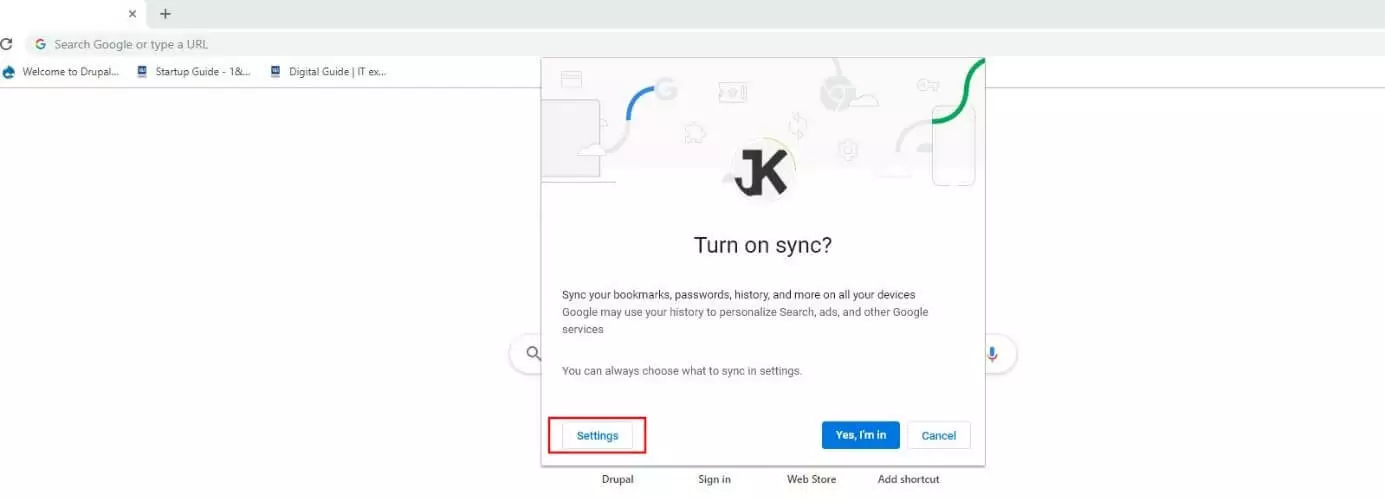
Sign into your account and press the “Settings” button in the sign-in window:
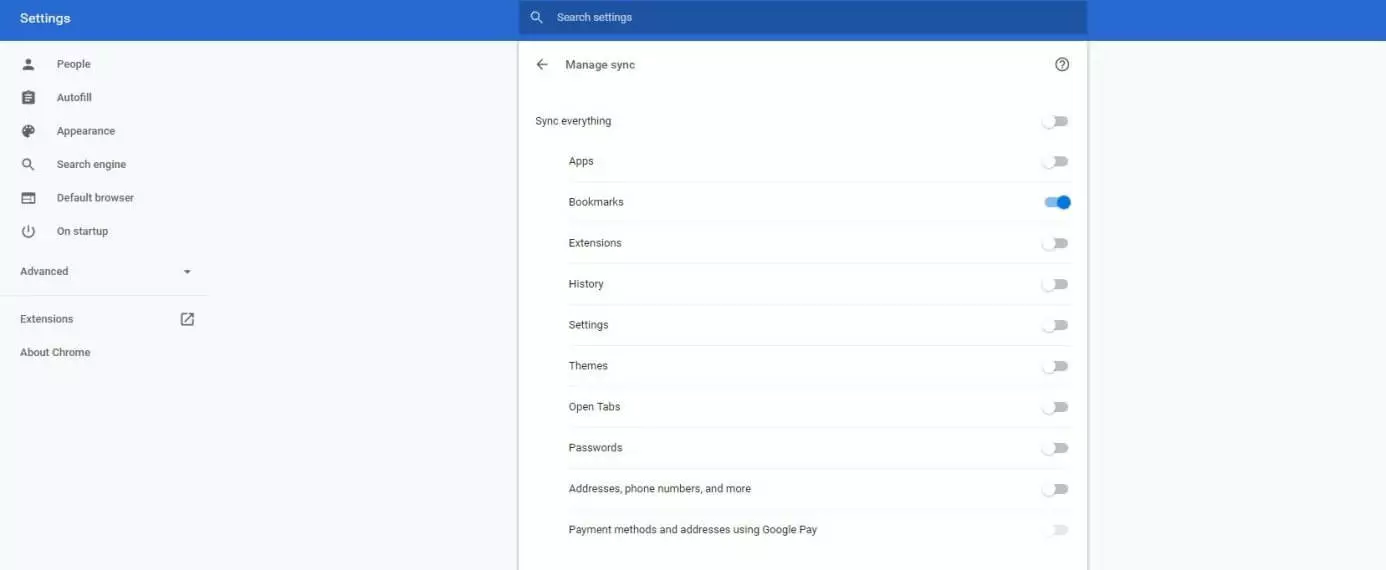
Click on “Manage sync” in the settings. Chrome will then open the selection menu for all elements that are to be synchronized. You can either synchronize everything or just the settings and data you want. In the case of the latter, first move the slider for “Sync everything” to the left and then make sure the sliders are activated (set to the right) for all the elements Chrome should include.
Switch the menu using the small arrow next to “Sync everything” and then press on “Confirm” to synchronize Chrome and the selected settings on all your devices:
On your smartphone or tablet, you only need to sign into Chrome with a Google account. All your bookmarks and any other synchronized data and settings will now be made available on this device.


