How to create an SRT Server for home grown streaming
Secure Reliable Transport (SRT) is an open-source protocol that lets you stream on the internet. If you set up your own SRT streaming server, you don’t have to rely on other platforms.
What is an SRT Server?
An SRT server allows you to broadcast video streams in real time on the internet. Whether live or using a recorded video, the server sends the stream to everyone who wants to watch you. With your own server, you won’t have to use platforms like Twitch and YouTube.
The SRT protocol is open source and users can freely use the streaming solution. To transmit videos, SRT builds on the User Datagram Protocol (UDP), which regulates the transfer of data. However, SRT adds interesting features to UDP that make the protocol (as the name suggests) secure and reliable.
To make the transmission of data secure, SRT offers the option of using encryption with AES-128 or AES-256. The recipients must know the key in order to process the signal. As a result, uninvolved third parties have no opportunity to intercept or modify the stream with a man in the middle attack.
Unlike other transmission media, the internet is not a particularly stable network. Data loss occurs regularly during transmissions. To counteract this, SRT uses the ARQ protocol. This checks whether all data blocks have arrived at the receiving end and returns this to the transmitting unit. If no acknowledgement has arrived for a data packet, these missing packets—and only these—are sent again. The whole process runs so fast that dropouts when watching a stream aren’t noticeable.
There are also other ways to broadcast your own videos or livestreams. Find out about the different options available before you decide on a server:
What are the benefits of an SRT Server?
There are several advantages of using your own SRT server:
- Independence: If you set up your own streaming server, you have complete control over what you transmit and how.
- Open source: The protocol is free to use and customizable for all users.
- Security: SRT adds end-to-end encryption to your stream. This prevents unwanted third parties from being involved in your streams.
- Quality: With your SRT server, you can choose which file format you want to transfer. High-quality codecs like HEVC are also possible.
- Stability: Thanks to the use of the ARQ protocol, the stream remains stable even if the internet connection causes problems.
Haivision, the company that invented the protocol, was awarded an Emmy in 2018. The committee saw SRT as an important contribution to the advancement of video transmission over the internet.
What are the requirements for setting up an SRT Server?
While it is possible to run an SRT streaming server on your PC or laptop at home, this is only a realistic option if you have a very small audience. On the other hand, a professional server is always available and can handle a lot of use. So, what should you look for when renting a server?
Processor (CPU)
An SRT server has relatively low CPU requirements. If you only use the server to distribute your video streams, one processor core is enough. If you use the server for other tasks like encoding the stream or as a game server, you’ll have to plan for more CPU power.
Memory (RAM)
RAM is hardly a decisive factor for the choice of a suitable server package. 1 gigabyte of RAM is already enough for one stream. If you have larger projects, you’ll need to plan for more RAM though.
Hard disk space
A server that is set up for SRT streams requires minimal disk space. If you decide to also use the server for media storage, for example, to store videos before you stream them, you might need a larger amount of storage space. Recording streams on the server is also possible but requires an adequate amount of space.
Bandwidth
For high-quality streams that have a wide reach, you’ll need a large bandwidth. Professional hosting usually provides enough bandwidth forperfect picture quality for lots of viewers.
Which SRT Server option from IONOS is best for me?
You can easily create a SRT streaming server with a IONOS server. You can choose from three different options:
- Dedicated Server: With this type of server, you have your own physical server that you don’t have to share with anyone.
- VPS: This variant, also known as a vServer, provides you with a completely virtualized server.
- Cloud Server: With a cloud server, you enjoy complete flexibility, because additional capacities can be added quickly and easily.
All servers are available in different sizes. There are plans with comparatively little RAM, disk space and CPU power, and those that are extensive.
When deciding on a server, price will probably be a major factor. Cloud servers are affordable and are billed by the minute at IONOS. You only pay for the resources you use. This billing model is also used for dedicated servers. However, this type of server is usually much more expensive since you are renting an entire device. A virtual private server (VPS) falls in between the two and, in contrast to the other options, has a fixed monthly fee.
How to create an SRT Server: A step-by-step guide
To create your own SRT server, it is best to use a Linux operating system. This way you can use the SRT Live Server (SLS) software. In this tutorial, we’ll use Ubuntu. You don’t need a graphical user interface to install the server. It can be installed via the terminal where you can operate the server via an SSH connection.
The following tutorial is based on the SRT Tutorial by Codexual on YouTube. Here you can find more information on how to use the SRT server and even how to stream on the go.
Step 1: SRT and library installation
First, upgrade your system and install the software and libraries that you need to set up the server. These include, for example, cmake (programming tool) and OpenSSL (encryption library).
Then you need to obtain the SRT protocol from GitHub:
Step 2: SRT Live Server installation
Download and install the server software from Gitlab.
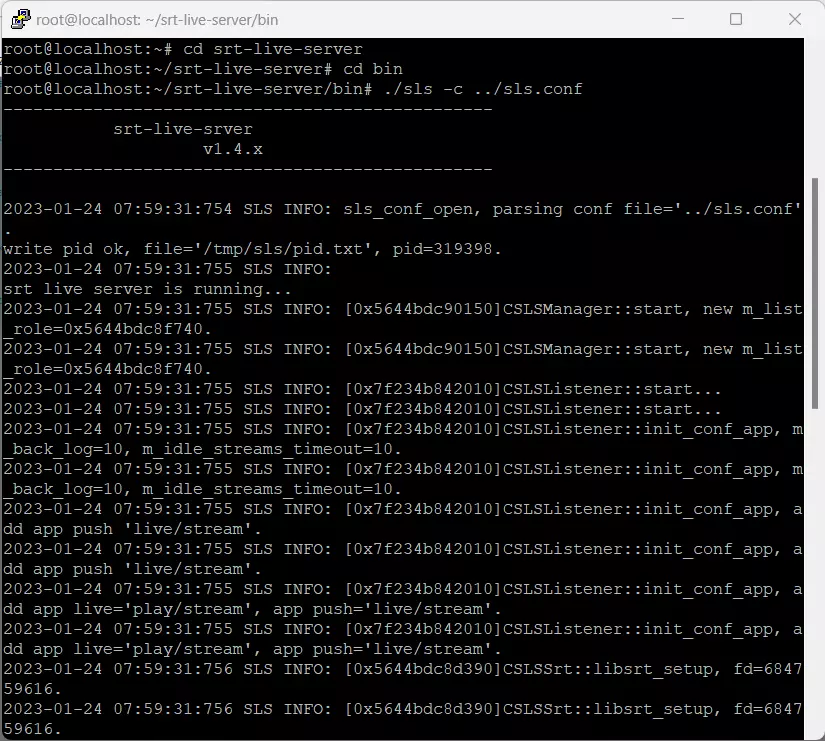
You should see a status message regarding successful installation.
Step 3: Configure the server
You’ll also receive a preset configuration file. You can use it or adapt it, or (like in this tutorial) create a new file and keep the old one as a backup.
Now it’s time to fill the new configuration file. The following code is a good basis for your own server:
In the configuration file, the following points are particularly important. First, you’ll need to open two ports. In our example, these are 8181 and 8282, but you can select other ports as long as they are not being used for other purposes. Secondly, the specification after “default_sid” is important. You can enter another term in place of “example”. This stream ID will be useful for some streaming tools.
Save your input and exit the document. Now you need to correctly assign the paths, and then you can start the server. To stop the server, use the key combination: [Ctrl] + [C].

Step 4: Open ports
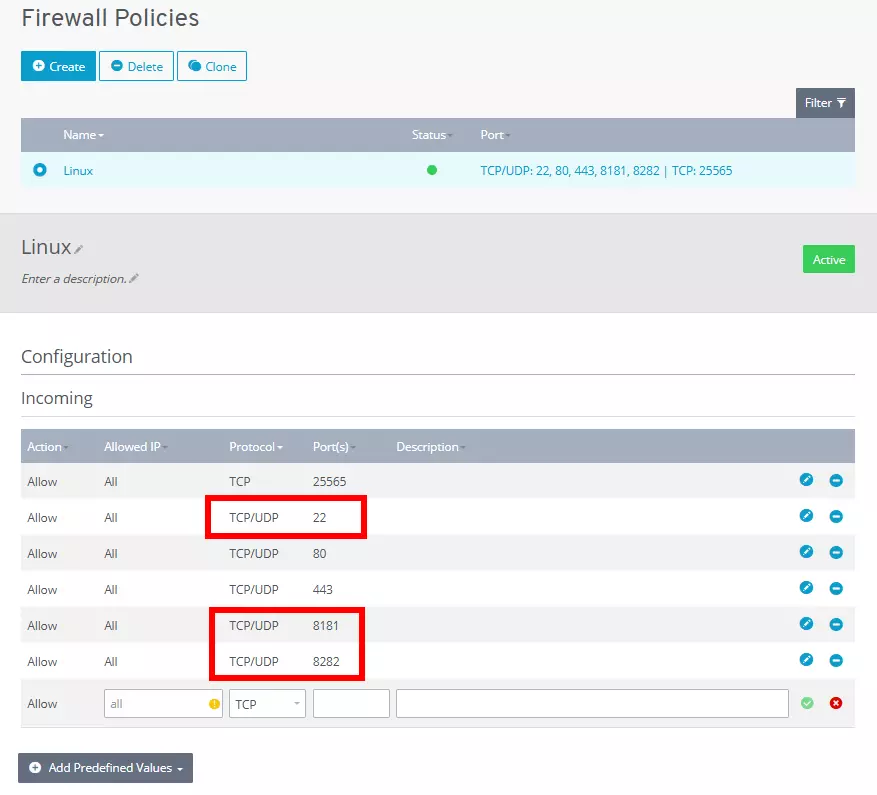
In order to be able to access your streams, you need to open the ports. You have already entered the ports in the configuration file: 8181 and 8282. In addition, you’ll need to open a port for SSH access.
Open the ports in the firewall settings as well. With IONOS, you can find this option in the Cloud Panel under the menu item Network.

Step 5: Send streams
After the server is set up, you’ll be able to send and receive streams. Various tools can be used for this purpose. The following software solutions are especially suitable for SRT streams:
- OBS: This streaming studio is popular for a wide variety of video streams, including Twitch streams.
- Larix Broadcaster: The mobile app lets you use the camera on your smartphone for streaming.
- VLC: This media player can also handle the SRT protocol.
No matter what software you use to set up the stream, you need the IP address of your server and the shared port. In our case, this is 8282. In addition, SRT has two important modes: caller and listener. In SRT, caller is the side that is sending, and listener is the receiving instance.
Depending on which programs you use, further settings may be needed, but, in many cases, a URL with the following scheme is enough:
For example, when you send your stream to the server, the URL may look like this:
Your viewers, on the other hand, receive the URL with the listener mode. They can enter the address as a network source in the VLC player and watch you. You can use the URL for broadcasting in the Larix app or in OBS.
Don’t want to become a streamer but are interested in gaming with your friends? In addition to a gaming server, you should also think about getting your own Teamspeak server. This will make it easier for you and your friends to share your game strategies with each other.

