DNS server not responding? Here’s how to fix the error
If your browser can’t establish a connection to the internetInternet, the Windows Troubleshooting function will occasionally respond with the message, “DNS server not responding”. There are many factors that can cause this notification to appear. Fortunately, this the DNS server problem can generally be correctedfixed in just a few simple steps.
- Faster domain resolution to keep you online longer
- Added protection against outages and downtime
- No domain transfer needed
DNS: online name resolution
The domain name system (DNS) is a directory service used for transforming alphanumeric domain names into numeric IP addresses. A decentralized process, name resolution generally takes place on DNS servers’ networks distributed throughout the world. Every Internet address you enter into your web browser’s search bar is then forwarded by your router to a DNS server. This server then dissolves the domain name into a numeric sequence and returns a corresponding IP address. Should the DNS server fail to produce an answer because it’s down, then it won’t be possible to access the desired website; the result is the error message “DNS server not responding”.
DNS server is down: The best solutions at a glance
The root of such irritating messages can often be traced back to the server outage. In such cases, the DNS server is temporarily unavailable. Most of the time, these problems can be corrected by changing browsers, or switching a few of your firewall settings. Restarting the router or changing the DNS server can also solve the problem.
Changing your web browser
To ensure the connection problem isn’t being caused by your web browser, carry out a test by attempting to visit the desired web page with alternative applications. Web browsers like Mozilla Firefox, Google Chrome, Microsoft Edge, and Apple Safari are some of the most conventional options. If you can solve the problem simply by switching browsers, then check your preferred application’s settings and make sure you’re using the latest version of it. Certain circumstances may require uninstalling the program and reinstalling it again.
Deactivating the firewall (temporary)
In case you aren’t able to achieve your desired results simply by changing browsers, then the next step is to rule out Windows Firewall as the possible culprit. Pull up the control panel and temporarily deactivate the firewall. If you’re now able to access the desired website, then it looks like you’ve identified the Firewall as the source to the problem. Next, check its configuration. Should the error persist even after deactivating the firewall, then the DNS server may yet prove to be the cause of the problem.
Restarting the router
Connection problems can often be solved by restarting the server. Most devices include a power button specifically for this purpose. Should this fail to yield any results, then it looks like a hard reboot may be in store; this is done simply by pulling out the power plug. Wait around 30 seconds until all of the electrical components have completely powered down before starting up the device again. Should you receive the error message “DNS server not responding” after having completed the first two steps, then the only choice remaining is to choose an alternative DNS server.
Selecting another DNS server
If you have ruled out common causes of error such as the router software crashes or conflicts with Windows Firewall, then changing your DNS server could be the solution.
Typically, the Internet provider usually assigns the DNS server address. A few clicks is all it takes to replace the DNS server with your desired server.
Using a public DNS server is also an option; just look on specific DNS server lists. Google operates a fast, free, and very reliable public DNS server. How to set up these DNS servers via the router settings or under Windows 10 and Windows 11 is explained in the step-by-step instructions below.
Changing the DNS server via the router
If you want to change the DNS server via your router’s settings, first open your browser and access your router as follows:
- Open the command line in Windows by using the key combination Windows key + [R] and typing “cmd”.
- Now enter “ipconfig” into the open tab and copy the numbers after “Default gateway” onto the clipboard.
- Now copy just the number into your browser’s address field, confirm it, and log in with your relevant access information.
- Log into web interface of your router.
- Look for the “Access data”. This is typically found in the “Internet” menu.
- Select the individual DNSv4 server and type in the addresses (primary and secondary) of your preferred choice. When it comes to Google servers, for example, these are 8.8.8.8 and 8.8.4.4.
If Internet Protocol Version 6 (IPv6) is used instead of the Internet Protocol Version 4 (IPv4), then the IPv6 addresses of the DNS server must also be exchanged. The public DNSv6 addresses of the Google servers are:
- 2001:4860:4860::8888
- 2001:4860:4860::8844
Change DNS server under Windows
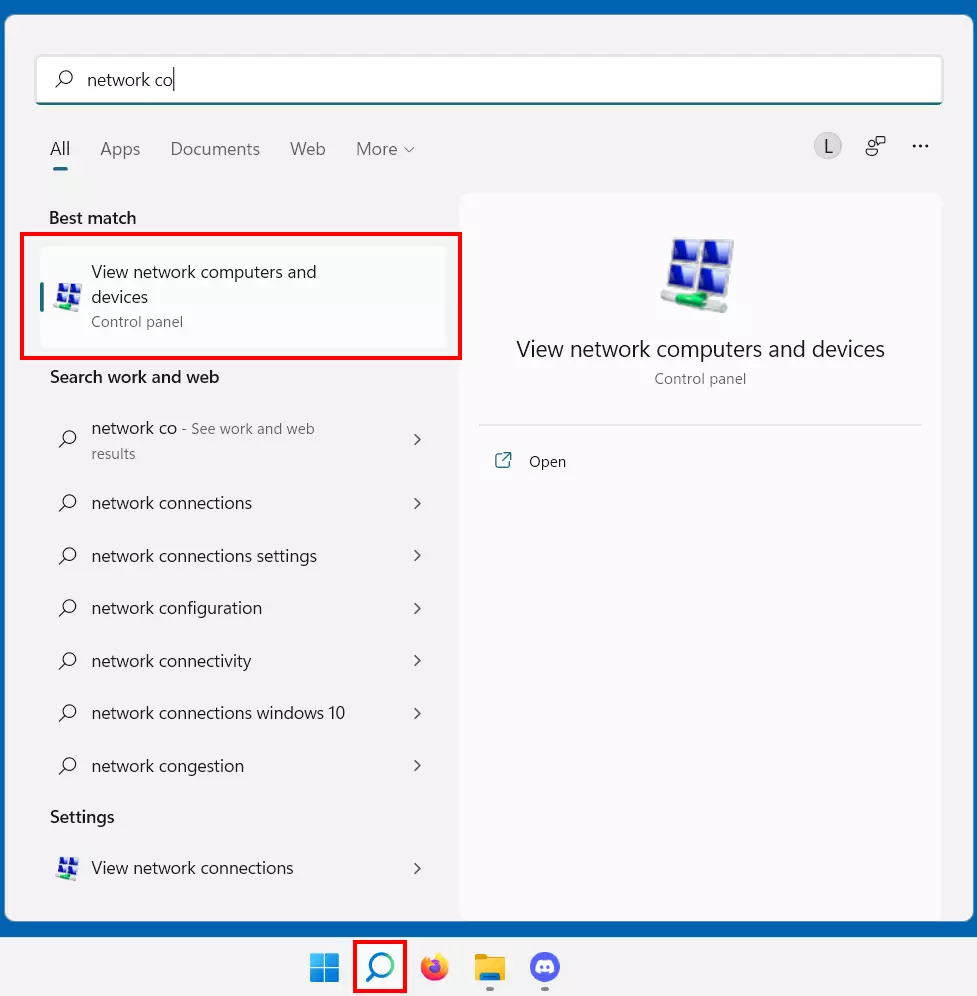
Step 2: Select the network adapter in use
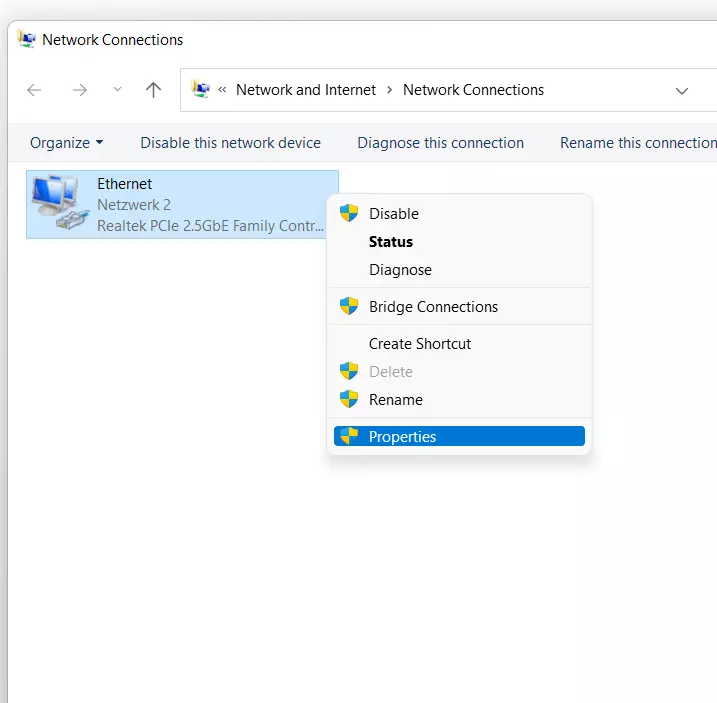
In the second step, you now need to select the Internet adapter you are using. If you have a wireless connection, select the WLAN adapter (Wireless Network Connection). If you are connecting to the Internet via cable, the LAN adapter is the right choice (LAN connection/Ethernet). Once you have identified the correct network adapter, right-click on it and select the “Properties” menu item.
Step 3: Select Internet protocol
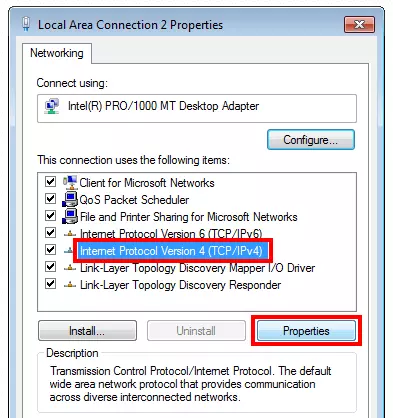
Now it is time to select the Internet protocol in use. You can choose between the Internet Protocol version 4 and the Internet Protocol version 6. Start with the DNS server settings for version 4 by selecting it and then clicking the “Properties” button.
Step 4: Change DNS server address
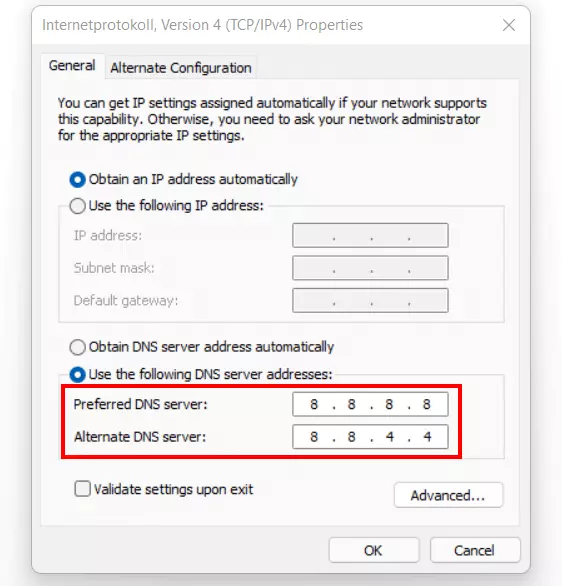
Click on “Use the following DNS server addresses” and enter the address of the alternative DNS server there. For example, if you want to use Google’s DNS server, enter 8.8.8.8 for “Preferred DNS server” and 8.8.4.4 for “Alternate DNS server”.
Click the “OK” button to confirm the DNS server change.
If Internet Protocol version 4 (IPv4) is used instead of Internet Protocol version 6 (IPv6), select version 6 in the third step and set the corresponding IPv6 addresses. For example, for Google servers, these would be 2001:4860:4860::8888 and 2001:4860:4860::8844.
Changing the DNS Server using PowerShell
You can also use Windows PowerShell to change the DNS server. This method is more suitable for experienced users. With just a single command, you can change the DNS server without having to click through all the Windows menus if, for example, the currently entered DNS server is not responding.
Click on the Windows icon on the task bar, search “PowerShell”, right-click “Windows PowerShell”, and then choose “Run as administrator” from the menu.
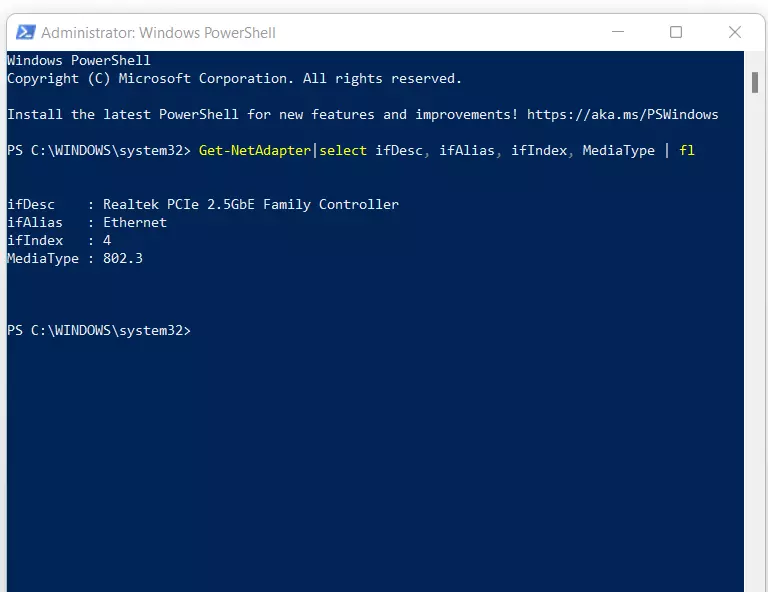
Now you can determine the name (alias) of the adapter (i.e. the network cable), which should connect you to the Internet. To do this, enter the following command into PowerShell:
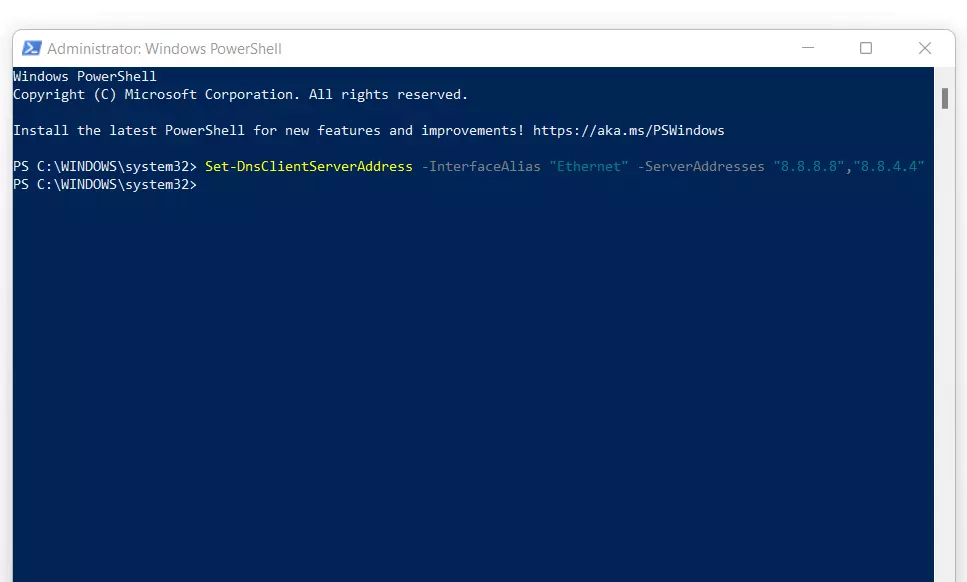
In the example, the name of the adapter is “Ethernet”. Use the following command to change the DNS server addresses:
The DNS server addresses, 8.8.8.8 and 8.8.4.4, are the addresses of Google’s public DNS servers. If another public DNS server is used, both addresses need to be changed accordingly in order to comply.
Changing the DNS server using the command prompt
Changing the DNS server via the command prompt is also aimed more at users with some experience in Windows administration.
First open the command prompt as an administrator by entering “cmd” in the search function, right-clicking the appropriate search result and clicking “Run as administrator”.
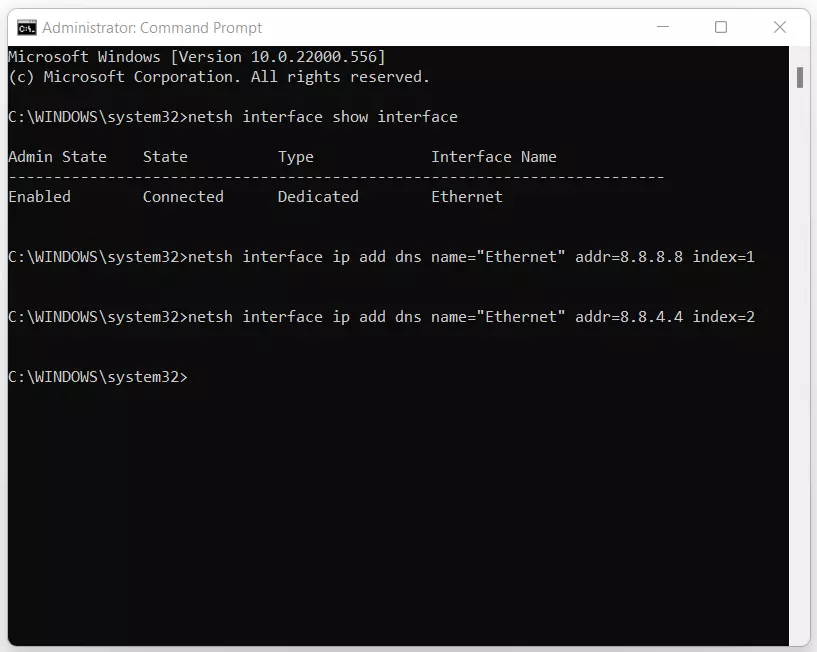
Next, determine the interface name as well. This is done with the command:
Now you can configure primary and secondary DNS servers with the following commands:
The name in the quotes must match the previously set interface name!
Checking the new DNS server
You can find out whether changing DNS server has solved the problem by carrying out a simple test. Enter the URL of a well-known site in your browser e.g. https://www.google.com. If the site can be accessed, it means the DNS server is functioning properly.
If the site can’t be accessed, you can enter the following IP address into your browser: 172.217.23.99. This is one of Google’s IP addresses. If Google doesn’t appear after entering the address, it probably means there’s a general Internet problem rather than a problem with the DNS server.
- Simple registration
- Premium TLDs at great prices
- 24/7 personal consultant included
- Free privacy protection for eligible domains


