How to create a dedicated CS2 Server (Counter Strike 2)
A dedicated server that you set up and host yourself is the best solution for an individual gaming experience, and CS2 (Counter Strike 2) is no exception. You can install the server on Windows via Steam or SteamCMD using the CS2 dedicated server app provided by Valve as long as you have the right hosting environment ready.
Why is a dedicated server a good idea for CS2?
Setting up your own Counter Strike 2 server allows you to benefit from lots of game control. Unlike with public community servers, you can easily host a private online session, in which no other players participate, meaning you get to decide who joins the game. Additionally, you get complete freedom over the maps played as well as the game settings such as friendly fire or rounds.
Generally speaking, you can also host the CS2 server on your own Windows computer. In this case, however, the dedicated server will only be online when your PC is on. In addition, the stability and performance of home internet connections is often unsuitable for hosting a gaming server. For the best possible gaming experience, renting server hardware from a professional provider makes the most sense.
Advancing from its forerunner, CS2 is supposed to offer gameplay that is independent of the tick rate of the server. The tick rate, i.e. how often the server is updated per second, doesn’t really play a major role in a Counter Strike 2 server anymore. However, if you were thinking of creating or running a CS:GO server this factor is another argument in favor of professional enterprise hardware due to Valve’s low tick rate servers.
Requirements for a Counter Strike 2 server
A stable CS2 server without lag and game crashes is the be-all and end-all for a successful multiplayer experience. Getting high-performance server hardware that meets the requirements of dedicated server applications is therefore integral to the success of your gaming experience. The system requirements depend on various factors such as the actual load of the CS2 dedicated server. The following values are considered minimum requirements for a Counter Strike 2 server:
- Computing power (CPU): min. 3.0 GHz (quad-core)
- Memory (RAM): min. 6 GB
- Hard disk space: min. 50 GB
In addition to the dedicated server software requirements, there are also operating system requirements. For example, the following additional resources must be reserved for a Windows Server 2022:
- 1.4 GHz processor (64-bit)
- 512 MB or 2 GB memory (with or without graphical user interface)
- 32 or 36 GB hard disk space (with or without graphical user interface)
As an alternative, you can use the runtime environment WINE to create and host your CS2 server under Linux!
CS2 server rental options with IONOS
IONOS offers various server solutions suitable for setting up your own Counter Strike 2 server. You can choose between three different models, which have different plans in terms of scope and cost:
- VPS (vServer): IONOS vServers are based on virtualized hardware from different host systems. The plan is set at a fixed monthly price.
- Cloud Server: Cloud servers from IONOS are also based on virtualized hardware, but in this model only a single host system is used. The performance can be flexibly scaled, and billing is done on a per-minute basis.
- Dedicated Server: A dedicated server from IONOS gives you access to a fixed hardware setup that is reserved just for you. The components with high single-core power are either fixed or scalable. Usage is billed by the minute, as with cloud servers.
Try out your VPS for 30 days. If you're not satisfied, you get your money back.
How to set up a Counter Strike 2 server
Once you have decided on a server setup, you can start installing and setting up your own CS2 server. Below you’ll find the set-up instructions which we have summarized for you. We will use IONOS hosting (vServer, Cloud Server, Dedicated Server) and Windows Server 2022 as the operating system for our examples.
Step 1: Establish a remote connection to the server
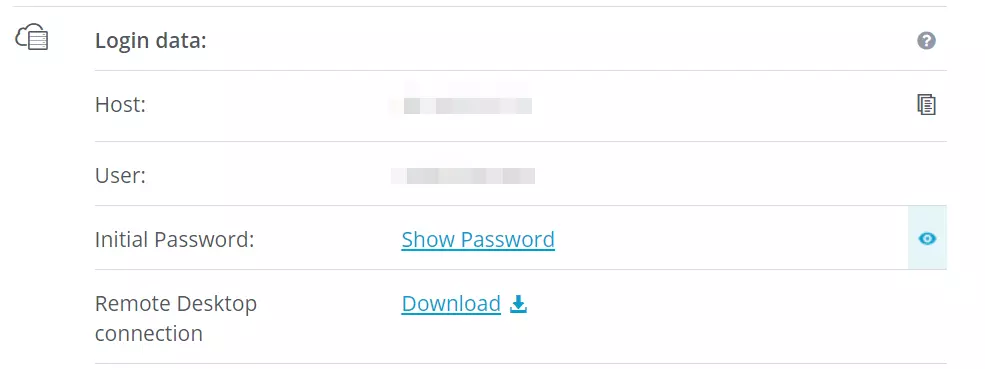
In order to access your rented server hardware and install applications like the dedicated server for Counter Strike 2, an active remote connection is required. For a Windows server system, you need to set up a remote desktop connection for this purpose. As a IONOS customer, you can do this easily in the web-based customer account.
- Access the IONOS Customer Account Login Page and log in.
- Select the product “Server & Cloud” and then the rented hosting server.
- Use the download link under the “Remote Desktop Connection” entry.
- Execute the downloaded .rdp file by double-clicking on it.
- Confirm the new connection by clicking on “Connect”.
- Log in to the server with the login data from the customer account (“user” and “initial password”). When establishing the connection for the first time, you’ll need to confirm the server’s security certificate.

Step 2: Install Steam command line client (SteamCMD)
You get the dedicated server application for CS2 directly from Steam’s public servers. With SteamCMD there is even a tool that makes this step much easier for you. To install the command line client, simply download the following SteamCMD installation file and unpack it in a suitable directory such as: C:\SteamCMD. Then run the file and SteamCMD will be installed automatically.
We can show you how to install SteamCMD in a bit more detail on both Windows and Linux in a separate article!
Step 3: Install CS2 Dedicated Server
By clicking on the steamcmd.exe you can now start the client at any time. Since the application is automatically updated every time it is started, you do not have to worry about it being up to date.
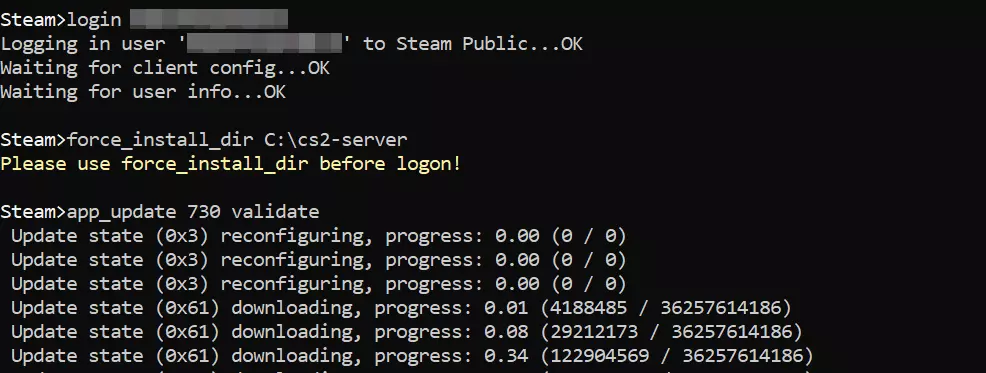
The server application for a dedicated Counter Strike 2 server is part of the general installation of the shooter game. This means you have to install the full game on your server. Unlike other game servers such as a Rust server, you can’t use an anonymous login. Logging in with a valid Steam account is required. Here’s how:
Instead of username, enter the username you use when you usually log in to Steam. To execute the login command, you will also need to enter your personal password and, if logging in for the first time, the Steam Guard code you were sent.
After successful login in, use the following command to create the installation directory for your CS2 server:
The last step is to install Counter Strike 2 and the dedicated server:

Alternatively, you can install CS2 and the dedicated server application via the default Steam client on your hosting environment as mentioned. This makes no difference for any following set-up, apart from different file paths.
Step 4: Configure the CS2 server
In the next step you can define the basic configuration of your Counter Strike 2 server. The file needed for this, server.cf, can be found in this subfolder in the server directory:
Open the file with the editor of your choice and insert the desired configuration for your server. So, for a classic training setup, you’d insert the following:
Step 5: Generate server token
In order for your dedicated server for Counter Strike 2 to show up later in the listing of available community servers, you also need to link it with a login token. You can create this token at any time in the Steam game server account management. After logging in, simply enter the CS2 Steam ID 730 under “App ID of base game” and then press “Create”. Optionally, you can also enter the name of the server as a note (“Memo”).

As of October 2023, the parameter for passing the login token (sv_setsteamaccount) does not work yet!
Step 6: Open server ports
To enable connections to your dedicated Counter Strike 2 server, the server ports 27015 and 27016 (TCP/UDP) need to be opened. With IONOS, you can also make these adjustments to the firewall settings via the customer account:
- Log in to the customer account.
- Click “Server & Cloud”.
- Select the previously set up “Counter Strike 2” server or the corresponding hosting setup.
- In the left side menu, press the “Network” and “Firewall Policies” buttons in succession.
- Under Inbound, add two new rules for TCP/UDP port 27105 and 27106.

Step 7: Start Counter Strike 2 server
Now you can start your dedicated server. Either create a batch script for this or execute the command sequence directly via the command prompt. A small overview of the most important parameters can be found in the following “Launch Command” wiki on GitHub.
On our server, we’ll start the training mode (+game_type 2 +game_mode 0) based on our previously recorded server configuration (+servercfgfile server.cfg). We’ll leave the anti-cheat system switched off for now (-insecure). The selected map is Dust 2 (+map de_dust2). The appended parameter -dedicated starts the dedicated server application instead of the game.
The command listed here is to be executed directly in the CS2 directory via the command prompt or by a script in the same directory. Otherwise, the absolute path must be specified.
Step 8: Connect to the CS2 server
As soon as the server is started, you and your friends will be able to connect to it as follows:
- Start Counter Strike 2 as you would Steam.
- Press the “Game” button.
- Click the small globe icon next to “Matchmaking” and “Practice” to open the server browser.

- Use the filter search to look for your server. Alternatively, go to the “Favorites” tab to add the Counter Strike 2 server manually via IP address.

Once you have found your dedicated server, you can start your online adventure on the training server or, of course, try out any other modes together with your friends!

It is possible to opt for an individual server address by linking your CS2 server with your own domain. Use the name of your team or let your creativity run wild and choose your ideal server address with the appropriate domain extension!

