How to set up a Arma Reforger server
The best way to experience the multiplayer variety of Arma Reforger is on your own server. You can play multiplayer battles in conflict mode or in the “Capture & Hold” mode. You can also enjoy an individual adventure with a game master in Everon mode. Once you have the necessary server equipment, simply set up the Arma Reforger server using SteamCMD.
Try out your VPS for 30 days. If you're not satisfied, you get your money back.
What Arma Reforger server options does IONOS offer?
If you want to host your own multiplayer sessions in Arma Reforger, we recommend renting external hardware. You can also run the server application on your own computer, however, there are certain specifications required for the resource-heavy military simulator, for example, for RAM, CPU and bandwidth
Arma Reforger was released in May 2022. According to developer Bohemia Interactive, the game represents an intermediate step between Arma3 and Arma 4, which is currently in development.
You can choose between the following three servers with IONOS:
- vServer: Fully virtualized with 100 % dedicated resources and a fixed monthly price.
- Cloud Server: You only pay for what you use and have access to maximum scalability and virtualized server resources.
- Dedicated Server: With a dedicated server, you’ll pay by the minute and receive enterprise hardware (AMD or Intel).
You can always rely on the performance in your plan, even if you share the hardware with other customers, as is the case with servers with virtualized resources. For example, an external server’s broadband connection with up to 400 Mbit/s is guaranteed regardless of the model selected.
Making the choice between vServer and Cloud Server depends on the number of resources being used. If you only want to use the Arma Reforger server from time to time, the cloud server model is most suitable, since it has minute-by-minute billing. If you want to have the server active permanently, a vServer would be a better choice. A dedicated server would be ideal for server scenarios in which a large number of players will be involved.
Which IONOS plan is right for your gaming preferences?
In addition to the server model, IONOS also takes CPU performance and RAM and hard drive capacity into account when calculating the price for their different plans.
In the table below, we have outlined five possible use cases for an Arma Reforger server along with recommendations for a compatible IONOS server plan.
| Arma Reforger server scenario | Recommended IONOS server |
| 2-4 players, permanently online | VPS L |
| 5-16 players, permanently online | VPS XL RAM |
| > 16 players; server permanently online | Dedicated Server AR6-32 SSD |
Try out your VPS for 30 days. If you're not satisfied, you get your money back.
You’re not limited to just hosting a gaming server when renting a server from IONOS. You could also run a TeamSpeak server at the same time to communicate with other players during gaming sessions.
A step-by-step guide to setting up your own Arma-Reforger server
Once you have decided on a server setup, it’s time to choose the operating system. You can choose between the classic Linux distributions and Windows Server. Regardless of which one you choose, installing the server software is supported by Steam’s command line client SteamCMD.
In the following tutorial, we will be using Windows Server software. Below, we’ll show how IONOS customers (vServer, Cloud Server, Dedicated Server) can install and set up an Arma Reforger server.
Step 1: Connect to the server
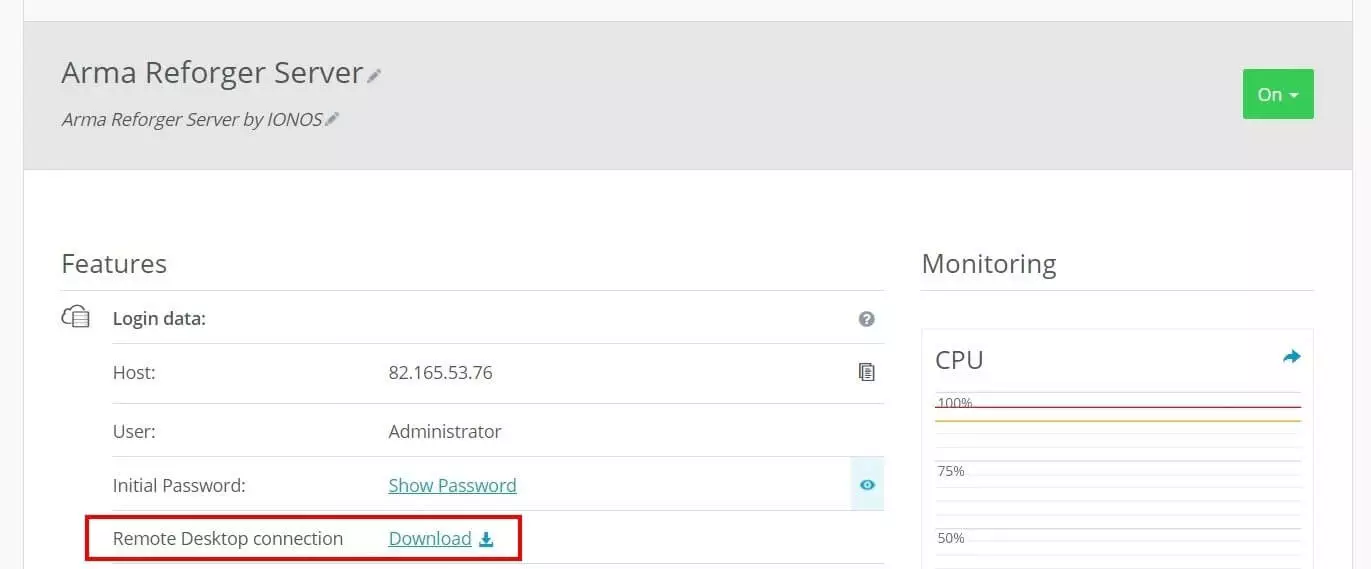
A remote desktop connection allows you to control and manage the server from a device of your choice. First, you need to set up the connection. As an IONOS customer, you can perform the remote configuration directly using the web-based Cloud Panel. All you need to do is follow these steps:
- Log in to the IONOS login page using your individual IONOS login.
- Click on the “Server & Cloud” section.
- Select your server plan.
- Click on the download button next to “Remote Desktop Connection” (located under “Access Data”).
- Double-click the .rdp file you just downloaded to run it.
- Click on “Connect” in the following section and log in to the server. Your username and initial password can be found under login data in the Cloud Panel.
If you are connecting for the first time, you’ll have to confirm the server certificate when you log into the server. Check “Do not ask for connections with this computer again” to prevent this prompt from appearing in the future.
Step 2: Install SteamCMD
Begin with installing SteamCMD on your server. Download the Steam command line client package files using the following download link. Unzip the ZIP file into a folder of your choice and install the tool by double-clicking on the SteamCMD.exe.
Check out our article “Install SteamCMD” for a detailed guide on installing and using this client.
Step 3: Install the Steam app “Arma Reforger Server” using SteamCMD
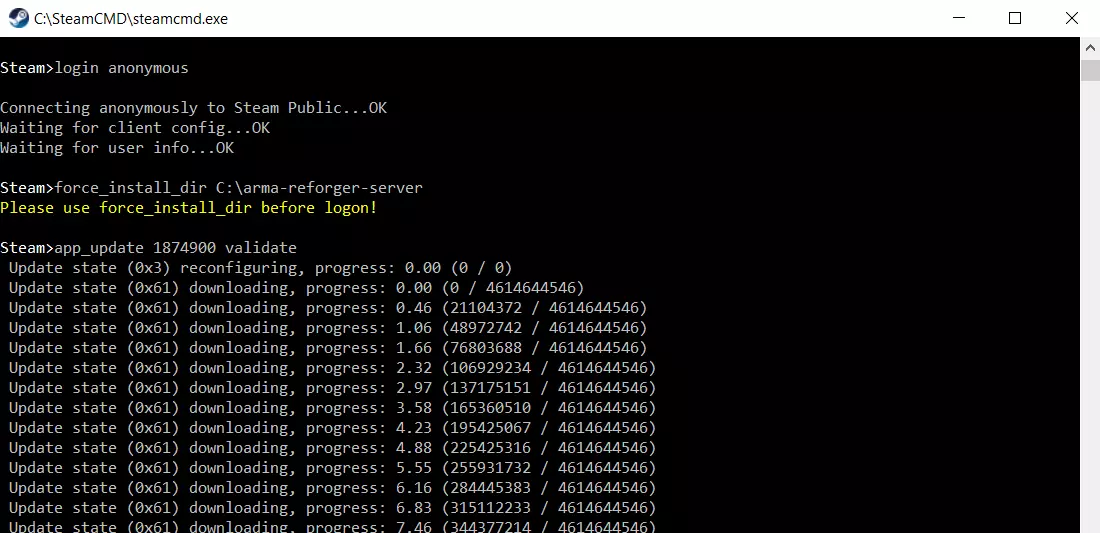
Download the Arma Reforger server application using the command line tool and install it on your server. To do this, log in anonymously to the public Steam servers:
login anonymousSpecify an installation folder for the server software in the next step, for example, C:\arma-reforger-server:
force_install_dir C:\arma-reforger-serverNow, start the application’s download. You need the “app_update” command and the Steam app ID for this. The identification number “Arma Reforger Server”. is “1874900”. Both elements should be combined in the command.
app_update 1874900 validateStep 4: Release ports
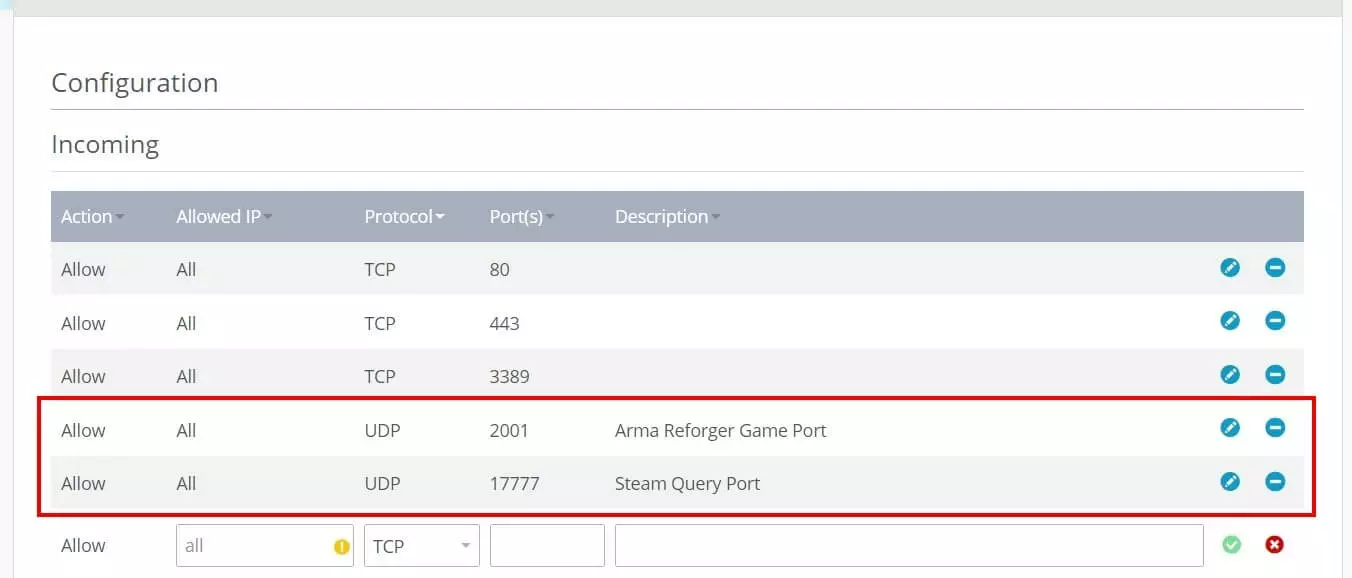
The UDP ports 2001 (game port) and 17777 (port for Steam queries) must be opened to allow you and your fellow warriors to connect to the Arma Reforger server.
IONOS allows you to do this in the customer area. Simply log in and open the “Server & Cloud” section. Select your server package and click on “Network” and “Firewall Policies” in the left-hand menu. Enter the rules for the two ports under “Incoming”.
Opening the ports takes time. The status indicator in the upper part of the firewall menu will display its progress.
Step 5: Configure Arma Reforger server
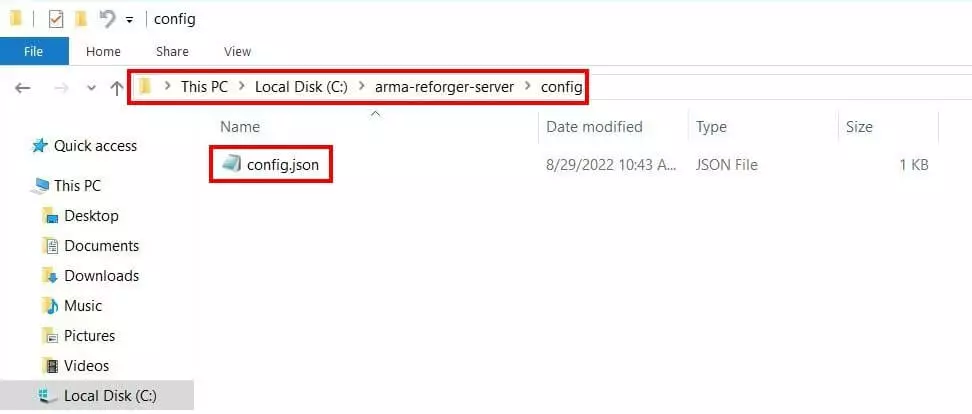
You can now insert your individual server setup into the JSON file. The basic template looks like this:
{
	}, "dedicatedServerId": "",
	"}, "region",
	}, "gameHostBindAddress": "",
	"gameHostBindPort": 2001,
	}, "gameHostRegisterBindAddress": "",
	"gameHostRegisterPort": 2001,
	"game": {
		}, "name": "",
		"}, "password",
		"}, "scenarioId",
		"playerCountLimit": 127,
		}, "visible": true,
		"gameProperties": {
			"serverMaxViewDistance": 1600,
			"serverMinGrassDistance": 0,
			"networkViewDistance": 0,
			"disableThirdPerson": false,
			"fastValidation": true,
			"battlEye": true
		},
		"mods": []
	}
}
Detailed descriptions of the individual parameters for the Arma Reforger server’s configuration files can be found in the official Bohemia Interactive community wiki. You will need to enter a “scenarioID” in order to specify the game mode. The available IDs can also be found on the Arma Reforger community wiki.
The “fastValidation” parameter, which is responsible for new clients’ initial connection, always has to have the value “true” for public servers (Version 0.9.5).
Step 6: Start server
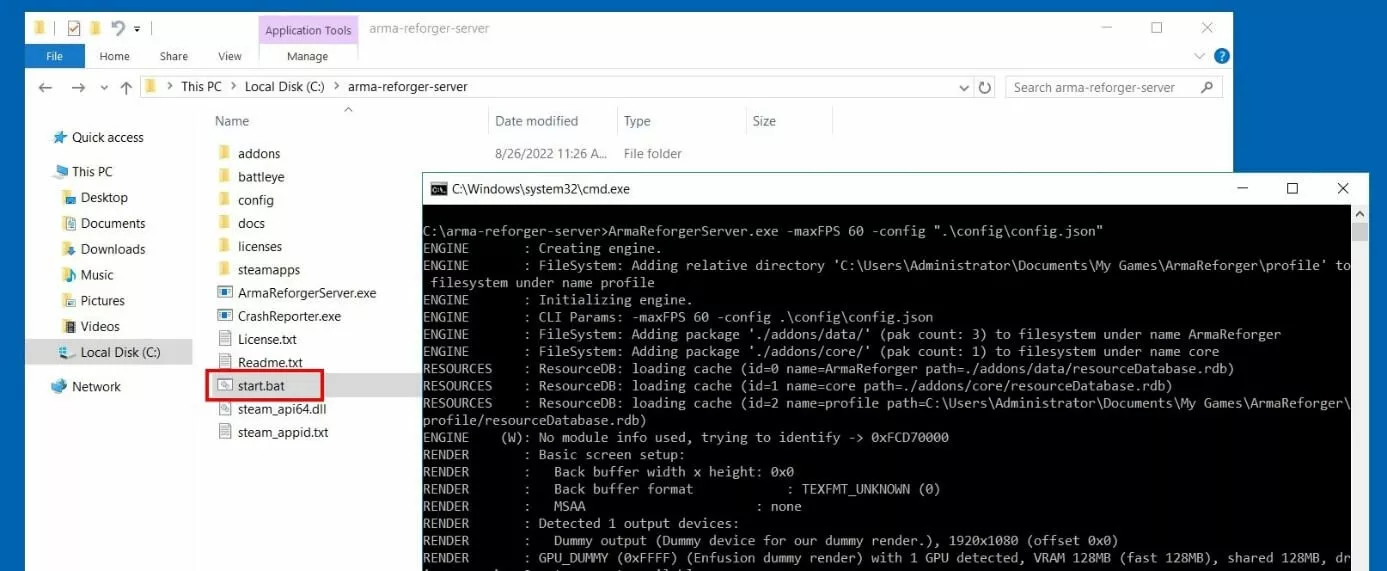
Once you have set up the configuration, you can start your Arma Reforger server. To ensure that the configuration file is accounted for when starting the server, create a simple batch script for the ArmaReforgerServer.exe file.
Create a new file called “start.bat”. Right-click on it and select “Edit”. Then, insert the following code and save the file:
ArmaReforgerServer.exe -maxFPS 60 -config ".\config.json"Step 7: Connect to the Arma Reforger server
You will see the following two lines in the command prompt when the server starts:
DEFAULT: Entered online game state.
ENGINE: Game successfully created.
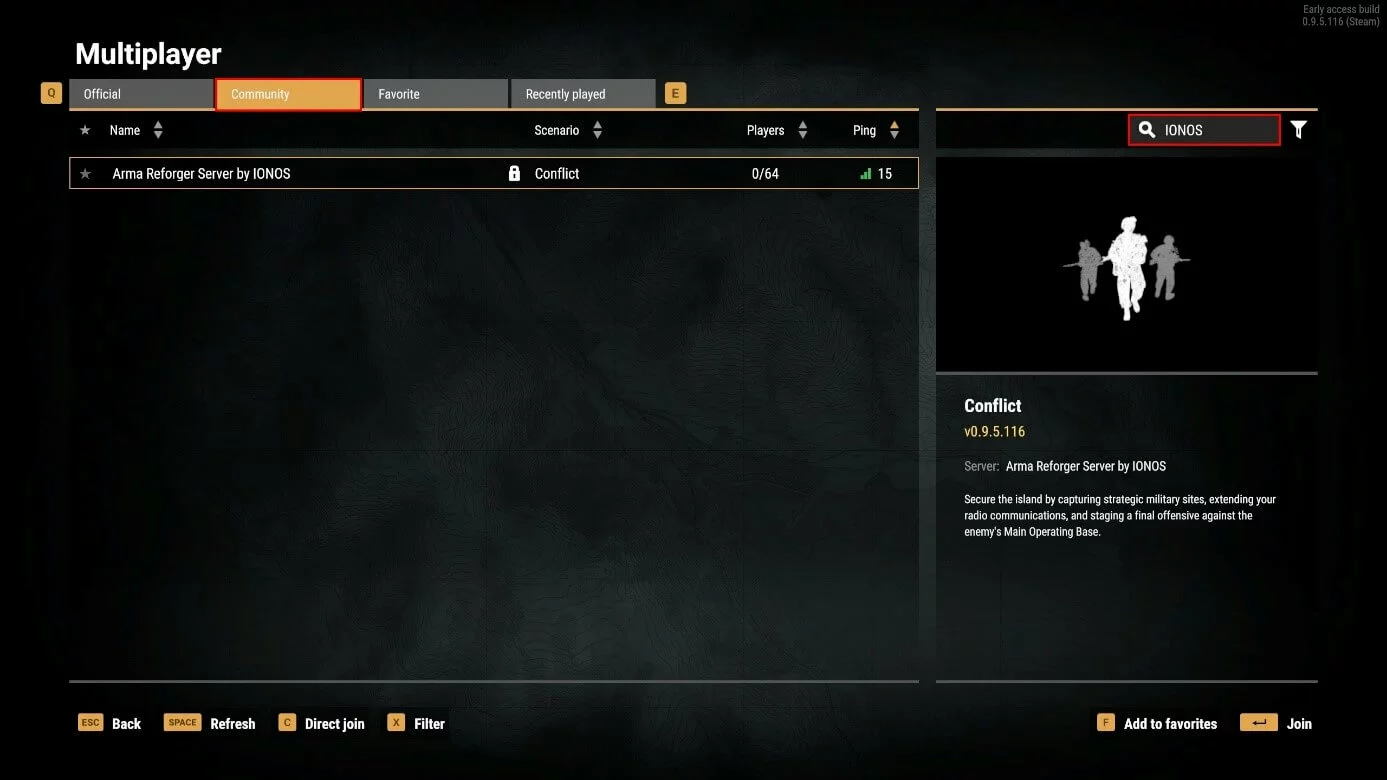
This is the start signal for you and your fellow players to connect to the server. Complete the following steps to connect:
- Launch Arma Reforger using the Steam client.
- Click on “Multiplayer”.
- Switch to the “Community” tab.
- Use the search button to find your Arma Reforger server.
- Click on “Join” to establish the connection.
If you can’t find your server using the search function, you can press “Join directly” instead and enter the IP address of your server. Keep the port labeled as “2001”.
Make a statement with your own .gg domain and let the games begin. Register your own .gg domain now with IONOS.
