How to resolve error 0x80073712 in Windows
Windows error code 0x80073712 usually occurs when trying to upgrade Windows or install an update or service pack. This can cause your Windows system to run sluggishly and not perform the required update. To resolve this, there are several options available such as a reboot, Windows built-in tools like DISM and SFC and Windows update repair tools.
Here we go again: Windows gives you cause for concern with a dreaded error message like the 0x800F0922 error or the 0x8024200d error. When you see the error code 0x80073712, Windows usually tells you laconically, “Windows cannot be updated because error 0x80073712 has occurred”. The error typically appears in connection with a Windows upgrade or update and indicates corrupt or missing Windows components. If your Windows update stalls, this can slow down your system and stop the update from happening at all.
Solutions to error 0x80073712
Before trying the somewhat more intensive approaches to solving the problem, you should try to solve the update error with the standard Windows troubleshooter steps. Just like unplugging devices or turning them off and on again, the following methods can often work wonders:
- Computer restart: In the best-case scenario, simply shut down and restart the computer to fix the update error.
- Update troubleshooting: Go to “Settings” > “Update and Security”, go to “Troubleshooting” in the left menu or to “Additional troubleshooting” to access automatic troubleshooting in Windows.
- Antivirus scan: In some cases, problems with updates can also be due to undetected malware, so use one of the reputable antivirus programs to detect and remove malware.
If this doesn’t work, try the following suggested solutions:
Solution 1: Use the SFC and DISM repair tools
Windows comes with DISM (Deployment Image Servicing and Management) and SFC (System File Checker) repair tools. Both are capable of checking, repairing and resetting corrupt or missing Windows system files. Here’s what you have to do:
Step 1: Press [Windows] + [R], type “cmd”, and then press [Ctrl] + [Shift] + [Enter] to open the command prompt with administrator rights.
Step 2: In the command prompt, enter the CMD command “sfc/scannow” and press [Enter].
Step 3: Next, type the commands “DISM.exe/Online/Cleanup-image/Scanhealth” and “DISM.exe/Online/Cleanup-image/Restorehealth”. Press [Enter] after each command.
Step 4: Now reboot the system.
Step 5: If the repair is successful, you can install the update or upgrade your computer.
Solution 2: Run disk cleanup
Since error 0x80073712 indicates update files that have not been downloaded correctly, cleaning up the corrupted files is recommended as they can prevent the update from working properly.
Step 1: Type “Disk Cleanup” in the Windows search box below and click the search result to open disk cleanup. Windows will first automatically calculate how much space can be freed up by deleting temporary files.
Step 2: Next, go to the “Clean up system files” button. You will now see a list of files that Windows can clean up for you. Select “Windows Update Cleanup” and click on “OK”. Windows will now delete older update files.
Step 3: Reboot your computer and start the update again.
Solution 3: Microsoft Update Assistant or Media Creation Tool
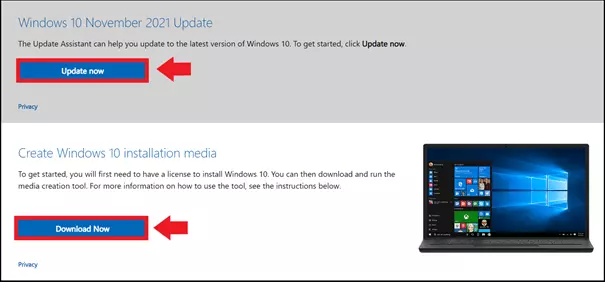
If the error occurs while updating to the latest version of Windows, you can also use Microsoft’s Media Creation Tool. This is specifically designed to bring your system up to date. Proceed as follows:
Step 1: Download the tool from the Microsoft Software Download Page.
Step 2: You’ll also see the “Update now” button on the Windows page. With this, you can use the Update Assistant to update your system to the latest version. If you want to upgrade to the next higher version of Windows, click on “Download tool now”. The Media Creation Tool will then be downloaded. It will automatically guide you through the upgrade process, which should also fix your update error.
Windows 11 users can download the Media Creation Tool on the following Microsoft download page Microsoft (under “Create Windows 11 Installation Media”).
Solution 4: Reset Windows update components
The error code indicates problems with Windows components. These can be reset and restarted manually via the command prompt. To do this, first open the command prompt with administrator rights by pressing [Windows] + [R], typing “cmd”, and then pressing [Ctrl] + [Shift] + [Enter].
Step 1: Enter the following commands and press [Enter] after each command:
- net stop wuauserv
- net stop cryptSvc
- net stop bits
- net stop msiserver
- ren C:\\Windows\\SoftwareDistribution SoftwareDistribution.old
- ren C:\\Windows\\System32\\catroot2 Catroot2.old
Step 2: You have disabled the update components in Windows. Now you need to restart them. Use the following commands and confirm each command with [Enter]:
- net start wuauserv
- net start cryptSvc
- net start bits
- net start msiserver
Then reboot and restart the upgrade or update.
Solution 5: Install updates one after the other
Usually, Windows performs updates automatically and installs them in parallel. Sometimes this can be the problem. Therefore, try to perform the updates one after the other. Proceed as follows:
Step 1: Open the “Updates & Security” menu from Windows settings. Go to “Advanced Options” at the bottom.
Step 2: Uncheck the sliding switch for “Get updates for other Microsoft products when you update Windows”.
Step 3: Now perform the upgrade or update.
If none of these solutions help, it may sometimes be necessary to reset Windows 10. However, keep in mind that all installed and saved data, programs and settings will be lost in the process. Therefore, save all important files beforehand. A less radical method is to reset to a restore point if you have enabled this feature. To do this, go to “System and Security” > “Security and Maintenance” > “Restore”. This will reset Windows to an earlier point in time, which will also remove any defective update files. Then run the update again.
- Simple registration
- Premium TLDs at great prices
- 24/7 personal consultant included
- Free privacy protection for eligible domains


