Deleting Duplicates in Excel: How it Works
Depending on the type and purpose of an Excel table, it can definitely make sense for certain entries not to be unique but appear repeatedly. However, it can often be the case that values are accidently entered into a table multiple times – especially when several people are working on a document or different datasets are combined. In this case, the affected rows don’t necessarily have to be cleared manually. This is thanks to Excel’s Remove Duplicates function – a useful tool for automatically removing identical entries.
The integrated function is not the only way to remove duplicates in Excel. There’s also the option of first filtering and displaying all duplicates. Find out how this works in our article on the topic “How to Find Excel Duplicates”.
The following sections reveal where you can find this feature and how it can be used to delete Excel duplicates. We look at the approach for scenarios in which all values of an entry have to match to be considered a duplicate, as well as situations in which only certain values of an entry have to match.
- Up to 50 GB Exchange email account
- Outlook Web App and collaboration tools
- Expert support & setup service
Tutorial: How to Remove Duplicates in Excel
If you want to remove double entries in Excel, no special measures need to be taken. As already mentioned, you can simply instruct the program to display duplicates without deleting them from the table straight away. But you can also dispense with this prior check and immediately remove duplicates in Excel. In both cases, you always have two ways to define a duplicate:
- A duplicate exists when all values of an entry match.
- A duplicate exists when x values of an entry match.
Excel Allows You to Delete Duplicates in Which All Values are Identical
The most likely scenario for using Excel’s Remove Duplicate function is if you want to remove entries from a table that are completely identical. For the Microsoft program, this means that it searches for rows in which every column contains the exact same value. If these kinds of matches exist, all entries but one will be removed from the table. In the table below – shown as an example – this applies to rows 2, 6, and 9:
To instruct Excel to remove these duplicates, the first step is to select any cell in the table – either with a left or right click.
You then need to open the Data tab and click on the Remove Duplicates button within the Data Tools section:
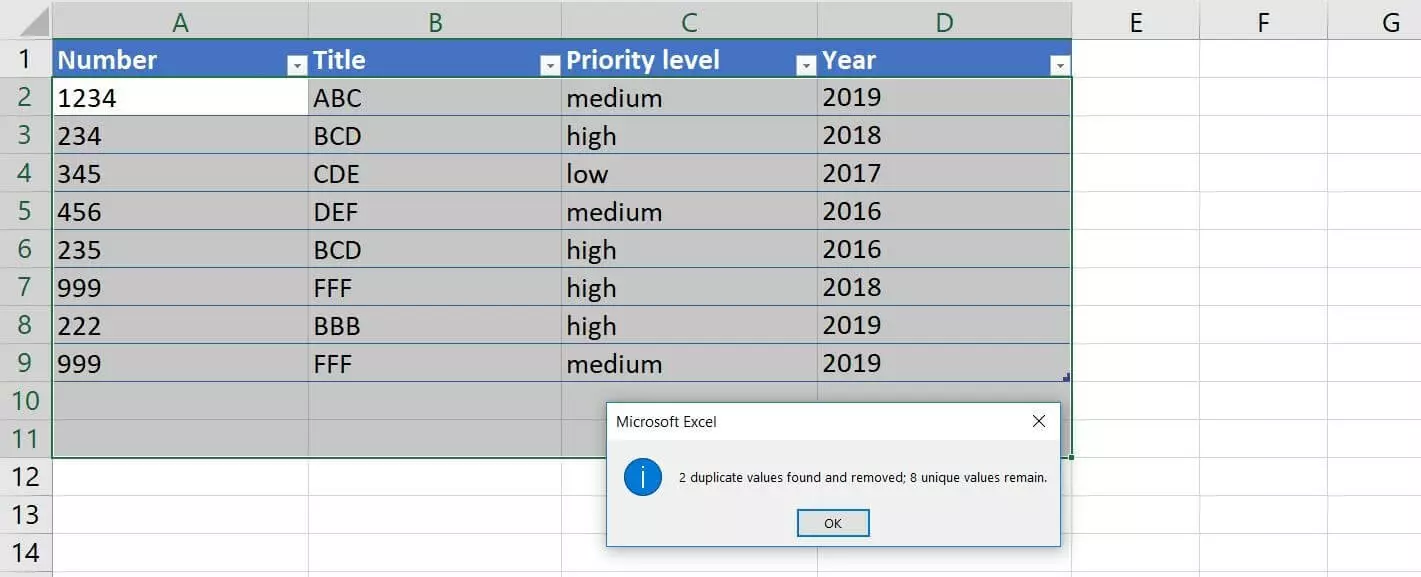
Excel will subsequently try to delete all double entries that are completely identical. Afterwards, the program will show you a notification. In our example table, the deletion process worked as intended and Excel removed two of the three identical rows:
Removing Duplicates in Excel with Only Some Identical Values
Deleting duplicates in Excel that are completely identical is undoubtedly the most common scenario for using this practical feature. But there are also tables in which columns should be considered duplicates if the various entries only match with some of their values. For instance, this is the case if columns provide additional optional parameters or outdated information that is no longer required.
If the values in the columns “Priority level” and “Year” were irrelevant in our tutorial Excel table, for example, we would still be left with a duplicate in rows 7 and 9 after filtering out the completely identical entries.
If Excel should also delete these duplicates, the approach is initially the same as described above:
- Select a cell in the table using the left or right mouse button.
- Open the Data tab.
- Click on Remove Duplicates in the “Data Tools” section.
In the “Remove Duplicates” dialog window, you can now remove each of the checkmarks in the boxes next to the table columns that are irrelevant for classifying the entries as duplicates – i.e. the “Priority level” and “Year” columns in our example table. Then confirm your changes with the OK button:
In this case, you will also receive a notification about how many duplicates were removed in Excel.
You can select any number of columns for categorizing duplicates. You don’t have to limit yourself to two columns like in this tutorial.
- Up to 50 GB Exchange email account
- Outlook Web App and collaboration tools
- Expert support & setup service


