How to add page numbers in Word
Microsoft Word offers a quick and easy way to add page numbers to Word documents.
How to add page numbers in Word quick guide
- Click the Insert tab in the top ribbon.
- Select the Page Number option.
- Select the position and alignment of the page numbers from the drop-down menu.
- Page numbers should now appear in your Word document.
- Store, share, and edit data easily
- Backed up and highly secure
- Sync with all devices
How to add page numbers in Word step by step
The easiest way to insert page numbers in Word is as follows. The following instructions work for Word versions from Office 2016 onwards as well as Microsoft 365.
- Click the Insert tab located in the navigation pane.
- Click on the menu item Page Number.

- A list of different options will appear, allowing you to specify where the page numbers should be displayed and how they should be aligned.
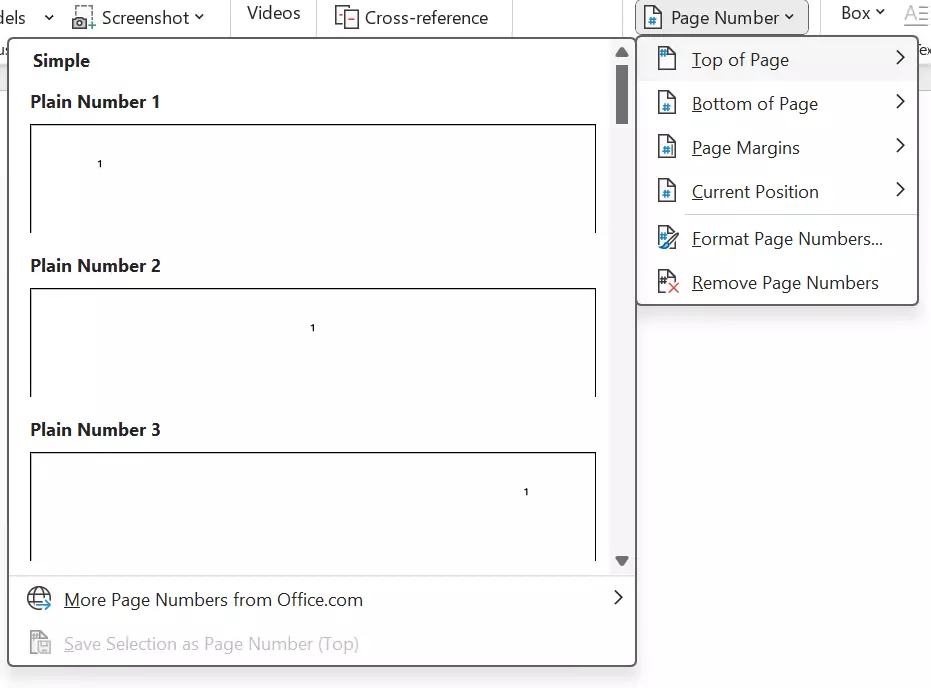
The document’s pages will now be numbered starting on the first page.
How to start page numbers on page 2 in Word
Page numbering doesn’t need to start on the first page of a document. For example, if you have a title page, it may make more sense to start page numbering on the second page of the Word document. To insert page numbers in Word from page 2 onwards, follow the steps below:
- Click on the Insert tab located in the navigation bar.
- Select the menu option Page Number.
- Insert the page numbers.
- After inserting the page numbers, the navigation bar will change to include the Header & Footer tool options. Check the option Different First Page.
- Page numbers will now start from the second page. Select Close Header and Footer.
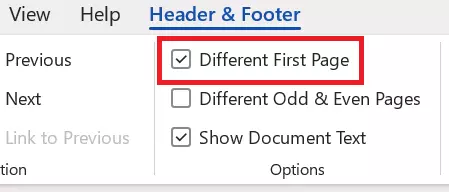
Important: When using this method to add page numbers in Word, the numbering will start with 2 on the second page.
However, there’s a simple trick for starting with the number 1 on page 2. Follow the steps for inserting page numbers in Word from above and then do the following:
- Click the Page Number option again to access the sub-categories. This time, select Format Page Numbers….
- The Page Number Format window will open.
- Check the Start at option and enter a 0 in the box.
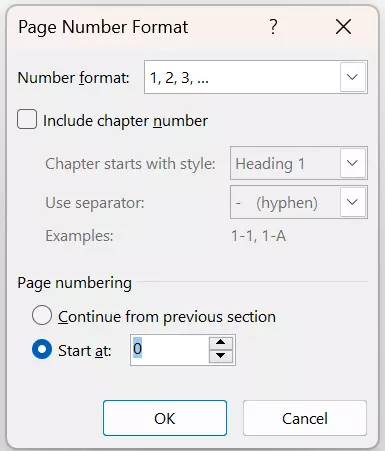
The second page will now begin with page number 1. Word will continue to number the subsequent pages in a sequential order.
- Up to 50 GB Exchange email account
- Outlook Web App and collaboration tools
- Expert support & setup service
How to start numbering pages on page 3 in Word
If you want to insert page numbers starting on the third page of a document, things get a little more complicated. With the following trick, you can number pages in relation to where they are in a document (i.e., page 3 is the third page) or you can assign the number 1 to a page of your choosing (i.e., the third page is page 1). This is relevant in documents where both a title page and a table of contents have been added. To do this, you need to divide the document into sections: Section 1 will include the first two pages and section 2 the pages with numbers in the footer area. To do this, follow the steps below:
- Start with a blank document.
- Select the Layout tab in the navigation bar.
- Here you’ll see different options. Click Breaks.
- Now, select Page. This will automatically take you to the second page.
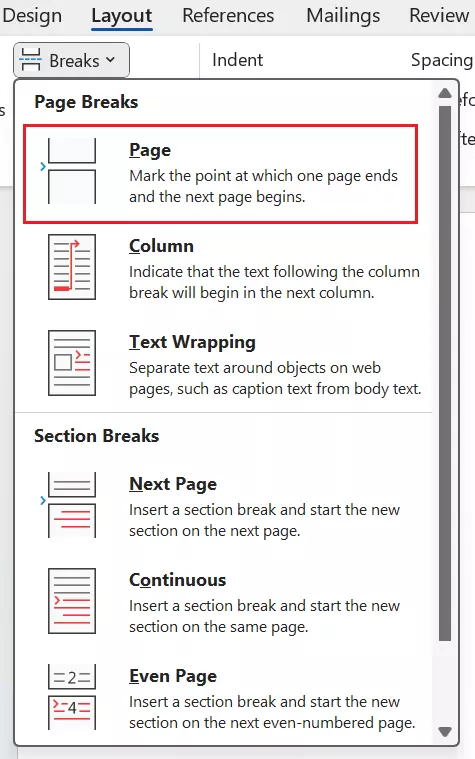
You’ve set up your first page break. Since the numbering should start at page 3 though, you need to skip one more page.
- Select the Layout tab.
- Click on the menu option Breaks.
- This time, select Next Page.
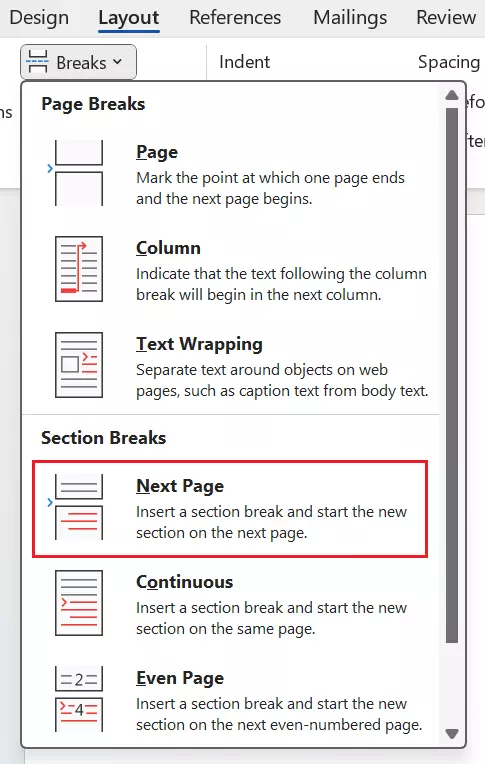
Now, you have a page break and a section break. This means the document has three pages and two sections. In order to insert different page numbers in Word, you need to remove the footer link.
- Go to page 3 of the document and double-click the footer area.
- The navigation pane will automatically open the Header & Footer tools.
- Click on Link to Previous to remove the footer link.

Then proceed as described in the previous sections to number pages on the third page beginning with page number 3. If you want to change the starting number to 1, you can go to Page Number > Format Page Numbers and type 1 next to Start at.
If you work with Word frequently, you should think about using templates. You can find out how to create your own style sheets in Word in our Digital Guide.

