How to track changes in Excel
Excel offers a feature for tracking changes, often referred to as the “tracking mode”. With this feature, you can highlight changes, list them in a tabular format, and undo them later if necessary. This can be helpful if you are working on a spreadsheet over a longer period of time or collaborating with other people on a spreadsheet.
Quick guide on how to track changes in Excel
In order to enable tracking in Excel, you have to share the Excel workbook first. Once you have shared it, it only takes a few steps to track any changes made to the spreadsheets in the workbook. If you are using a newer version of Excel, you’ll need to add the menu options below to the Quick Access Toolbar. We’ll go over how to do this in the next section.
- Go to the Review tab and find the section labeled Changes.
- Select Track Changes and then click on Highlight changes. In the window that pops open, you can change the settings so that changes are highlighted.
- Click on OK to close the window. Your new settings will be saved and any subsequent changes to the workbook will be highlighted.
How to turn on the Track Changes feature in Excel
In Excel, there is more than one way to turn on the Track Changes feature. We’ll go over the different methods for turning this feature on below. The instructions can be used for the Microsoft 365 version of Excel as well as for versions 2021, 2019 and 2016. In some versions, it may be necessary to add this functionality to the interface via the Quick Access Toolbar.
Adding track changes to Excel via the Quick Access Toolbar
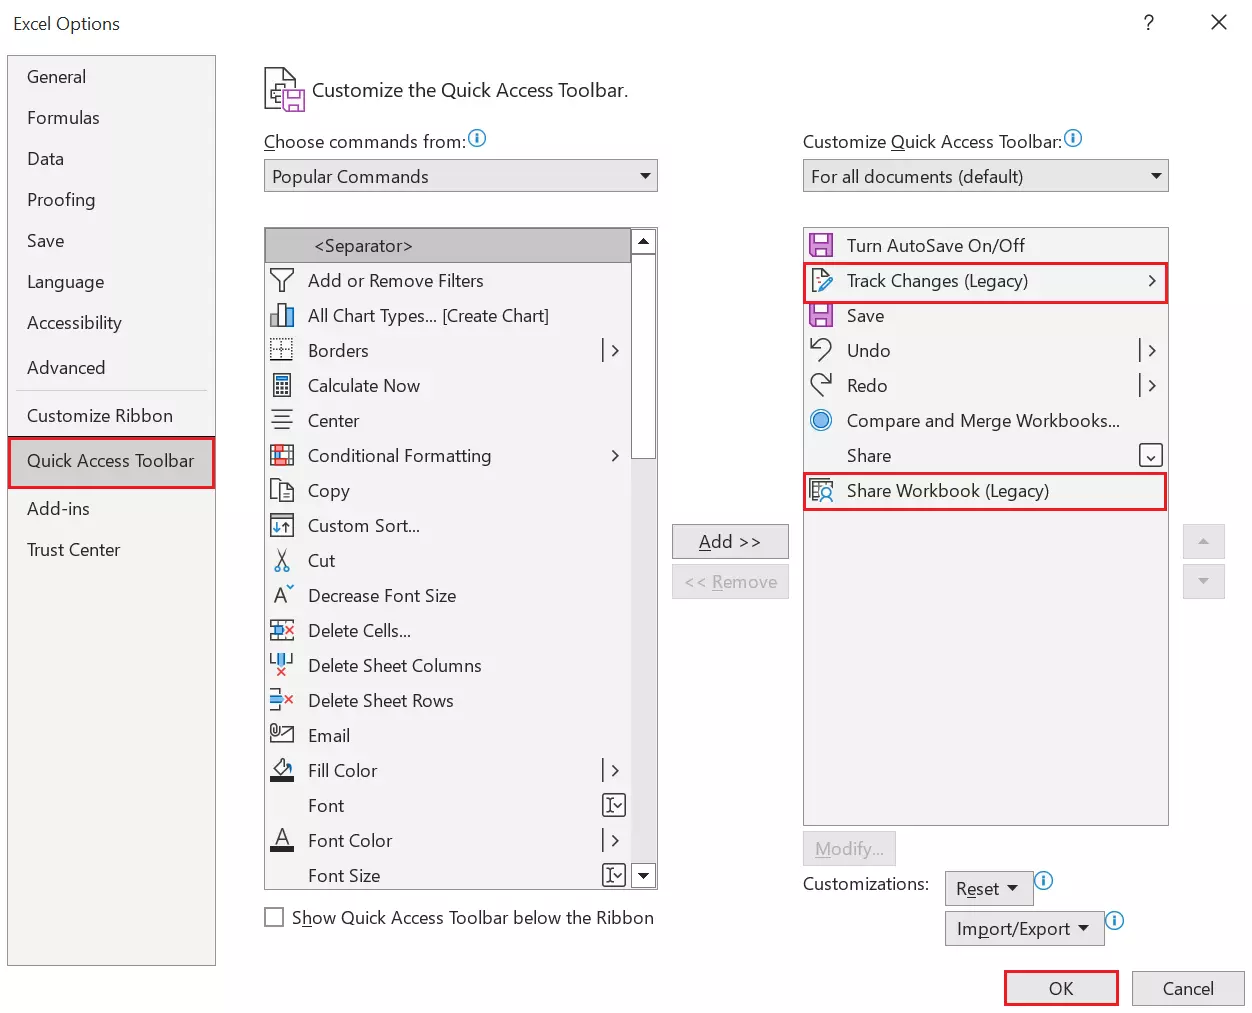
If the buttons to enable tracking changes are not present in your Excel menu (for example, if you are using Microsoft 365), you can add them to the Quick Access Toolbar by doing the following:
- Go to File > Options. Under Options, select Quick Access Toolbar from the menu on the left.
- In the field Choose commands from:, select All Commands.
- Scroll through the list and look for the entry Share Workbook (Legacy). Once you have found it, add it to the Quick Access Toolbar by clicking on Add. Then find Track Changes (Legacy) and add it to the toolbar as well.
- Confirm the changes by clicking on OK.
Tracking changes in Excel
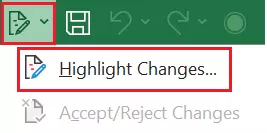
In the Quick Access Toolbar, click on Track Changes and then on Highlight Changes… to turn on the feature for tracking changes in Excel.
In the following dialog box, you can specify the criteria for tracking changes.
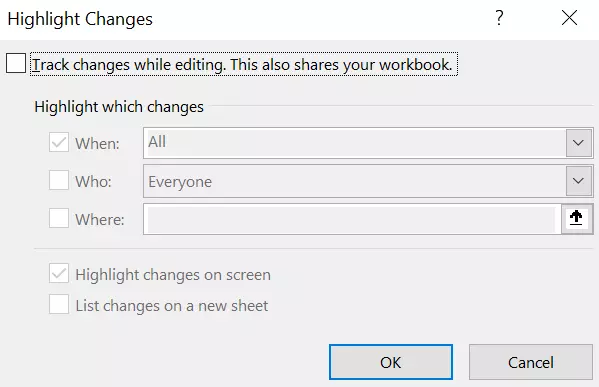
A simple option is to select Track changes while editing. This also shares your workbook. and Highlight changes on screen. With this option, the changes will be tracked in Excel and highlighted with a comment next to the cell. Additionally, the workbook automatically gets shared.
With this default setting, all other settings remain unchanged. The fields When, Who and Where can be used to further specify how changes should be tracked. You can decide, for example, if your changes should be tracked as well and if changes made to the document at a specific time should be tracked or not.
You also have the option to list all of the changes in a tabular format in a separate Excel sheet. In order to turn on this feature, simply place a checkmark next to the option List changes on a new sheet.
Sharing a workbook
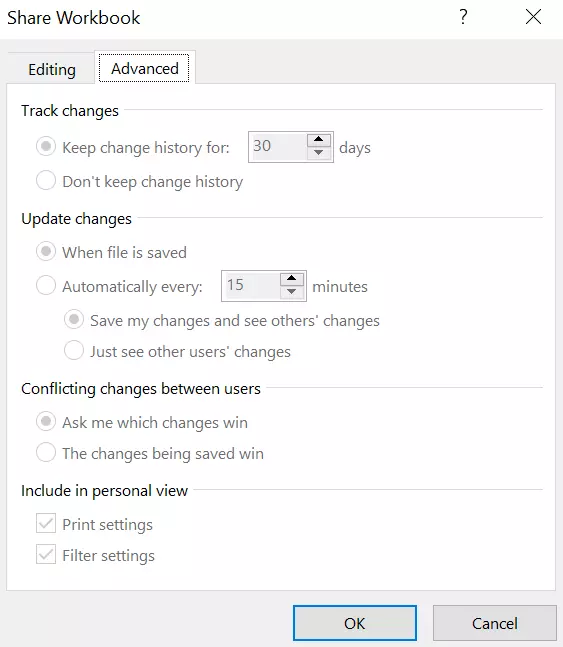
To share a workbook, you can also go to the Quick Access Toolbar and select the icon for sharing a workbook.

A dialog box will appear. Under the Editing section, you need to click the circle next toAllow changes by more than one user at the same time. In the Advanced tab, you can specify if changes should be tracked and how changes should be handled. You can, for example, decide when changes should be saved and what should happen if changes from different users conflict with each other.
How to detect changes in cells
Once you have activated the tracking mode in Excel, the way that changes will be displayed in your workbook depends on your settings.
Highlighting changes
If you select the Highlight changes on screen option from the settings, the column and row labels turn dark red as soon as a cell has been changed in the column or row. In addition, changed cells are automatically tagged with a comment, which can easily be recognized by the colored frame. Additionally, there will also be a small triangle in the upper-left corner of the cell. A different color is assigned to each user. If you move the mouse cursor over the changed cell, the comment will be displayed. You can also see who changed the cell and when as well as what changes were made.

Displaying changes in a separate worksheet
Once you select the option List changes on a new sheet, a new worksheet with the name “Change History” will launch in your workbook. This provides a tabular overview of changes made in the workbook. In this overview, you will also see cases of conflict, for example, if two users want to change the same cell.
Only saved changes are included in the list. The scope of the included changes also depends on your settings.

If you uncheck List changes on a new sheet in the settings, the Change History worksheet will be removed.
You can also track changes in Word.
CELL function
In addition to tracking changes in Excel you can use the Excel function CELL to check which cell was changed last. Just enter the following formula into a cell:
Now you can view the address of the cell that was last modified. If you don’t specify a reference, the information for the cell that was changed last will automatically be output.
- Store, share, and edit data easily
- Backed up and highly secure
- Sync with all devices
How to accept or reject changes
If you want to accept or reject changes that have been tracked in Excel, you can use the Accept/Reject Changes button. You can find this button under Track Changes. Initially, a message will appear informing you that you need to save the worksheet. Click OK to confirm and continue. In the dialog box that follows, you can specify which changes you want to review. Here, you can filter by time, user and range, similar to the setting options for tracking changes in Excel. You will now be able to check all tracked changes that have not yet been reviewed.
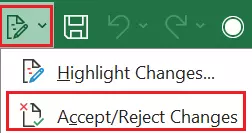
A dialog box will guide you through the individual changes. You can choose to accept or reject the changes individually or all at once. If you reject a change, the corresponding cell will be returned to the state it was in before the change was made. If a cell has been modified several times, you can check the changes individually and accept or reject them as you see fit.
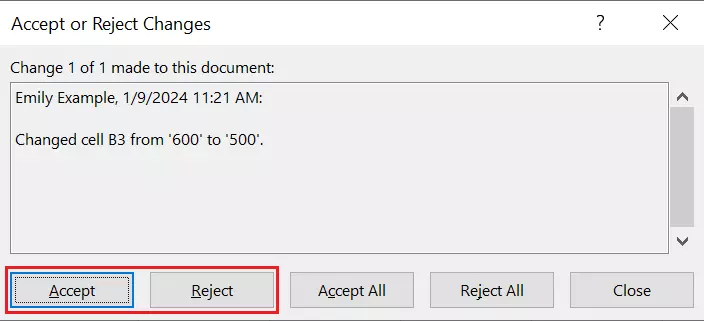
Once you are done, the changed cells will be highlighted, even if you have accepted or rejected the change. The highlighting will disappear when you turn off the feature for tracking changes in Excel.
How to turn off the Track Changes feature
If you no longer want Excel to track changes, follow the steps below to turn off the feature:
- Select the Review tab from the main menu.
- Select Track Changes from the Changes section.
- Click on Highlight Changes.
- Deactivate the checkbox that reads Track changes while editing….
When you turn off Track Changes, the change history will be deleted. However, you can save the history beforehand. To do this, select List changes in a new worksheet as described above and copy the worksheet with the history to another Excel workbook.
After deactivating Track Changes, it will no longer be possible to jointly edit the workbook. As a result, a warning message will pop up if you try to deactivate this feature. If another user saves their version of the workbook after the feature has been deactivated, previously saved versions will be overwritten with the newer version.
With Microsoft 365 plans from IONOS, you’ve got the perfect toolkit at hand to work collaboratively in the cloud.
What restrictions are there when using Excel’s Track Changes feature?
When Track Changes is enabled, the restrictions for shared workbooks are applied. This means that certain editing options are not possible, e.g., conditional formatting, joining cells, adding hyperlinks, using Excel macros as well as a handful of other features that are listed below. If you want to use an Excel function but it is grayed out, you should check to see whether the title bar of your Excel window says “[Shared]” next to the file name. If this is the case, it may explain why certain features are not available.
Examples of Excel features that are not supported when the Track Changes feature in Excel is on include:
- Creating and pasting tables
- Pasting or deleting cell blocks
- Adding or changing conditional formatting
- Deleting worksheets
- Adding or changing of data validation
- Connecting cells or breaking up connected cells
- Creating or changing diagrams or PivotChart reports
- Sorting or filtering by format
- Inserting or changing images or other objects
- The use of drawing tools
It’s also important to note that you can’t undo tracked changes in the reverse order that they were made (like with the Undo button). Each change has to be rejected individually.
Not all changes are logged. Changes to the values in cells are tracked, but changes such as formatting, showing or hiding rows/columns, or simple recalculations are not tracked.
Can I track changes in any type of Excel workbook?
Excel’s Track Changes only works in shared workbooks. When you enable this feature, it automatically shares the workbook (see the first section “How to turn on the track changes feature in Excel” for more information about this). In newer versions of Excel like Microsoft 365, the concept of shared workbooks has been replaced by co-authoring, where several users can edit the workbook at the same time and immediately see the edits made by others. However, this new concept also means that tracking mode cannot be used anymore. If you have, for example, saved an Excel workbook in a shared space such as OneDrive or SharePoint, you can only track changes made by other editors directly, and not later on.
Other spreadsheet programs also offer a feature for tracking changes. If you, however, prefer working with Microsoft Excel, the articles below can help you with other aspects of Microsoft’s popular spreadsheet program:

