Excel DATE function
Excel provides many versatile functions which enable you to perform a wide variety of calculations. For referencing purposes, date and time information is often included in these calculations. Excel uses an internal date format for this purpose. Using the Excel formula DATE, you can ensure that a date will always be correctly displayed and that it can be read and understood by other functions.
- Free Wildcard SSL for safer data transfers
- Free private registration for more privacy
- Free 2 GB email account
Why do you need the Excel DATE formula?
The way dates are written can differ between countries. For example, in the US the month is usually written before the day (e.g. May 10, 2020, or 5/10/2020), while the UK puts the month in second position after the day (e.g. 10 May 2020 or 10/5/2020). Some situations may require the month to be written as a number (e.g. 5/10/2020). Other times, it may be necessary to display the day of the week (e.g. Sunday, May 10, 2020).
It’s possible to enter a date as text, but the option is only suitable if you’re dealing with just a handful of dates and times. And if you need to change the format of a date at some point in time, it’s much more efficient to enter the date in a universal format. Regardless of how it is displayed, the program identifies the value as a date and saves the entry internally in its own format. Using the DATE function, Excel then enables you to change how a date is written. The corresponding value can also be applied to other functions and used in calculations.
What format does Excel save dates in internally?
Excel saves dates internally as serial numbers - typically as the number of days since January 1, 1900. In our example, Excel saves May 10, 2020 as “43961” which is the number of days between January 1, 1900 and May 10, 2020. Times, on the other hand, are recorded as fractions of days. The entry “May 10, 2020 at 12:00 pm” would be saved internally as “43961.5”. By saving dates as serial numbers, Excel can format them as desired and perform calculations more easily.
How to enter dates in Excel
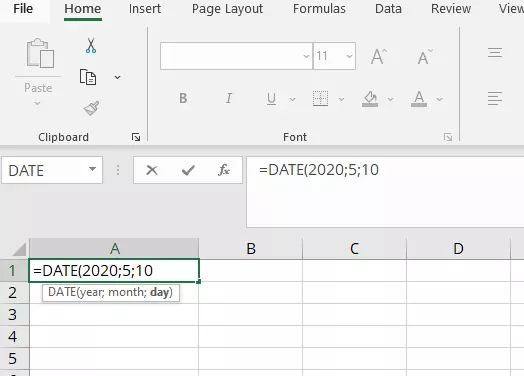
You can enter a date directly in a cell using the following formula:
It is important to enter all four digits of a year. If you only enter two digits, Excel won’t know which century you’re referring to. Does the number 20 refer to 1920 or 2020? By entering 2020, it is clear which century you mean.
An interesting quirk in Excel is that you can enter values for days or months that are too large or too small. For example, if you enter the date as May 40, 2020, Excel will automatically calculate that to be June 9, 2020. It is also possible to enter negative values. In this case, Excel would calculate the corresponding earlier date. However, it is not possible to enter a date before 1900. If the year is between 0 and 1899, Excel will add 1900 years to it. For example, if you enter the year 1800, Excel will calculate that to be the year 3700.
Composing the date using multiple cells
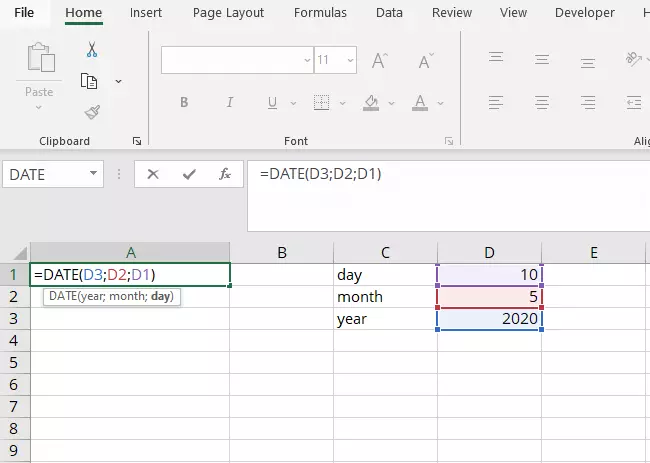
As with all other Excel functions, you can also enter cell references for the individual parameters in the Excel DATE formula. In our example, the entries for the date, the month and the year are in three different cells. The DATE function combines the data from these three cells.
Formatting the date
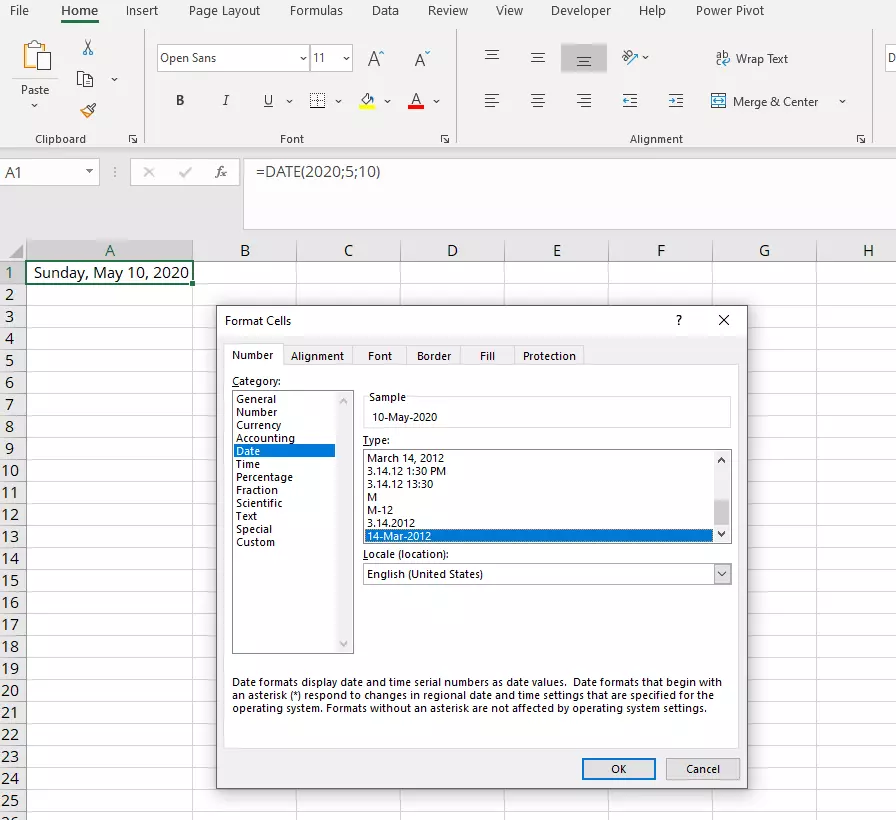
After entering the date in a cell, you can format it using the “Number” tab in the “Format Cells” menu. Right-click on the corresponding cell with the date entered and then select “Format Cells” from the menu. In the dialog box, left-click on the “Date” category and then select the desired format.
You can select one of the predefined date formats or create your own. To define your desired date format, follow the steps below:
- In the category list on the left, select “Custom” at the bottom of the list.
- Type the format code in the “Type” field.
- Click OK.
The following table contains the most important format codes:
| Parameter | Displayed as follows | Format code |
|---|---|---|
| Year | Two digits: 21 | yy |
| Year | Four digits: 2021 | yyyy |
| Month | One to two digits: 1–12 | m |
| Month | Two digits: 01–12 | mm |
| Month | Month abbreviated as three letters: Jan, Feb, etc. | mmm |
| Month | Full month displayed: January, February, etc. | mmmm |
| Month | Month abbreviated using first letter: J, F, etc. | mmmmm |
| Day | One to two digits: 1–31 | d |
| Day | Two digits: 01–31 | dd |
| Day | Day abbreviated as three letters: Mon, Tue, Wed, etc. | ddd |
| Day | Full day displayed: Monday, Tuesday, etc. | dddd |
A detailed list of the available format symbols can be found in this article provided by Microsoft.
In addition to these format codes, you can also add any other text. But you should enclose the text in quotation marks to ensure that Excel does not interpret the letters in the text as format code. This makes it possible to recreate any date format whether it be with hyphenation points, slashes, hyphens or any other printable character.
Converting date text into an Excel date
Sometimes dates are saved as text in Excel spreadsheets, such as after importing a database. You can use the DATEVALUE function to convert the date represented by text into a proper date format (i.e. the internal Excel serial number representing the date):
The value returned when using DATEVALUE is the date in the typical Excel format (i.e. the serial number). As described above, you can format this date value in your desired date format. Once again, you can use cell references for the returned values. To do so, simply enter the cell reference in the parameter of the corresponding function.
Entering the date without a formula
Excel is programmed to automatically format any text entries that look like a date as a date. It does not matter whether the month is written as a number or a word. So, how do you know whether Excel has interpreted the written date as a date or as text? If Excel has converted the text entry into an internal Excel DATE, the entry displayed will be aligned to the right. If it remains aligned to the left, Excel did not recognize the entry as a date and thus has stored it as text.
Direct input is particularly useful if you want to enter the time as well as the date in the same cell. To do so, simply enter the date followed by a space and the time. For time, you need to separate the hours and minutes using a colon.
Example: May 10, 2020 12:00
This date and time entry can be formatted in the same way as the date entries which do not indicate times.
Sometimes Excel will convert number entries into dates even though you don’t want it to do so. If you want to prevent Excel from interpreting your entry as a date, type an apostrophe (‘) as the first character. It will not be displayed in the cell.
Entering the current date
You can have the current date or time displayed automatically. There are two ways to accomplish this: one is dynamic where the date is automatically updated, while the other is static where Excel does not update the value.
While you can use the two formulas TODAY and NOW for dynamic entries, you need to use the keyboard shortcut [Ctrl] + [;] or [Ctrl] + [Shift] + [:] for a static entry that will not change.
| Input | Effect |
|---|---|
| =TODAY() | Current date, continuously updated |
| =NOW() | Current time, continuously updated |
| [Ctrl] + [;] (semicolon) | Current date, remains unchanged (no update) |
| [Ctrl] + [Shift] + [:] (colon) | Current time, remains unchanged (no update) |
Do you want to perform more calculations using time data? Find out how to add up hours in Excel.
- Store, share, and edit data easily
- Backed up and highly secure
- Sync with all devices


