How to create an NFT marketplace
If you want to create and sell NFTs on your own, you should consider creating an NFT marketplace. This can be done easily using suitable plugins on WordPress or WooCommerce.
What do you need to create your own NFT platform?
There are some interesting options out there for those who want to earn money with NFTs. One of them is creating your own NFT marketplace. This does, however, come with quite a lot of work. While this type of platform operates essentially like a typical online shop, the peculiarities of NFTs must be taken into account:
Users must be able to register on your NFT marketplace and create their own digital wallets. This allows your customers to later buy and sell NFTs as well as transfer cryptocurrencies.
Additionally, you will need to be able to support blockchains like Ethereum or Binance Smart Chain. These distributed databases are the basis for NFTs alongside tokens, which are used to clearly identify NFTs. The more blockchains your NFT marketplace supports, the more freely your users can choose.
Depending on the type of NFT platform you have, there may be other requirements you’ll need to fulfill when creating it. For example, if you plan on creating your own NFT marketplace for property, you may be required to register with local authorities. On the other hand, NFT platforms for video games require close integration with the corresponding game.
Should I use modules, a CMS or write the code myself?
To create your own NFT marketplace, you can opt for different solutions:
- You can write the code yourself or ask an agency to do it. However, in doing so, the time and financial costs will be very high.
- You can also use a modular solution or a shop system to create your NFT marketplace. Just be aware that not all systems support NFT. It’s important to first make sure that your preferred solution can support the creation of an NFT marketplace.
- Finally, you can use a content management system such as WordPress and its shop upgrade WooCommerce to set up a shop and implement all the important NFT features.
What hosting and domain options are there for my NFT marketplace?
Whatever you choose to do, you need a suitable hosting platform and your own domain to be able to share your NFT platform using your preferred web address. If you choose a modular solution or a shop system, they often have packages with the hardware and domain included. If you use a CMS or a platform you have written yourself, you will need to find separate solutions for these. The most important things to take into account are:
- Computing power: Your NFT marketplace should offer all users the best possible experience. You can ensure fast load times and the best-possible availability by having sufficient CPU and storage capacity. The higher the traffic on your NFT marketplace and the more NFTs being offered, the more resources you will need.
- Storage: Your platform’s data will be stored in databases. You need to make sure that the database system you use is supported. As your NFT marketplace grows, you should also expand the available storage space so that your project has room to grow.
- Security: To make your NFT shop safe, any data transfers should be protected using SSL/TLS. On top of this, you need to ensure that your hosting environment is protected from malware and has firewalls to filter incoming traffic. It’s also a good idea to carry out regular backups and update the applications you are using.
You can learn more about other considerations you need to make when creating your own NFT marketplace in our article, “Setting up an online store: The basics”.
What types of hosting plans does IONOS offer for NFT marketplaces?
IONOS offers several hosting plans that you can easily create your own NFT marketplace with using WordPress or WooCommerce. Alongside the standard web hosting for projects of different types, you can also choose from managed WordPress hosting and WooCommerce hosting. The latter options have been designed to cater to the most popular content management system and the well-known shop plugin.
Deciding which is the best for your NFT platform depends on the size of your project. You should ask yourself the following: How many NFTs do you plan on offering? Will there be lots of NFTs in high demand that will likely lead to high amounts of traffic? Will there be user interactions that require additional interfaces (e.g., other databases, cryptocurrencies, payment methods, etc.)? And how much management will be needed for your NFT marketplace? The following table should help you find an option from IONOS that is right for you.
| NFT platform usage scenario | Suitable IONOS hosting option |
|---|---|
| A simple NFT marketplace for images, videos, GIFs and music with up to 10,000 visitors per month | IONOS Managed WordPress Hosting Start |
| A larger, established NFT platform with up to 20,000 visitors per month | IONOS Managed WordPress Hosting Boost |
| A more complex NFT marketplace (e.g., for property, objects of speculation, video games) with more than 20,000 visitors per month. | IONOS WooCommerce Hosting |
How to create an NFT marketplace: A step-by-step tutorial using WordPress
Once you’ve got the right hosting solution, you can start to create your own NFT marketplace. In the following guide, we’ll show you how IONOS customers (WooCommerce hosting or (managed) WordPress hosting) can create a marketplace using WordPress and the WPSmartContracts plugin. To get started with this, you’ll need to have WordPress installed.
If you want to use a WooCommerce extension such as NFT Maker to create your own NFT marketplace, you need to first set up an online store with WordPress.
Step 1: Register in the WordPress backend
Log in to the backend of your WordPress or WooCommerce installation using your WordPress admin login. If you haven’t already done so, you should change your WP admin URL to better protect your NFT marketplace.
Step 2: Install the NFT marketplace plugin
In order to create your NFT marketplace, you need the right plugin. A popular extension for WooCommerce shops is the NFT Maker plugin, which was developed by Tatum. It can support the following blockchains: Ethereum, Polygon, Binance Smart Chain, Celo and Harmony.
As part of this tutorial, we’ll use the plugin we mentioned earlier, WPSmartContracts. To use this plugin, you just need to have WordPress installed. This extension supports Ethereum, Ethereum Classic, Polygon, Binance Smart Chain, Avalanche C-Chain and Fantom Opera.
To install the extension, open Plugins from the menu on the left-hand side of the backend and choose Install. Look for WPSmartContracts and select Install now.
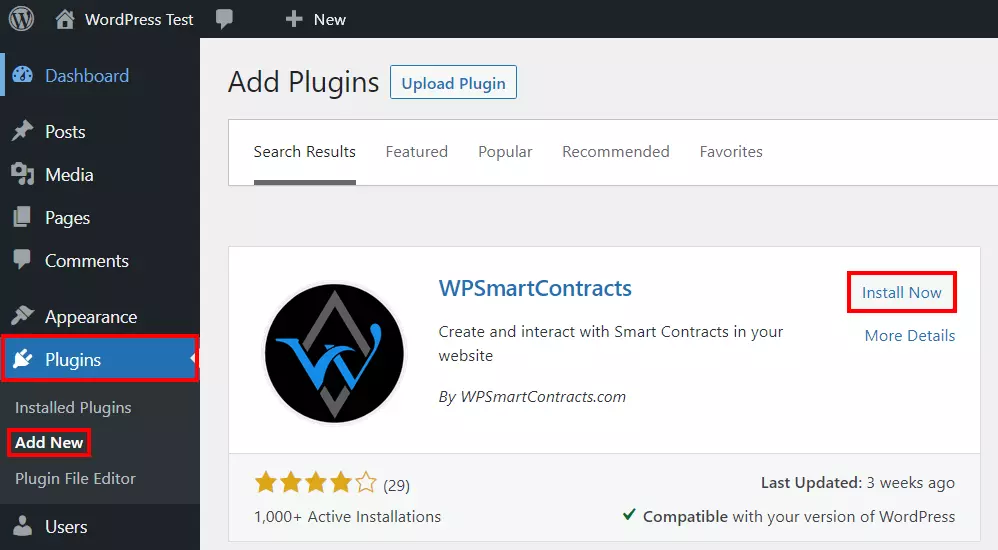
Once it has successfully been installed, you can activate the plugin by clicking on Activate.
Step 3: Choose the design of your NFT marketplace
In the Settings menu, you will now see the submenu for WP Smart Contracts. There you will be able to adjust the basic settings for the NFT plugin as well as choose a layout for your NFT marketplace. To see exactly what the available designs (default, light 1, light 2 and dark) look like, you can take a look at the corresponding YouTube clips.
Once you’ve chosen your layout, you can select it by moving the slider to the right and clicking on Save changes.
Step 4: Create your Infura project account
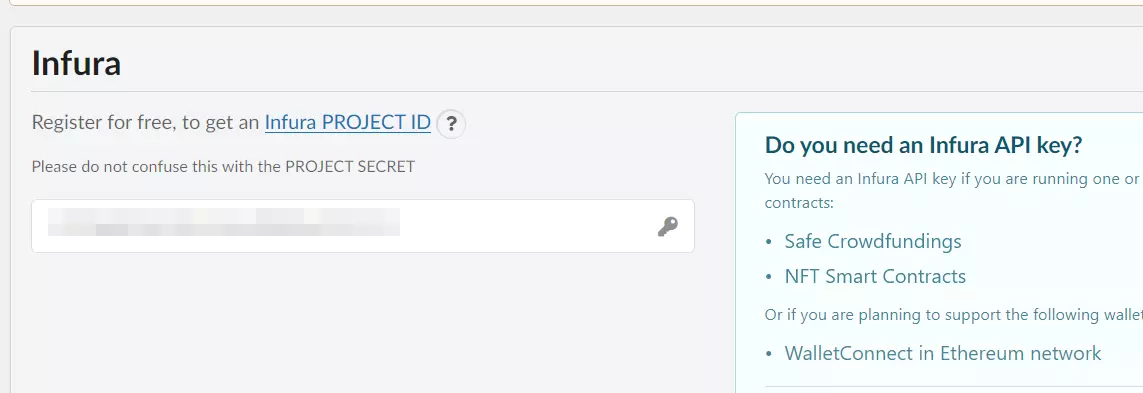
To set up an account, click on the Infura PROJECT ID link. You will be redirected automatically to the service’s website. Click Get started at the top. You then need to enter a valid email address and your chosen password. After accepting the terms and conditions, click on Create free account.
Confirm your account by clicking on the link in the confirmation email. Log in to your account, create a Web3 API project and then click on MANAGE KEY. Under API KEY, you will find your key, which you can copy into the Infura tab in the WordPress backend.
You can also enter your personalized Infura project key into the Settings menu of the plugin. This key is important for two reasons: By entering the key, users who aren’t connected with MetaMask (explained in the next step) will be able to see your marketplace’s data. Secondly, the key allows you and your users to access the Ethereum network.
Step 5: Install MetaMask
The next step is to install MetaMask. You need this crypto service to forward users of your NFT marketplace to the Infura blockchain service, i.e., to send and receive NFT tokens and carry out transactions using cryptocurrencies. MetaMask is available as a browser extension for Firefox, Chrome, Edge, Opera and Brave as well as an app for iOS and Android.
Open MetaMask website and start downloading the version you need. If you’re using a browser extension, you need to give MetaMask the permissions it requires.
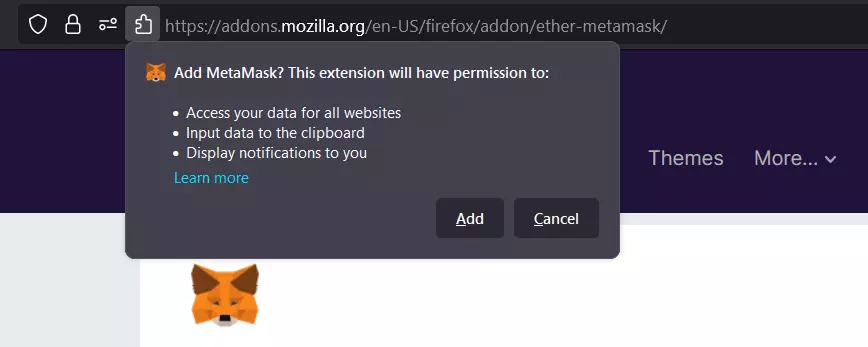
Open MetaMask (via the button in the toolbar on your browser) and click on Get started. Before clicking on Create a wallet, choose whether you want MetaMask to use your data for optimization.
The wallet you created will have generated a secret, 12-word phrase which will now serve as a master key. Click on CLICK HERE TO REVEAL SECRET WORDS to reveal your secret words and save the phrase, as is best practice using a password manager. To confirm your secret phrase, use the next dialog box to choose the words in the correct order and then click on Confirm.
Step 6: Link WordPress with MetaMask
From now on, as soon as you open the WordPress backend in your browser, the MetaMask extension will automatically open a dialog to set up a connection. Before your NFT marketplace is active, you should work with a test network. You can always change this to the Ethereum Mainnet or another network later. Click Cancel to stop the automatic connection and manually open the crypto extension from the icon in the browser toolbar.
Click on the little downward-facing arrow next to the Ethereum Mainnet option and then on Show/hide test networks.
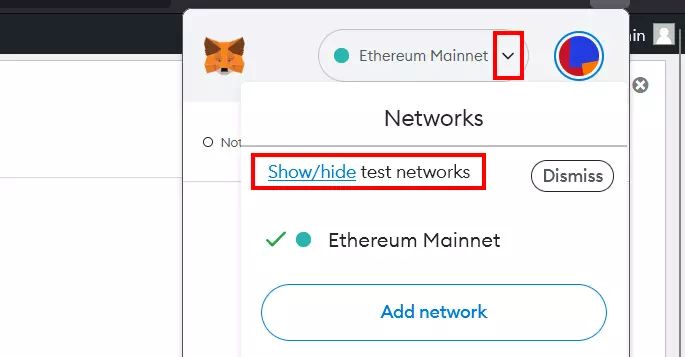
Now when you click on the little arrow pointing downward, you will see different test networks. Restart your browser and create a link to a network.
Step 7: Create an NFT marketplace
Use the side menu to navigate to the NFT collections menu in the WordPress backend. Click on Add new collection to create a new NFT marketplace.
In the Flavor section, you can find different templates for your NFT platform. We recommend using the standard marketplace “ERC-721 NFT Marketplace (MATCHA)” to start with. If you want to use another template, you can move the slider to the flavor you want.
Once you’ve chosen your template, keep scrolling down until you reach Smart Contract Options. In this section, the fields marked with an asterisk must be completed. If you are using the MATCHA flavor, this will include the following:
- Symbol: The symbol is a short tag for your shop or the relevant subcategory (collection).
- Name: Here you can set the name for your NFT marketplace or the relevant NFT category (collection).
- Sales commissions: In this field, you can enter the applicable fee for each NFT sold. Enter a percentage between 0 and 100, for example, “2” if you want to charge a commission for two percent of the sales price.

In this section, you can also add the wallet (or corresponding address) that the sales commission is to be transferred to. You can find this in the MetaMask account you created. Open the extension and choose the account you want to use. The address will be copied automatically, and you can copy it into the wallet field of the WordPress backend using the keyboard combination [Ctrl] + [V].
Step 8: Configure user roles
Directly underneath the options for the NFT collection you can find the Options menu, where you can define the user roles to create NFTs for your marketplace. By default, this is set to only administrators. There are, however, other options. You can also allow all users to edit the NFTs available in the frontend.
Step 9: Deploy your NFT marketplace
You are now ready to deploy your NFT marketplace. You can do this by clicking on the deploy button. Ensure that the network you want to use for your marketplace has been selected. In our example, we’ve used the test network “Goerli”.

Now you need to confirm that you are an adult and agree to the Terms of Service. Then, click on Confirm in the MetaMask extension.
To ensure that your NFT marketplace deploys successfully, you must have the currency used by the corresponding network in your wallet. This also applies to test networks, but it’s possible to transfer units to your address at any time free of charge.
The process will be completed in a short amount of time, after which you can find and open the NFT marketplace you created directly in the NFT collections menu.

Step 10: Add NFTs to the marketplace
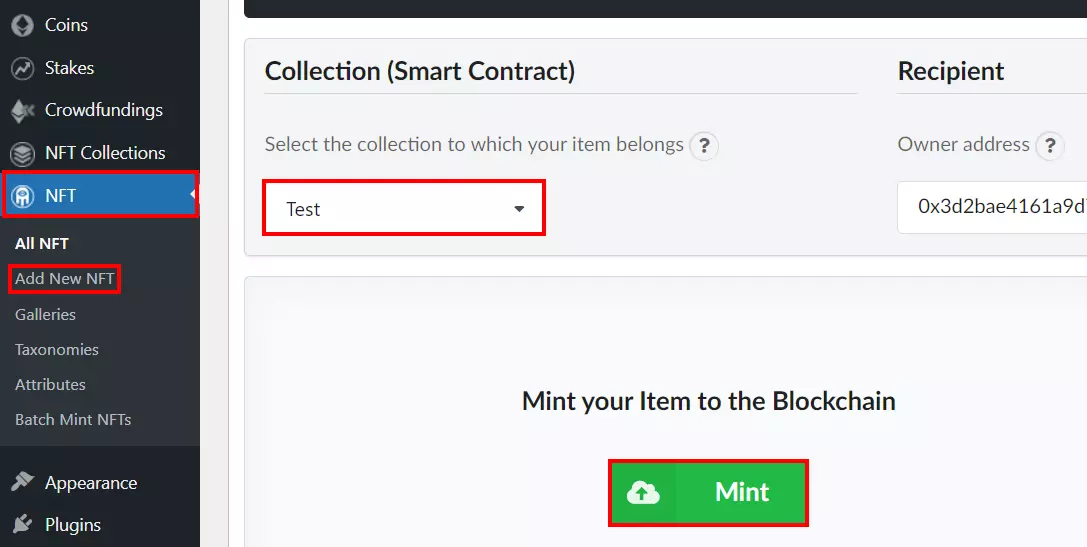
You can now create NFTs and put them on sale in your marketplace. To do this, open the NFT option in the side menu. Click on Add new NFT and complete the following steps:
- Enter a name for your NFT. This is used as a template for the URL. You can also edit the permalink that is automatically generated.
- Write a unique description for your NFT.
- In Media, enter your NFT’s file type.
- Click on Add menu and upload the file you want.
- In the Collection (Smart Contract) field, you can assign the NFT to the NFT marketplace you created earlier.
- In Unit price, you can set the price of the NFT (per unit).
- If you want to set a maximum number of available units for your NFT, enter this into Maximum quantity.
- Finally click on Mint to add the NFT to the blockchain and send it to the marketplace.
- Confirm your NFT has been created via the MetaMask browser extension user interface.
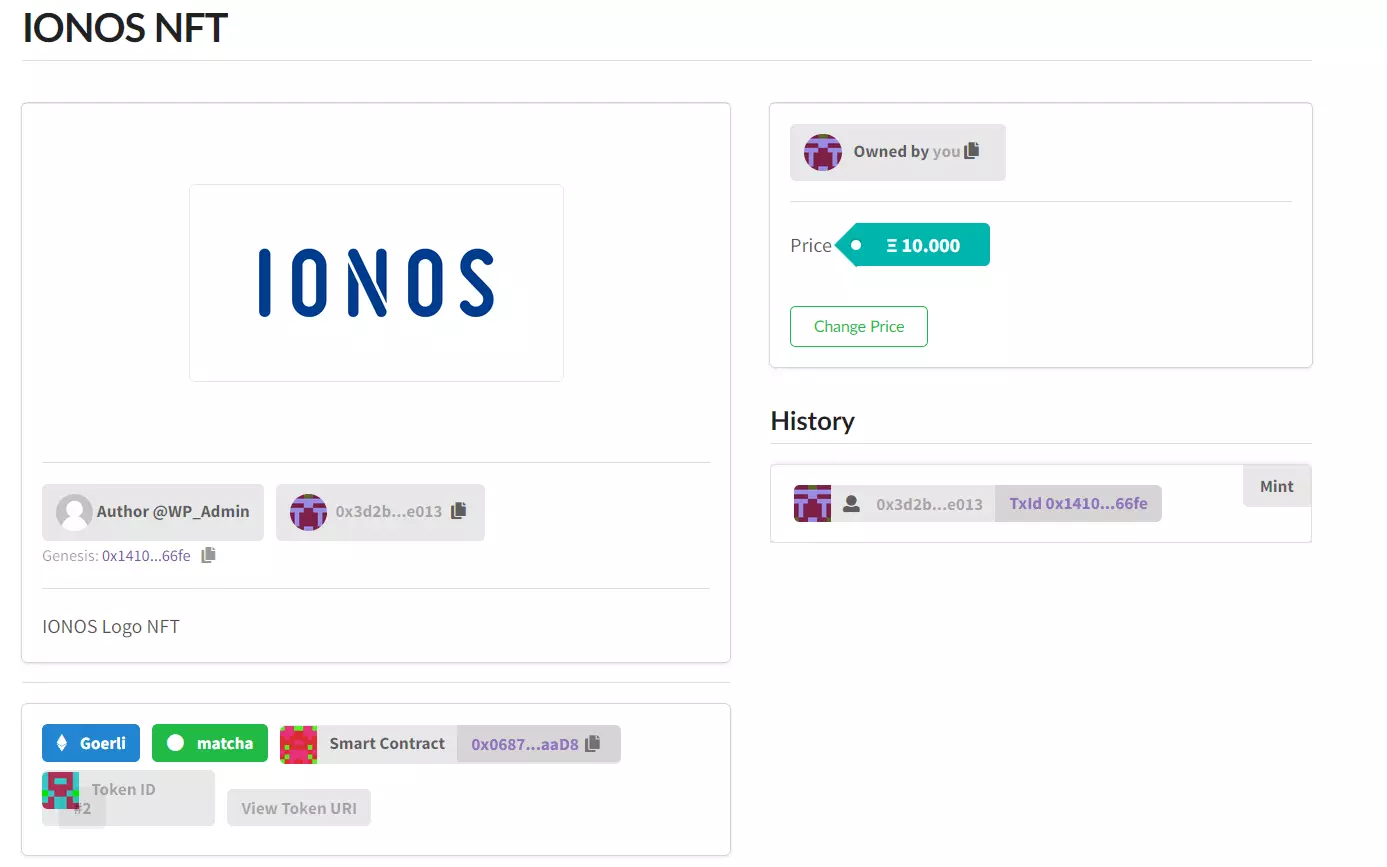
Use the corresponding URLs to open the marketplace and the NFTs you’ve created. If you need to, you can add additional categories and set up your store as you wish.
Are you an artist or interested in art? NFT Art is a cryptocurrency that was developed in 2021 to cater to the art world.

