Program Alexa Skills easily by yourself
With Alexa, Amazon operates a cloud-based voice service for the smart speakers distributed by the company – like the Amazon Echo, Echo Dot, Echo Show, or Echo Spot. A smart speaker is a loudspeaker connected to the internet with an integrated virtual assistant that receives commands through a voice interface and therefore facilitates various interactions.
Smart speakers facilitate the use of audio-based internet services and make it possible to control devices connected through Wi-Fi or Bluetooth as part of home automation (smart home). The Alexa voice assistant already offers various basic functions. Users can use their smart speaker to play music, listen to the news, traffic reports, and weather reports, or to provide calendar functions via voice commands. In combination with smart home devices, Alexa offers a vocal interface for controlling intelligent lamps, thermostats, or sockets.
Further functions can be installed as “skills.” In the Alexa Skills Store, there are more than 50,000 skills made by external developers available to users. These can be activated free of charge in some cases. If you want to be creative yourself, you can program your own Alexa Skills in just a few steps using the Alexa Skills Kit and AWS Lambda. We’ll show you how it works.
What is an Alexa Skill?
Alexa Skills are programs that can be activated online and extend the range the Alexa Language Service’s functions with certain abilities. Technically, an Alexa skill consists of a user interface (the “front end”) and the program logic (the back end). The front end of an Alexa Skill is any smart device that supports the Alexa voice service – for example, an Amazon Echo smart speaker or an appropriately equipped LG refrigerator. The program logic in the back end runs either on your own server or on the basis of AWS Lambda, a data processing service provided by Amazon.
AWS (Amazon Web Services) is a subsidiary of the US online mail order company Amazon. With its cloud computing platform of the same name, the company is one of the leading providers of on-demand IT resource provisioning with a usage-based billing model.
Requirements for Alexa skill development
Alexa Skills are developed using the Alexa Skills Kit (ASK) and made available to users through the Alexa Skills Store. Access to the Alexa Skills Kit is available with a free Amazon Developer account.
The Alexa Skills Kit (ASK) is a collection of self-service APIs, tools, documentation, and code samples that allows you to create your own Alexa Skills quickly and free of charge using pre-built building blocks if needed.
If you do not want to host your Alexa’s Skills’ program logic yourself, you will also need an AWS account that gives you access to the AWS Lambda processing service.
Tutorial: Create your own Alexa Skill in seven steps
The process of creating your first Alexa Skill to publishing your app takes 7 steps:
- In steps 1 and 2, you create a new Alexa Skill in the Amazon Developer Console and configure the interaction model for the voice interface.
- Based on the interaction model, you create an AWS Lambda function in step 3. This includes the program logic for your skill and runs on Amazon’s cloud computing platform AWS.
- In step 4, link the AWS Lambda feature to the Amazon Developer Console to make your skill available to Amazon devices.
- This is followed by a testing phase in step 5 and the validation and publication of your skill in steps 6 and 7.
We will outline developing an Alexa skill with a simple example.
Small business owner Jess runs a sandwich shop in Bend, Oregon. Flour Pot Sandwiches is popular with customers looking for a healthy, fast option. The sandwich shop is located in downtown Bend, and Jess would like to meet the needs of her customers and maintain an online presence listing her range of products and services. To this end, she will launch the store’s own website, as well as a skill for the Alexa voice service. The small business owner starts the development out small, first creating a skill with which her customers can access Flour Pot Sandwiches’ opening hours using the Alexa voice interface.
1. Preparation
To allow Alexa voice service users to develop their own Alexa Skills, Amazon provides the Alexa Skills Kit through the Alexa Developer Console as a development environment with a graphical web interface. The Alexa Developer Console is part of the Amazon Developer Console.
Log in to Amazon Developer. If you don’t have an Amazon Developer account yet, create a free one.
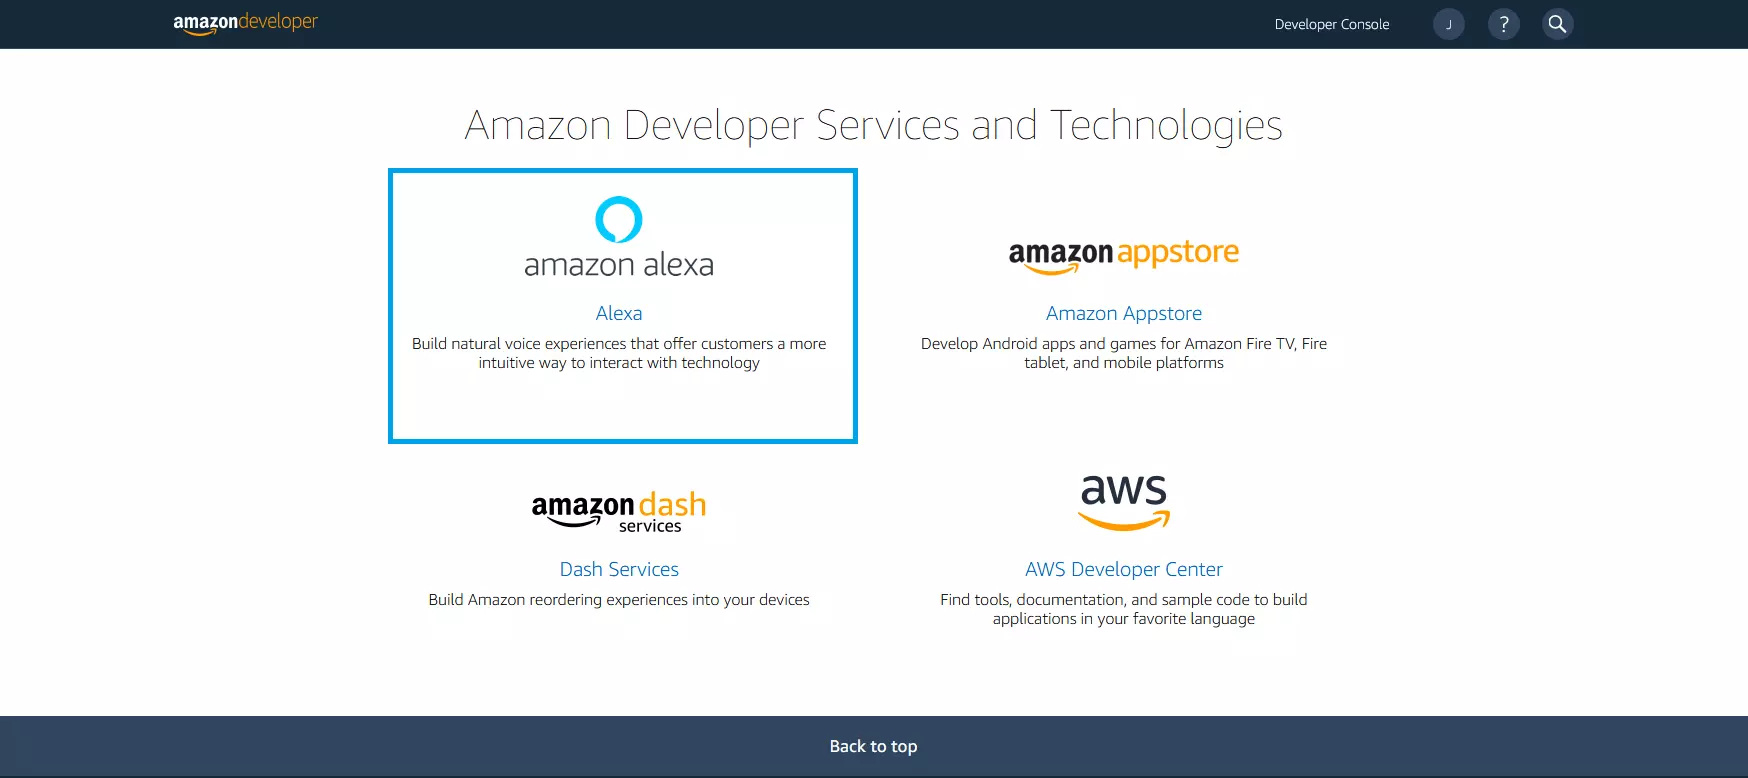
After logging in, you will be taken to the service overview. Select “Amazon Alexa” here.
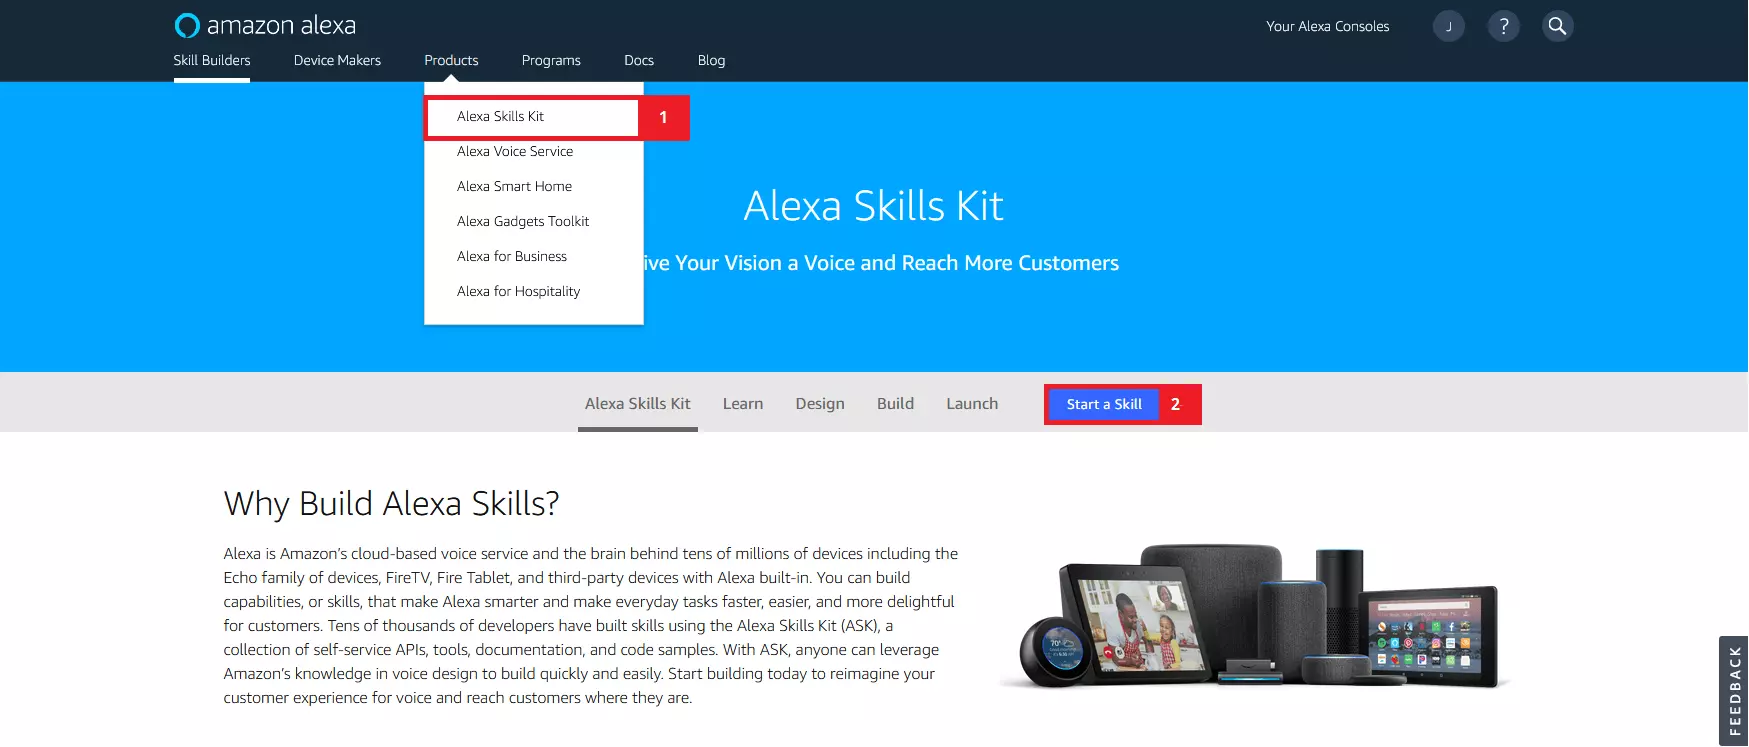
Click on “Alexa Skills Kit” in the drop-down menu under “Products” and then on “Start a Skill” to open the Alexa Developer console.
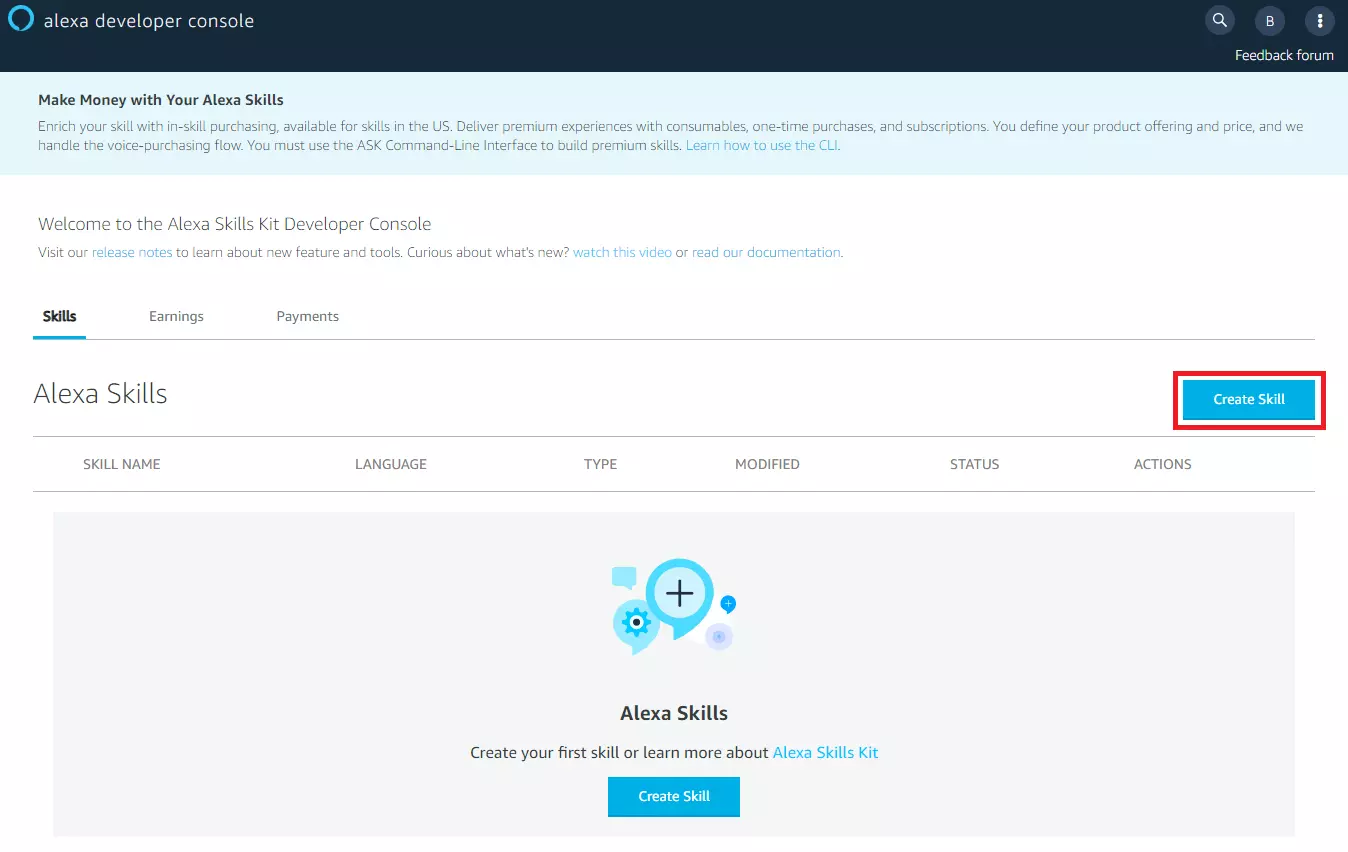
The Alexa Developer Console home page will show you all the Alexa Skills you have created yourself. If you log in for the first time, the list will be empty.
The Alexa Developer Console is currently available in English, Japanese, and Chinese only.
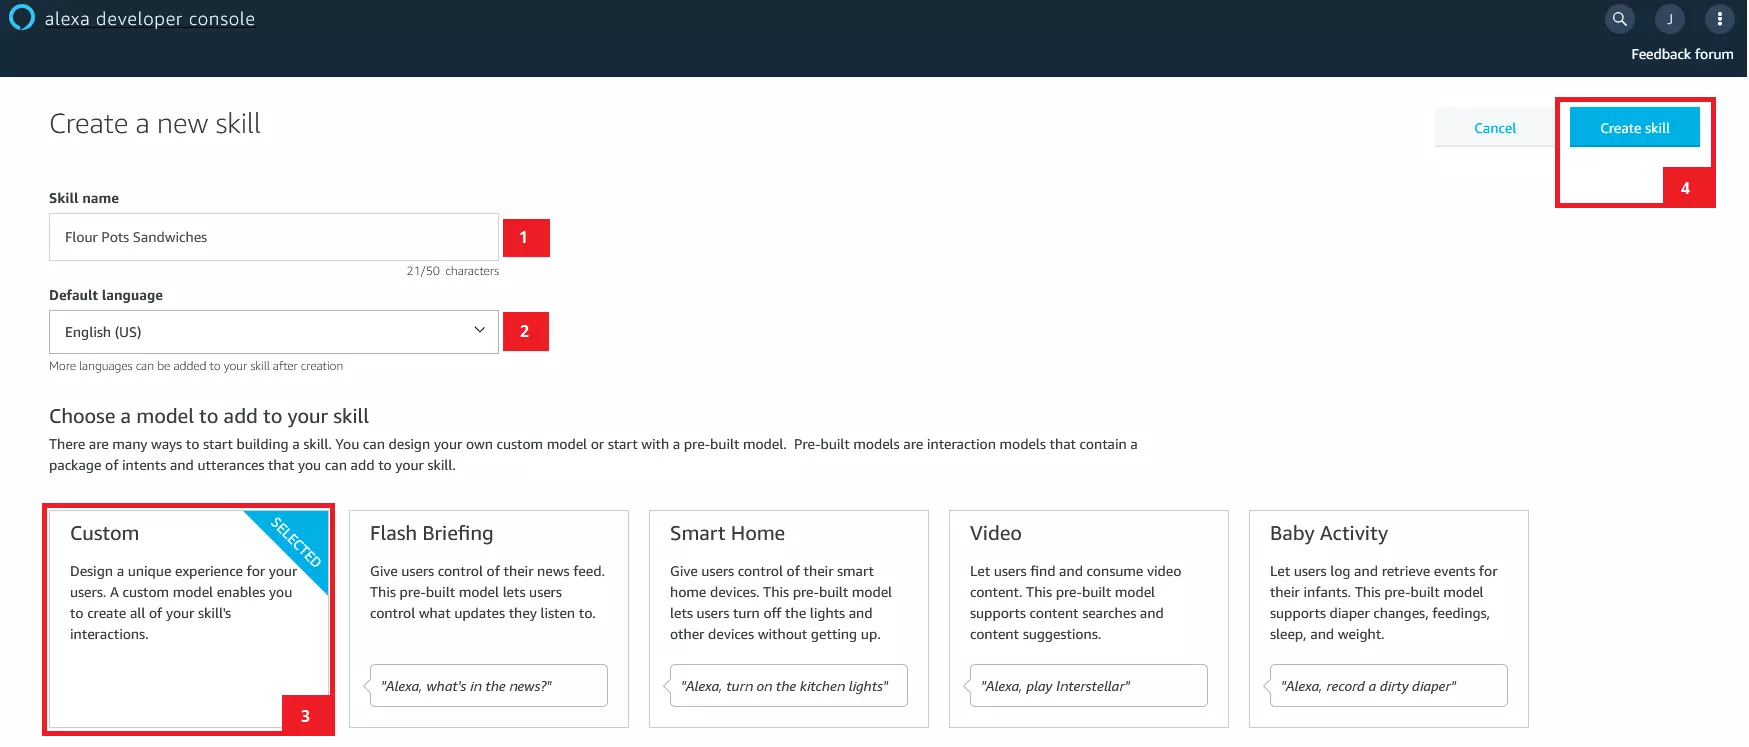
Name your skill, select the desired language, and choose one of four model types for your skill’s interaction model:
- Custom model (user-defined interaction model)
- Flash briefing model (predefined interaction model for news feeds)
- Smart home model (predefined interaction model for smart home applications)
- Video model (predefined interaction model for video applications)
In this Alexa Skills tutorial, we’ll show you how to create custom interaction models using the custom skill model.
Enter the display name for your Alexa skill as the “Skill Name.” In our example, we have chosen the name “Flour Pot Sandwiches.”
Then click on “Create Skill” to start the development process. You will automatically be redirected to the “Edit View” of the Alexa Developer Console.
If you want to customize or further develop an already created skill, click on the “Edit” button in the “Skill Overview” to switch to the “Edit View.”
2. Configure the interaction model using the Alexa Skills Kit
For the development of your Alexa Skill, there is a graphical user interface that reduces programming to a minimum. The “Edit View” of the Alexa Development Console is divided into five sections:
- Build (development)
- Test
- Distribution (publication)
- Certification
- Analytics
Use the tabs in the navigation bar at the top of the browser window to move from one area to the next.
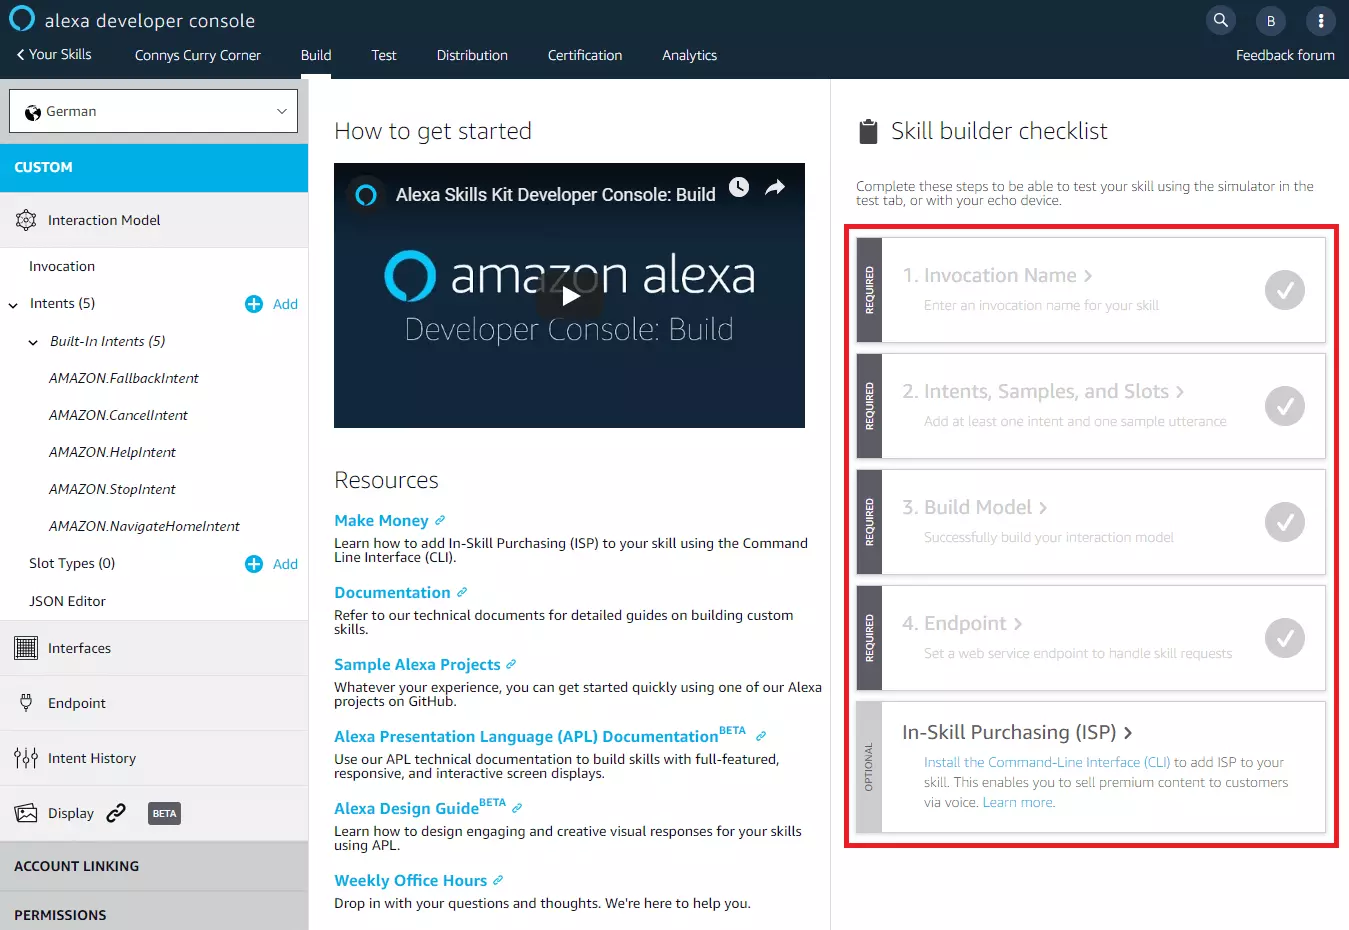
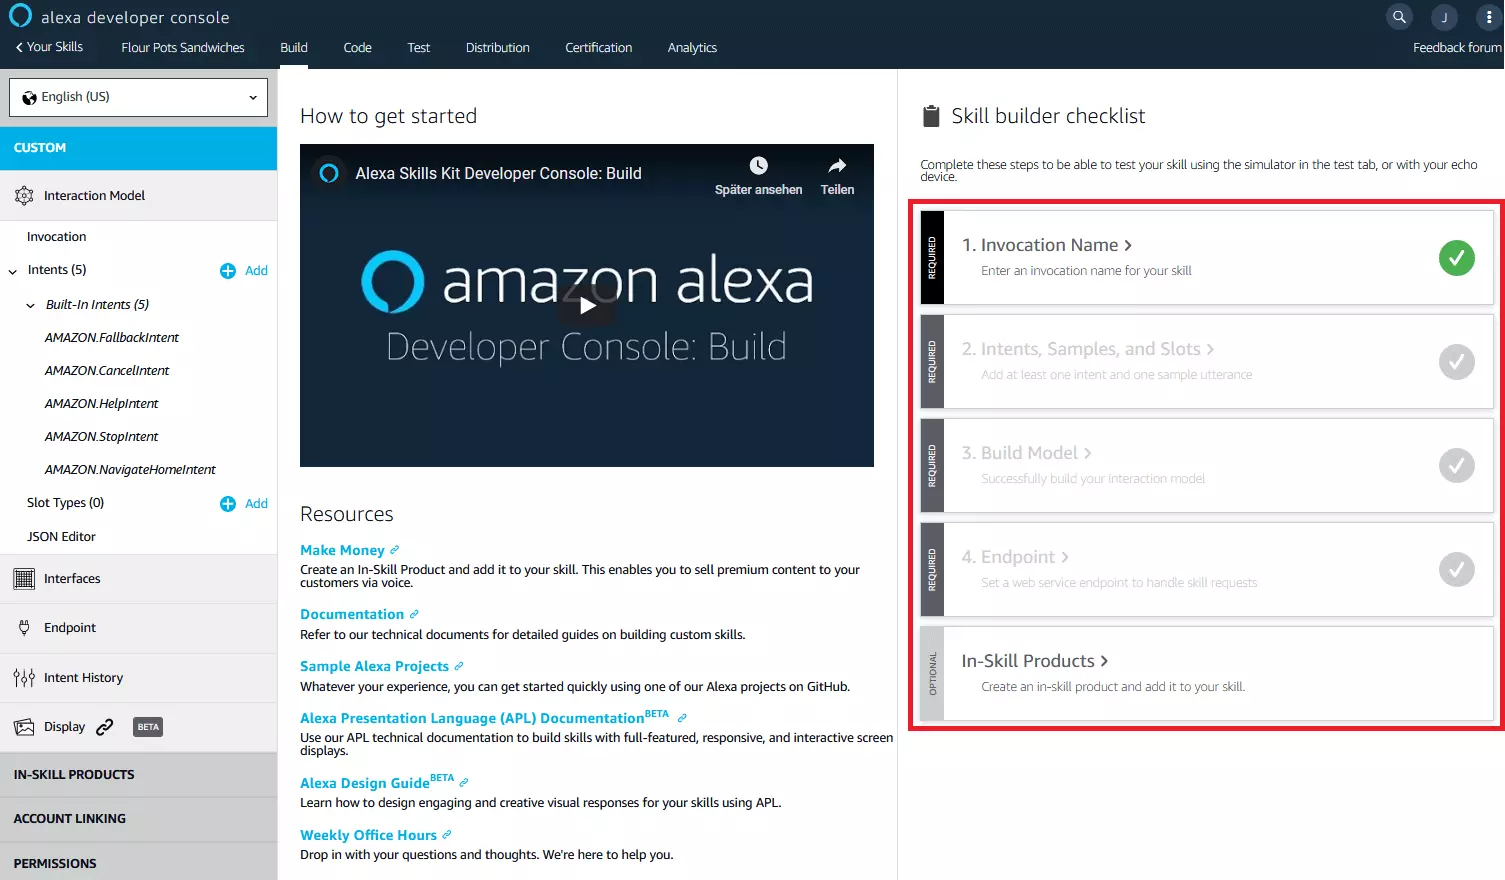
Start in the “Build” section to design an interaction model for your custom skill and train using the Alexa Skills Kit. The overview page of the build area is divided into three columns. The skill is created using the skill builder checklist in the right column and consists of four configuration steps:
- Select invocation name
- Define intents and example statements
- Create model
- Select web service endpoint
If you have completed one of the required steps, a green checkmark will indicate this.
Start a configuration step by clicking on the corresponding button in the skill builder checklist. Alternatively, you can call up the individual configuration areas through the menu bar on the left-hand side column. This also includes a JSON editor and a menu item for selecting the user interfaces.
In the middle column of the overview page you will find information material on Alexa Skill development, as well as a video on the selected area of the Alexa Developer Console.
Select invocation name
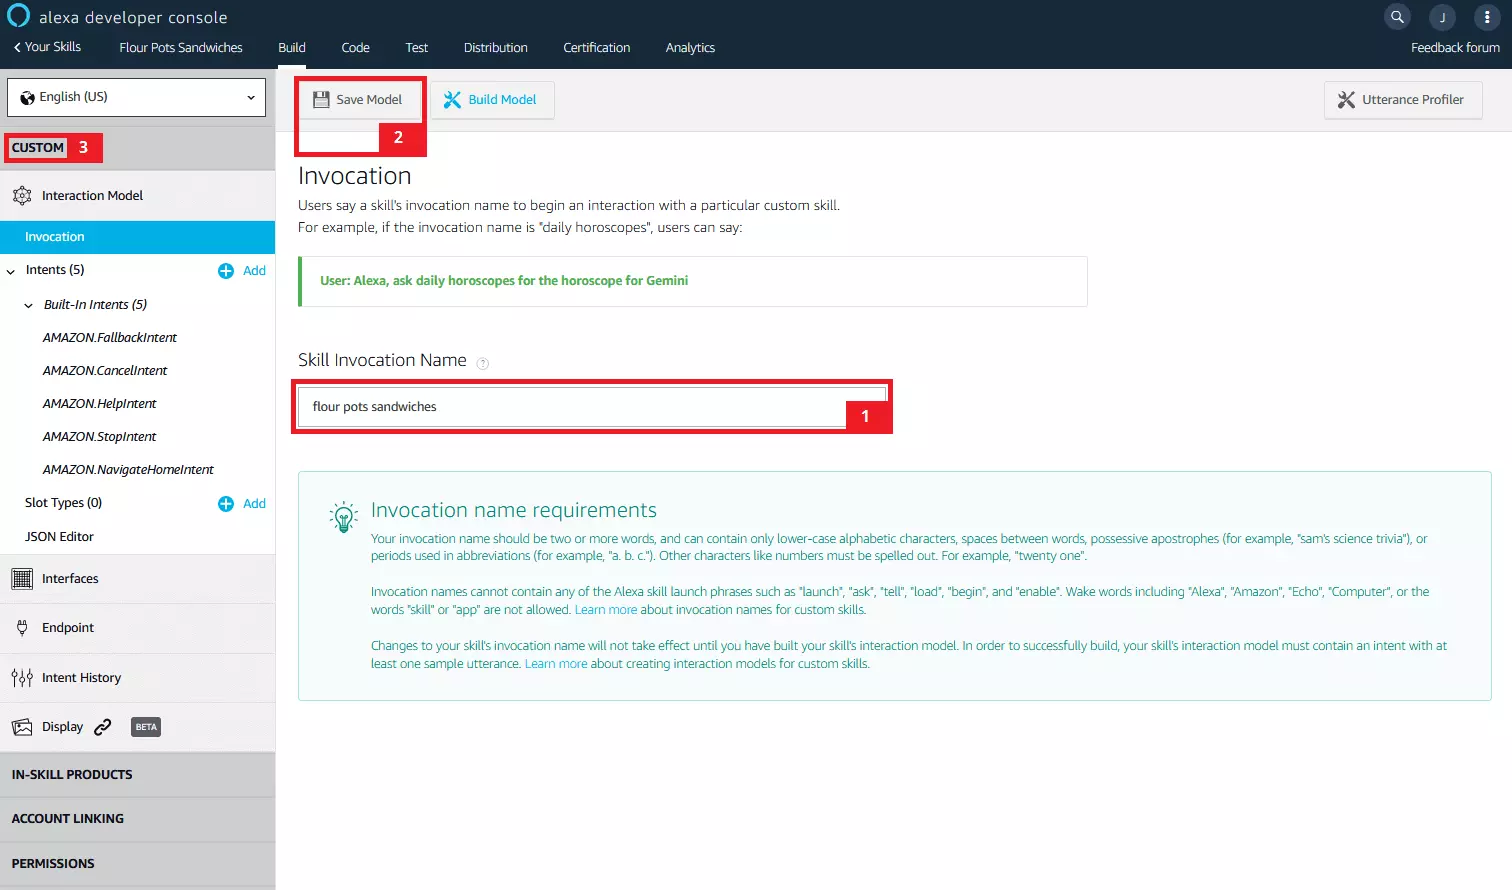
First you define your Alexa skill’s invocation name. Click on step 1 of the skill builder checklist or select the menu item “Invocation” in the left column to open the corresponding configuration area.
The invocation name is the term used by users to refer to your skill. The invocation name may be the same as the skill name, but may differ from it if necessary.
Enter the desired invocation name in the field provided. Please note the following prerequisites:
- Use an invocation name with two or more words
- Separate the words with spaces
- Use lowercase letters only
- Put the invocation name in quotation marks if you use an apostrophe or an abbreviation with a period
- Numbers or other special characters must be written in full
The invocation name must not contain any of the Alexa skill start phrases like “launch,” “ask,” “tell,” “load,” “open,” or “play,” nor should it contain wake-up words like “Alexa,” “Amazon,” “Echo,” or “Computer” that are used to address the smart speaker. Also the words “skill” and “app” are not allowed.
Define intents and example statements
With intents, you define actions that your Alexa skill performs as soon as a user uses a specific language pattern. You define what potential skill users might say, what the intention is and how your skill reacts. Each custom skill already contains five preset intents that need to be implemented later. In addition, you can add either pre-built or custom intents to your skill as needed.
Proceed as follows to create a custom intent:
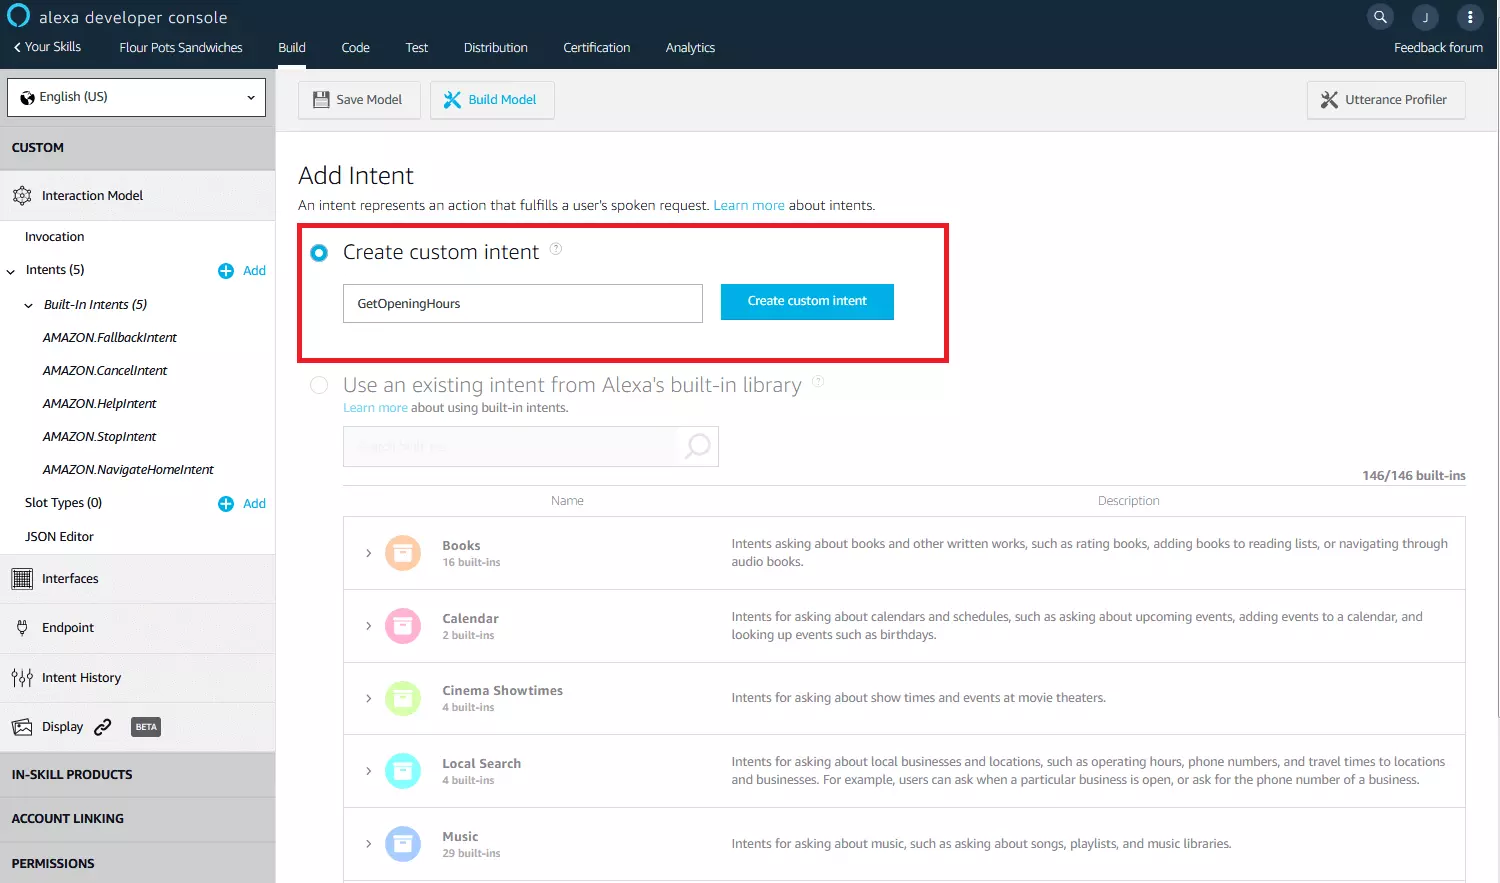
Name the new intent and click “Create custom intent.”
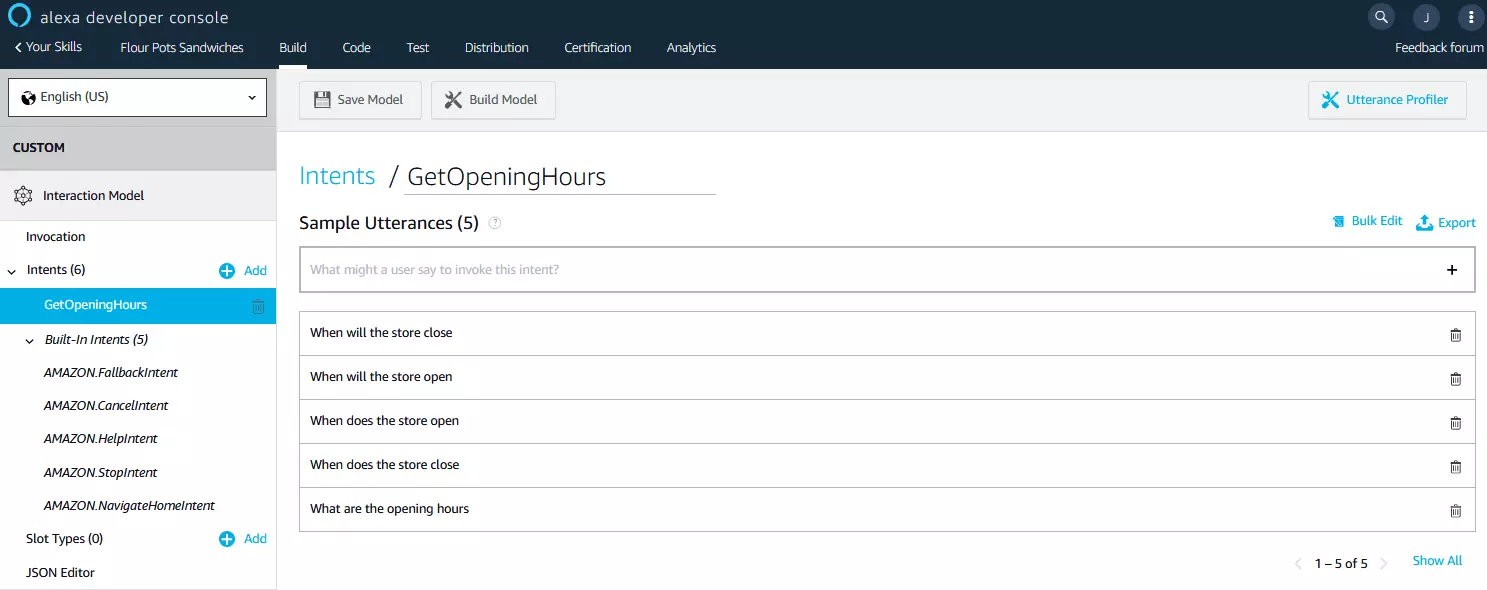
Define sample utterances with which users can call up the new intent. Enter the desired phrase in the text field provided and click on the plug sign (+).
We would like the program to call up an intent for your Alexa skill that allows users to request our store’s opening hours. We call the intent “GetOpeningHours” and enter the example phrases for it, with which users could possibly ask for the desired information.
The defined language patterns are then automatically extended by the Alexa Development console through machine learning. However, this only works if the system has a sufficiently large data basis at its disposal. You should therefore enter at least eight (preferably around 30) sample statements with the desired intention.
If you have entered a sufficient number of sample statements, return to the overview through the “Custom” button to create the model and train it through machine learning.
Create model
Proceed as follows to create your Alexa skill’s interaction model based on the settings you have made:
Click on “Build Model” in the skill builder checklist. The Amazon Developer console will play a push message informing you that the build process has started.
Wait until the console notifies you that your interaction model has been successfully created.
If you want to change the invocation name, the intents or the sample statements afterwards, you just have to restart the build process to create a new model.
Select web service endpoint
Step 4 of the skill builder checklist includes selecting the web service endpoint. There are two options to choose from. Your Alexa skill’s program logic can be executed either as a Lambda function on the AWS cloud computing platform or through HTTPS on your own web server.
If you want to run to the program logic on your own resources, you need a web server that meets the following requirements:
- Connection to the internet
- HTTPS through an Amazon recognized SSL/TLS certificate
- Port 443 is available for inquiries
If you would like to use AWS Lambda for hosting, you will need a user account for the Amazon Web Service.
In this tutorial, we will focus on AWS and create the Alexa Skill’s program logic as a Lambda function.
Activate the checkbox for AWS Lambda ARN. ARN stands for “Amazon Resource Name.” It is a unique name for an AWS resource, like a Lambda function.
Before you can use ARN to refer to a Lambda function that contains your skill’s program logic, you must first create it in the AWS console. We will show you how to do this in step 3 of this Alexa Skills tutorial.
Optional: programming interfaces
Alexa Skills can be extended by various APIs (programming interfaces), which offer you additional possibilities to provide multimedia contents or to integrate external devices. The following table shows a selection of the available APIs.
| Interface | Description |
|---|---|
| Audio player API | The audio player API extends the program code of a skill to include all requirements for playback of audio streaming content. |
| Display API | In addition to the voice interface, an Alexa skill which has been enhanced with the display API enables interaction through the Echo Show’s screen. |
| Video app API | A skill with video app API can play video streaming content on the Echo show. |
| Alexa gadget API | The gadget API can be used to develop Alexa Skills that allow interactions with Alexa accessories. |
3. Create program logic for AWS Lambda
The AWS Lambda data processing service is part of Amazon Web Services. Register first for a free AWS account.
You do not incur any costs when registering your AWS account. These costs are only incurred when you use AWS resources. For the first 12 months, Amazon will make selected services available free of charge to a certain extent to newly registered users. At AWS Lambda, the free service currently includes 1 million requests per month and 3.2 million seconds of computing time per month.
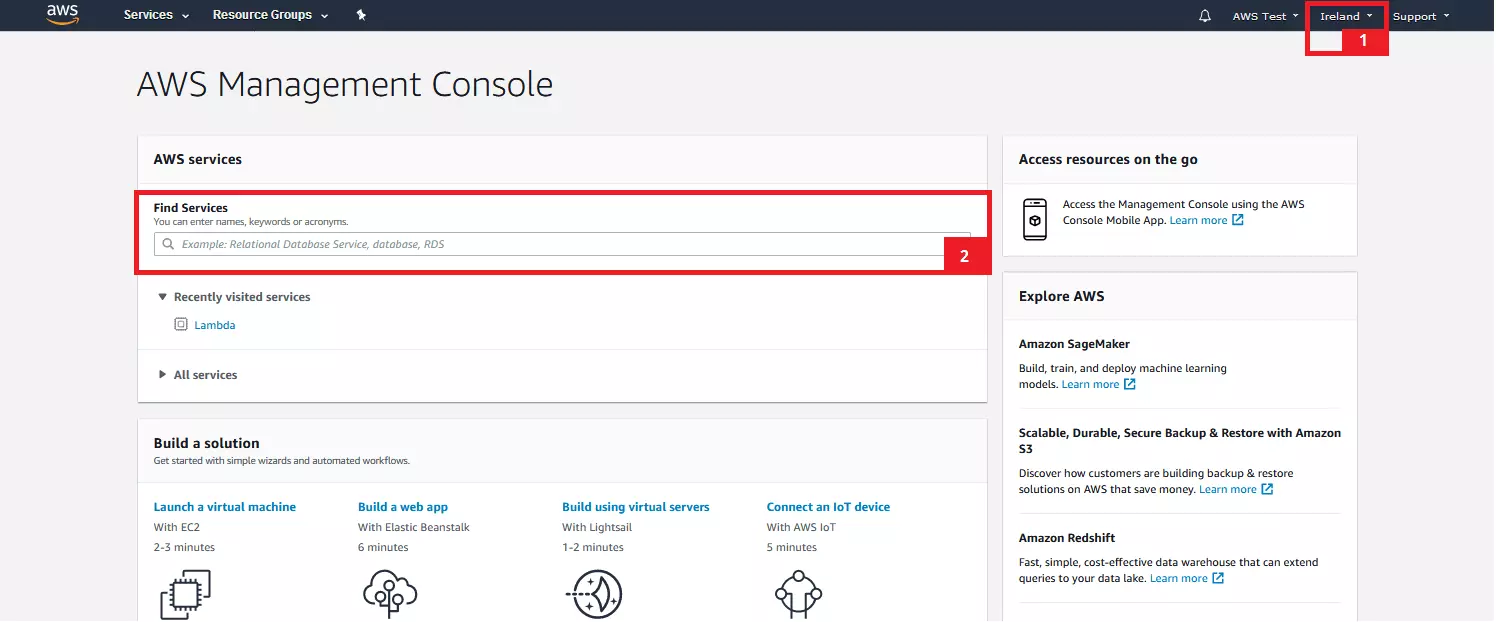
Log in to your AWS account and select “AWS Management Console” under “My Account.”
The AWS Management Console is a browser-based interface that you use to access and manage Amazon Web Services.
First, make sure your console is set to the region where you want to offer your Alexa Skill. Select the regional setting “US” if you want your skill to be available to users in the US.
On the AWS Lambda data processing service home page, the AWS console displays an overview of the Lambda functions you have created. If you have not yet created any functions, the list will be empty.
Click on the “Create function” to start the configuration process for a new Lambda function.
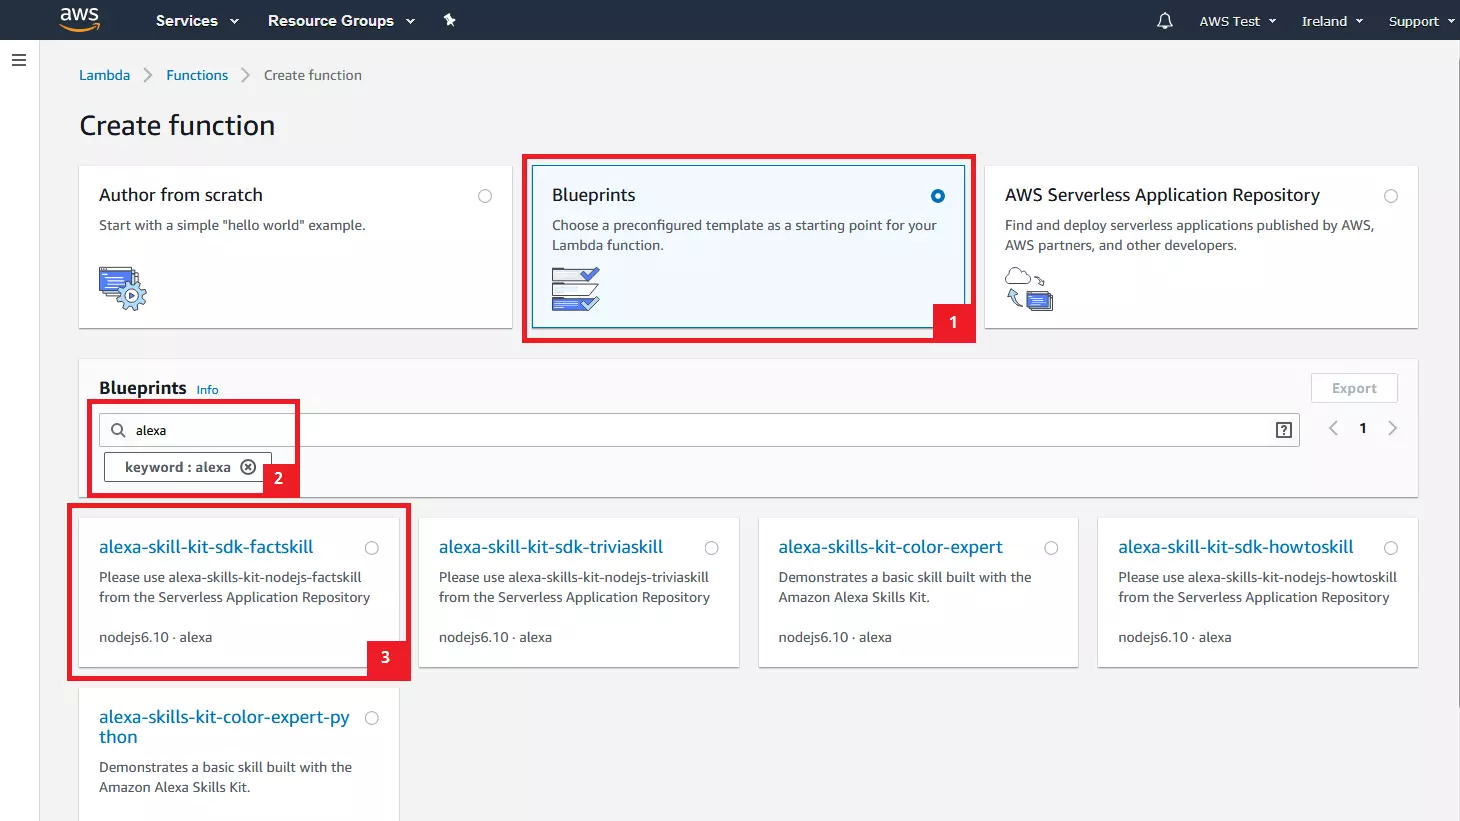
AWS Lambda functions can be created from scratch, using a preconfigured template, or based on an application provided by AWS or AWS partners in the AWS serverless application repository.
Since we have to rely on various libraries for the program logic of our Alexa Skill, the creation on the basis of a template is a good idea.
Select the option “Template” and enter the keyword “Alexa” into the search mask.
In this case, it does not matter which template you choose, since we only need the underlying libraries and completely overwrite the program code in the following steps.
For the tutorial, we chose the template “alexa-skill-kit-sdk-factskill” based on Node.js 6.10.
Confirm your selection by clicking on “Configure.”
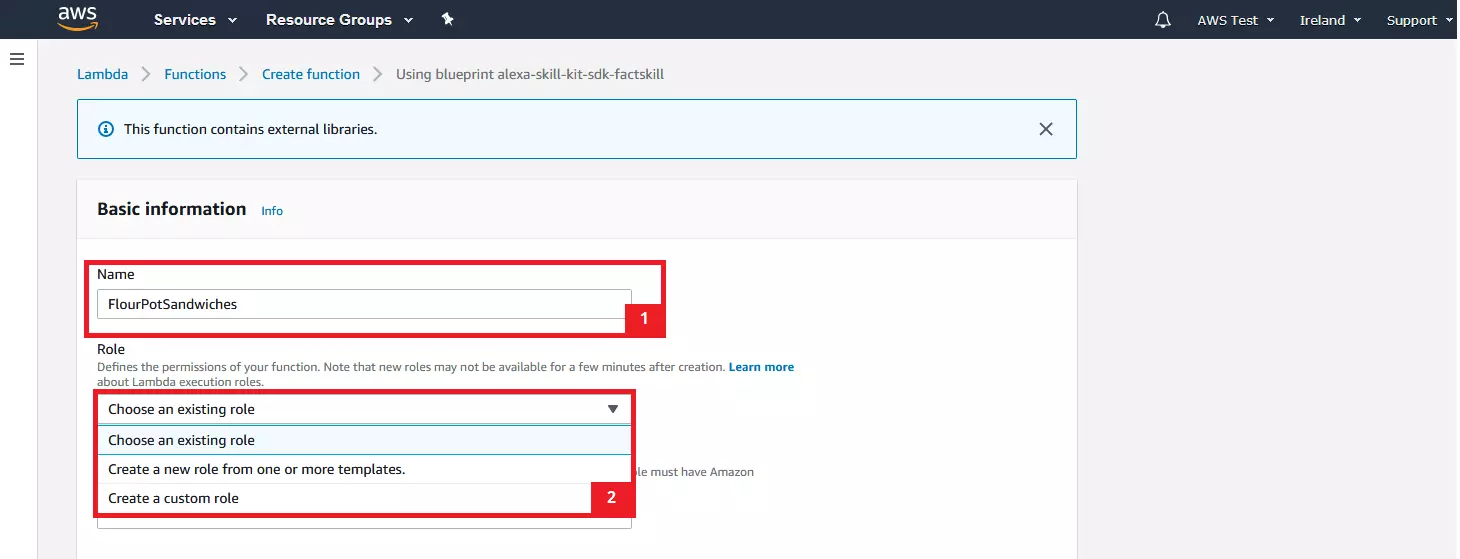
In the next step, select a name and the desired Lambda execution role. The latter defines the function’s authorizations. In line with our example, the function should be called “FlourPotSandwiches.” To define their authorizations, we click on “Create a user-defined role” in the drop-down menu under role.
The AWS Management Console informs you that your function contains external libraries.
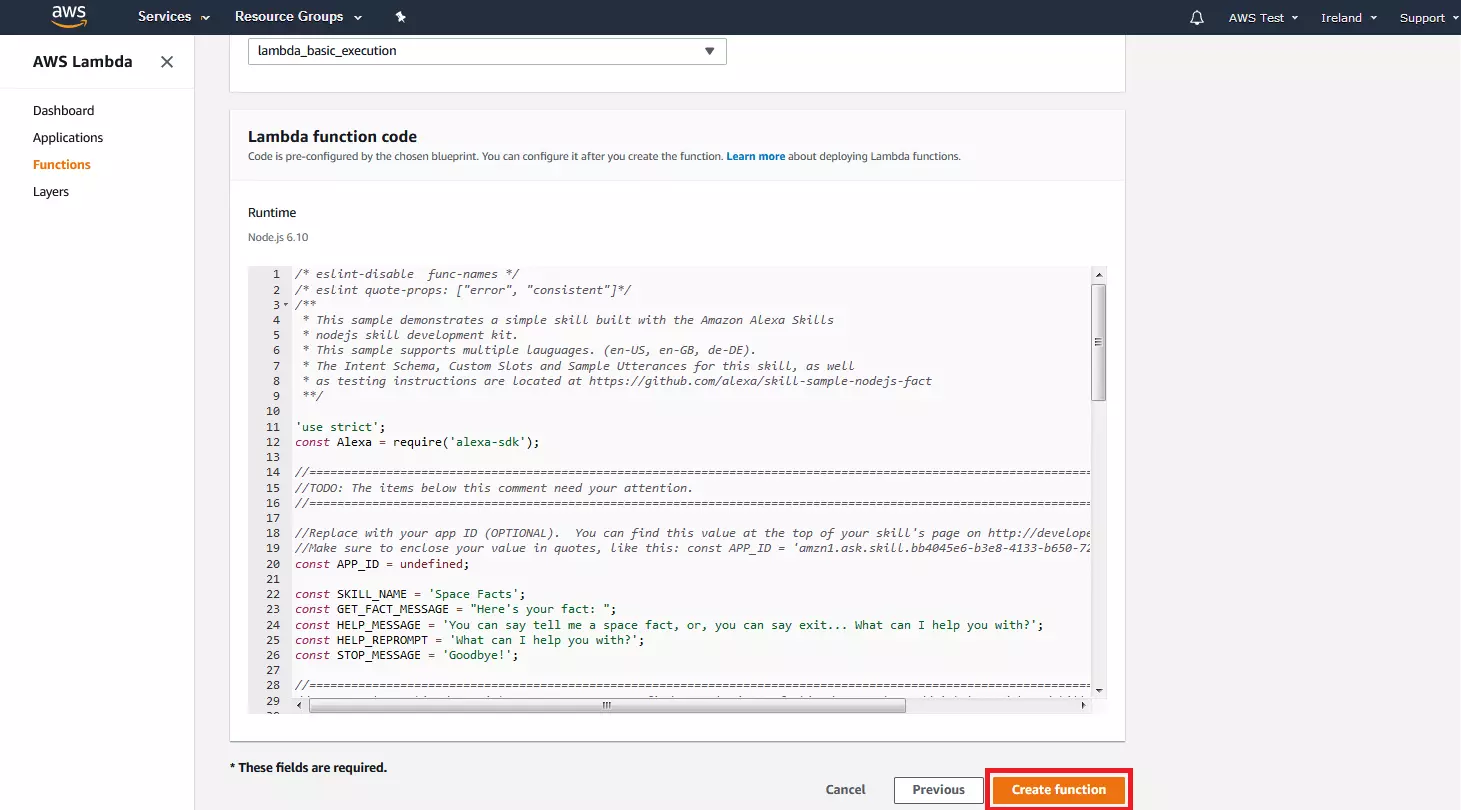
Do not change anything here and confirm the setting with “Allow.” The Lambda function is created with the role “lambda_basic_execution”. The tab closes automatically.
In the lower area of the configuration mask, you will find the template’s Lambda function code. You do not need to pay attention to this at first. Instead, click on “Create function.”
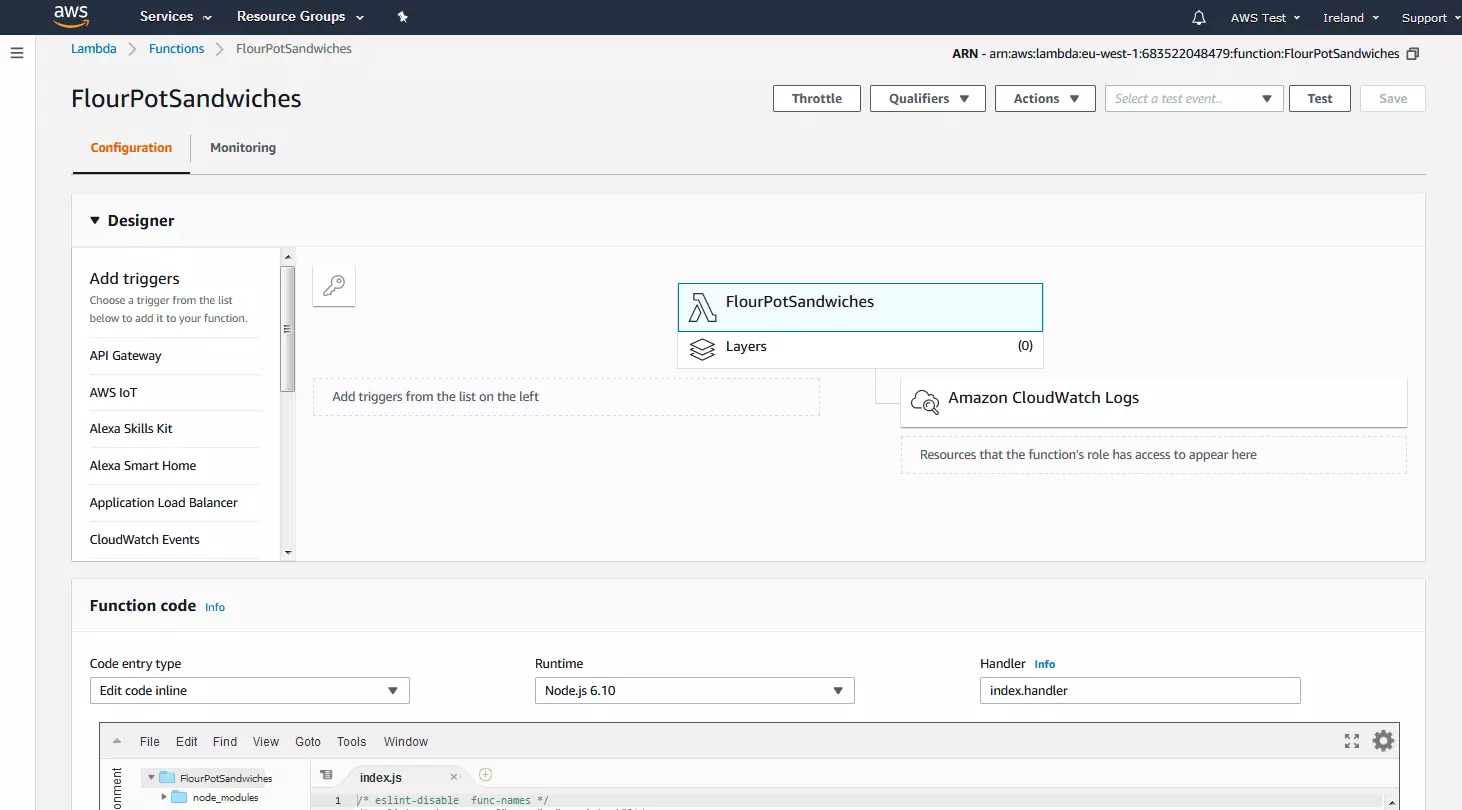
After your Lambda function has been created, you are automatically forwarded to the Lambda function’s configuration overview, where you make all further settings.
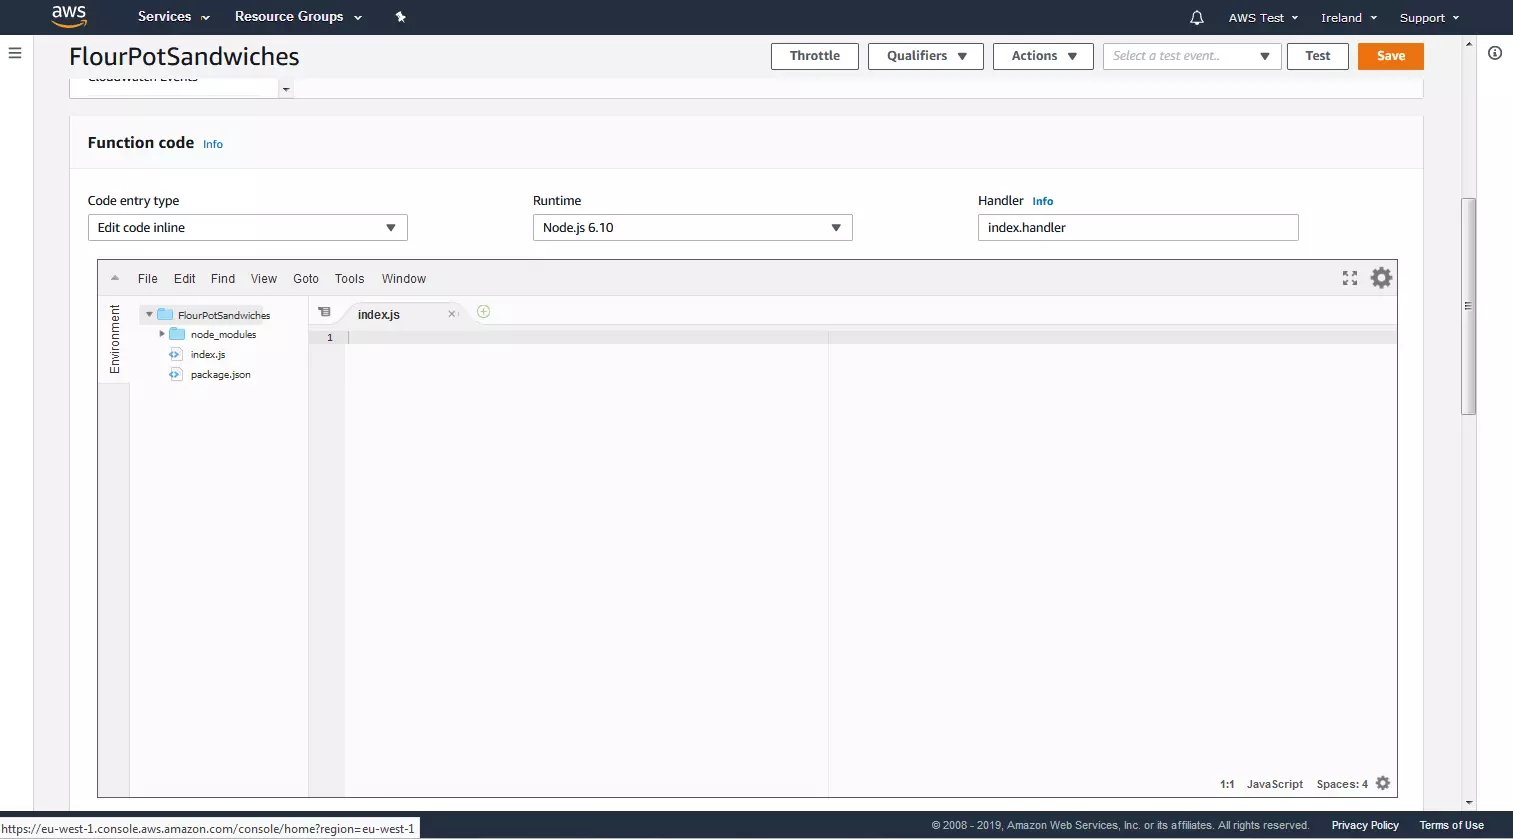
In the upper area of the configuration overview, you will find the function designer and an editor with which you can manually intervene in the function code. The editor is followed by further configuration buttons, which are not discussed in detail in this Alexa Skill tutorial.
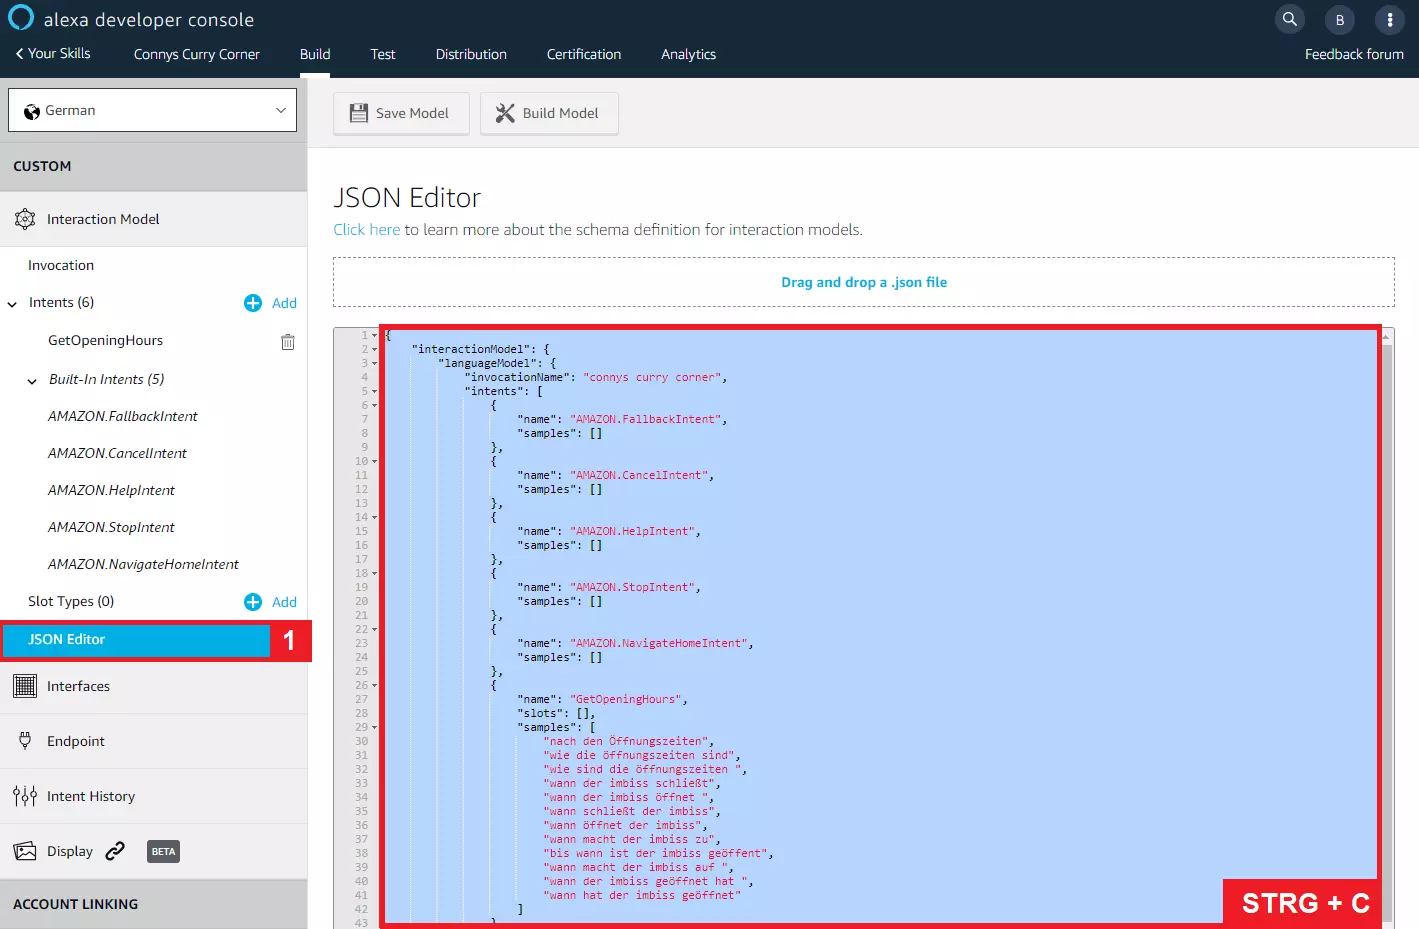
Now switch to the Amazon Developer Console and open the interaction model of your Alexa skill in the JSON editor. The corresponding button can be found in the navigation menu on the left side of the window.
Mark the entire JSON code with [Ctrl] + [A] and copy it to the clipboard with [Ctrl] + [C].
The interaction model for our sample skill “FlourPotSandwiches” looks as follows:
The code shows the previously created interaction model in JSON format.
JSON (JavaScript Object Notation) is a compact, text-based data exchange format that is easy for both humans and machines to process. Data in JSON format is stored either as name-value pairs or as ordered lists.
Our JSON document contains the intents of our Alexa Skill, as well as the sample statements assigned to the intents (if available). It therefore includes all interaction possibilities that are available on the user page.
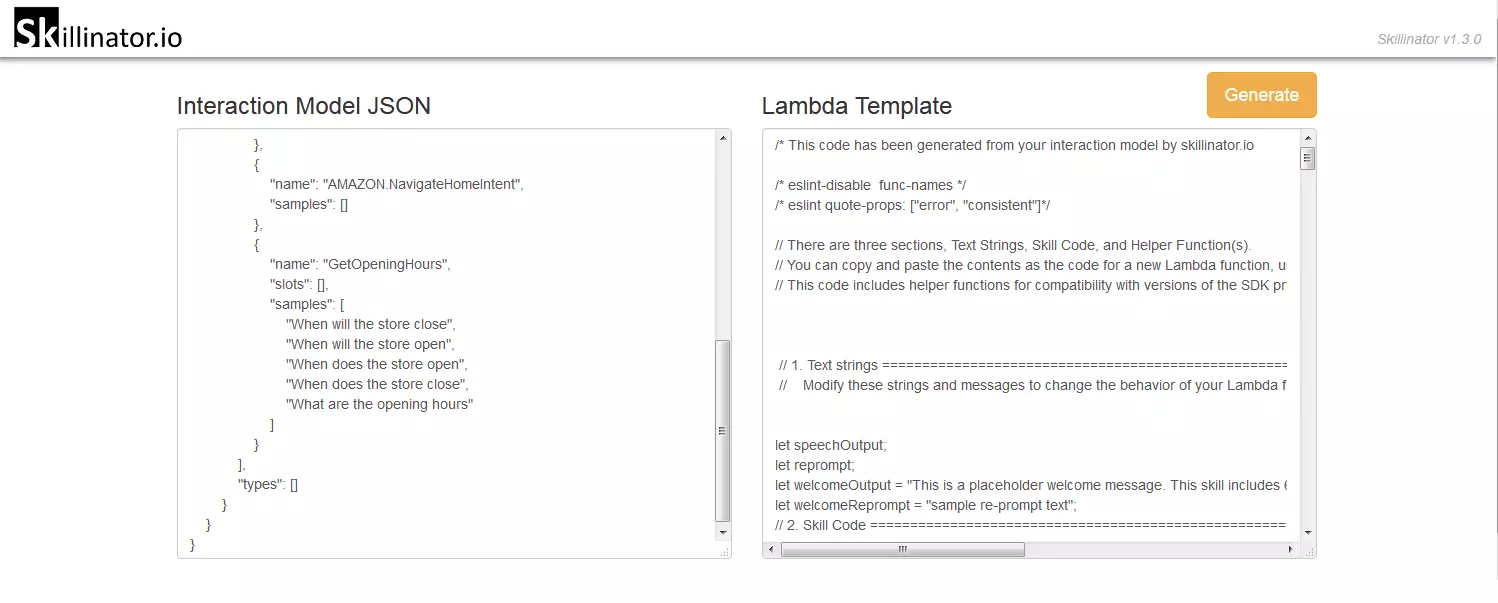
How our skill reacts to user signals is defined in our Lambda function’s code. For this, we used the web app Skillinator.io. With this free tool, you can convert an interaction model in JSON format into a valid Lambda template with just one click.
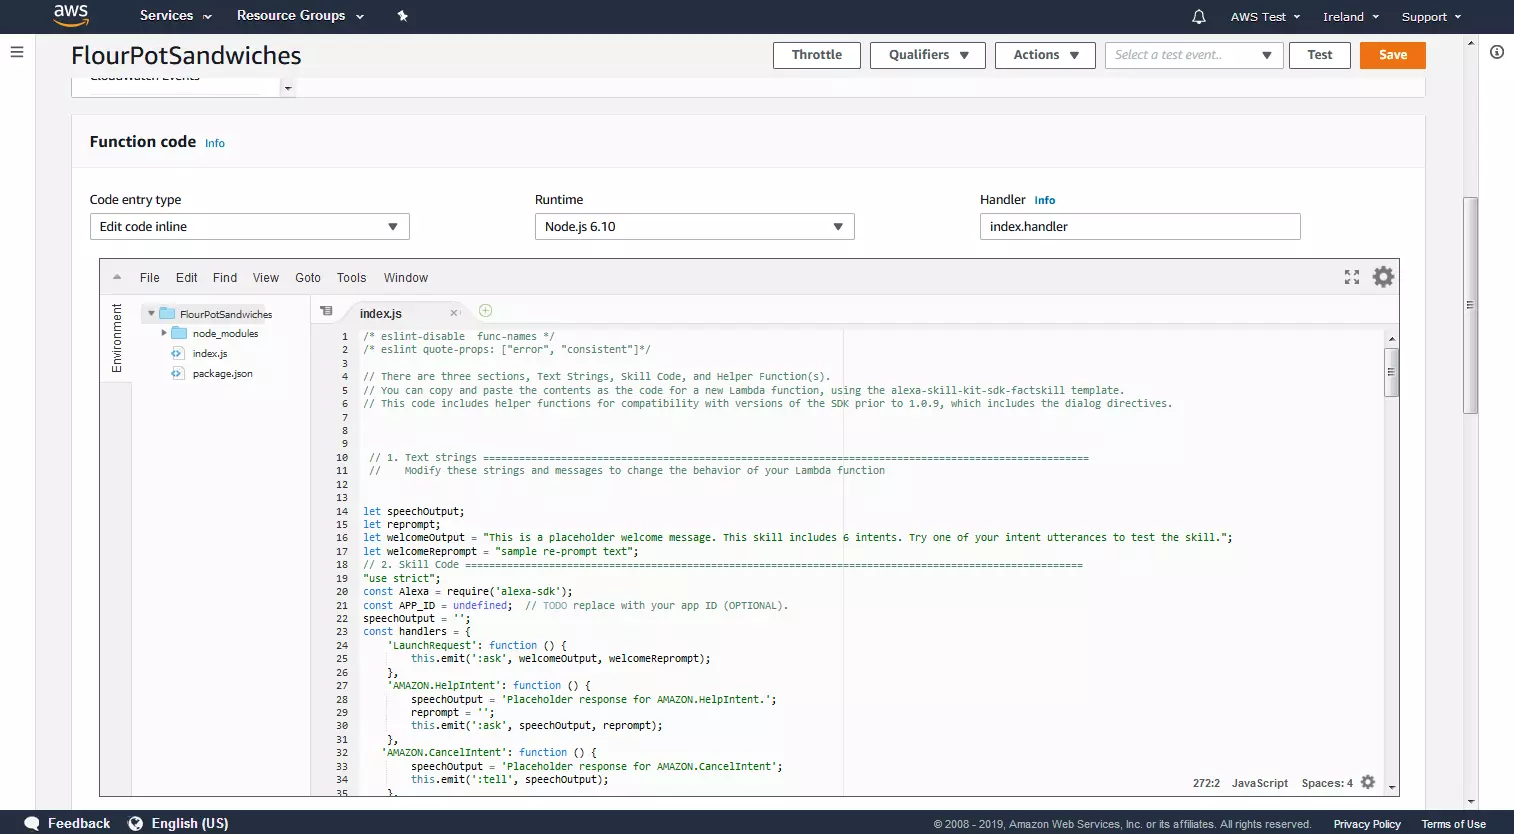
Copy the generated Lambda template to the clipboard and call up the configuration overview of your Lambda function in the AWS Management Console. Now, insert the template as the function code for your Lambda function. Click on “Save” to accept the change.
You have now created a Lambda function with valid program logic. However, essential sections of the function code are filled with placeholders – for example, the speech output that Alexa plays as soon as a user utters a phrase that corresponds to the intent defined above.
In the following, it is therefore necessary to go through the template created with Skillinator.io line by line and rewrite the corresponding sections manually.
In this Alexa skill tutorial, we limit the adaption of the function code to the welcomeOutput and the speech output for the intent “GetOpeningHours” defined in the interaction model. In practice, however, you should define an individual speech output for all intents of your skill.
The welcomeOutput is defined by the variable of the same name and is located in the area “1. Text strings.” We replace the placeholder “This is a placeholder welcome message. This skill includes 6 intents. Try one of your intent utterances to test the skill” by a user-defined greeting.
The welcomeOutput is supplemented by a welcomeReprompt. Here you define what Alexa should say if the user does not respond to the welcome prompt.
For voice applications, always work with variations. Make the interaction with your skill as varied as possible. For example, the reprompt should always be a reformulation of the first output played.
Then scroll to the area “2nd Skill Code.” Here, we find six intent-slots according to our interaction model – the five preconfigured intents as well as our self-defined intent “GetOpeningHours.”
The Intent “GetOpeningHours” corresponds to the intention of a user to inquire about Flour Pot Sandwiches opening hours. We replace the placeholder “This is a placeholder response for the intent named GetOpeningHours. This intent has no slots. Anything else?“ with an answer corresponding to the intent.
After we have saved the changes, our self-developed Alexa Skill is theoretically ready for the first test run. For this, we first have to link the Lambda function “FlourPotSandwiches” with the skill’s web configuration in the Alexa Developer Console.
4. Link interaction model with AWS Lambda function
In order for our Alexa skill to be accessed by users through a smart speaker, a link on both sides is required. Proceed as follows:
- First, we define the interaction model configured in the Alexa developer console as a trigger for the AWS Lambda function.
- We then enter the Lambda function FlourPotSandwiches in the Alexa developer console as the web service endpoint for the skill.
Defining an interaction model as a trigger
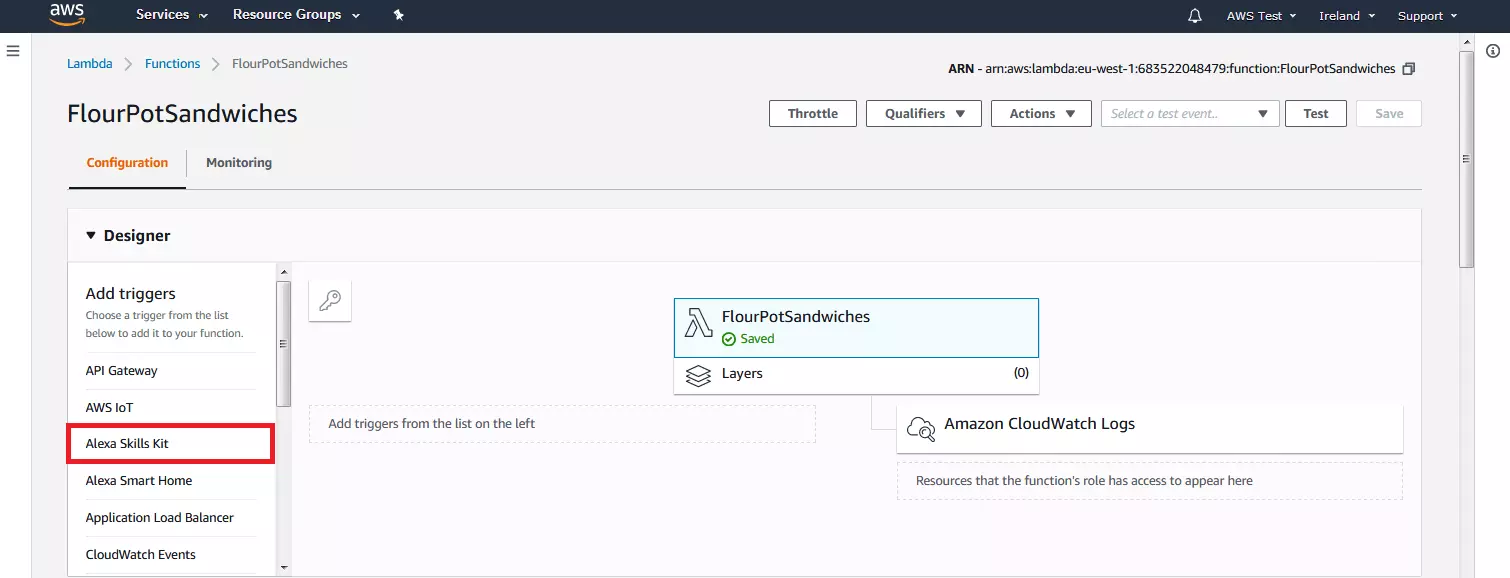
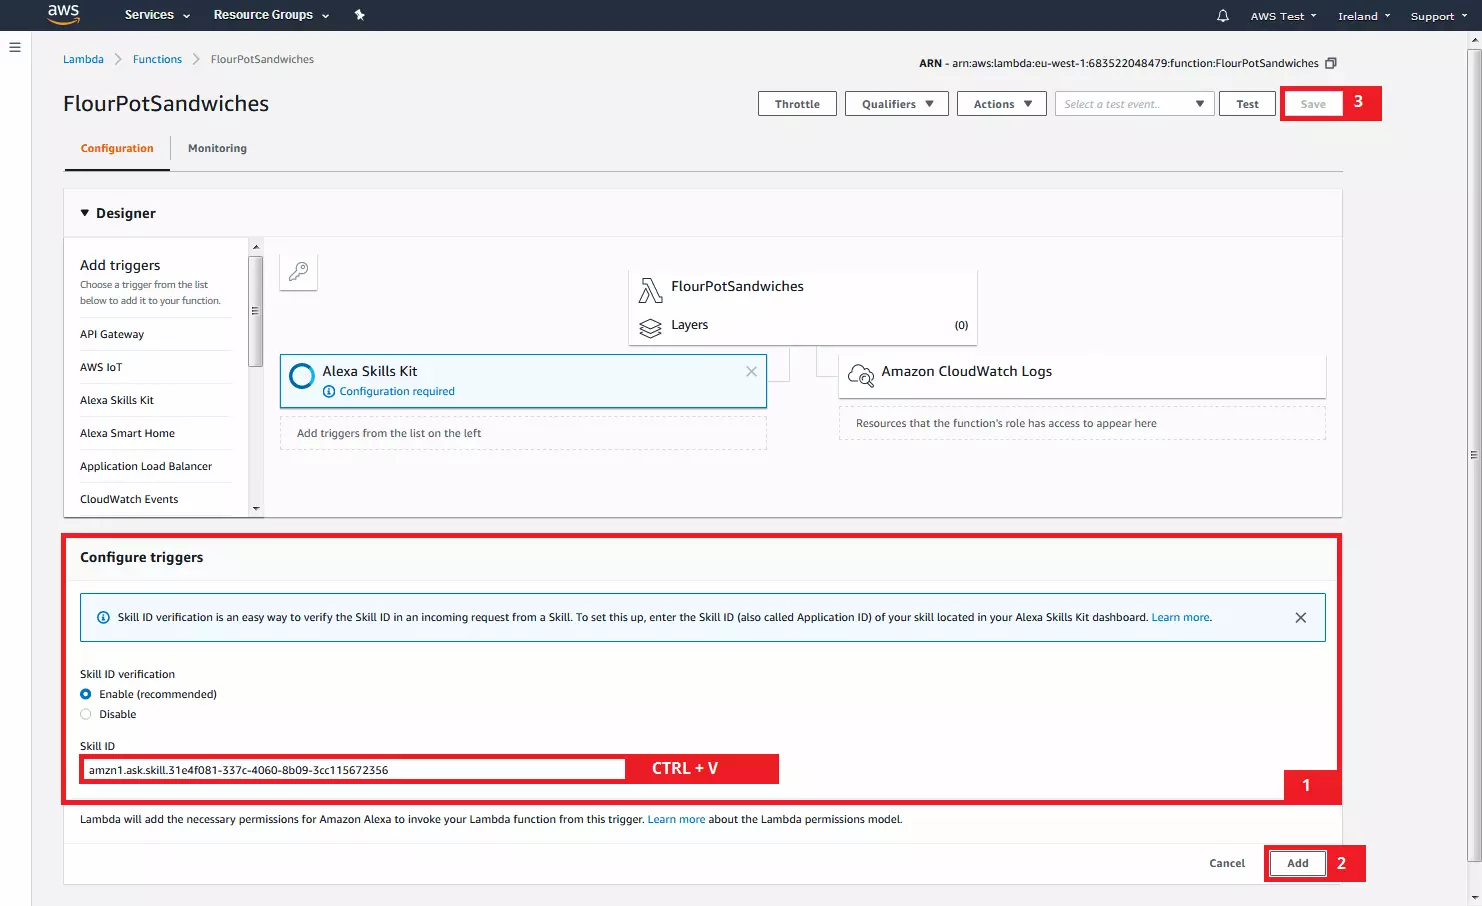
The Alexa Skills Kit is now listed as a trigger in the graphical representation of your Lambda function, but requires further configuration.
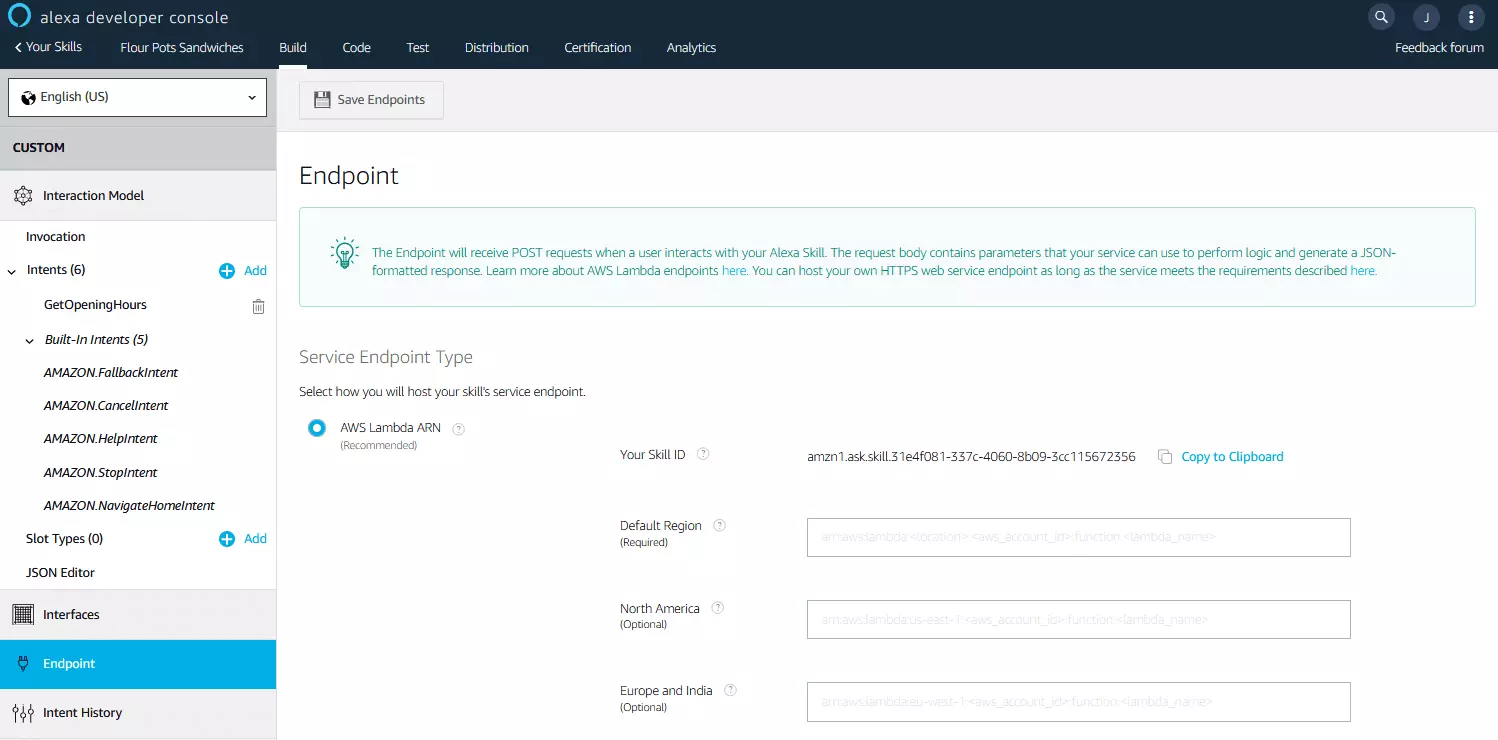
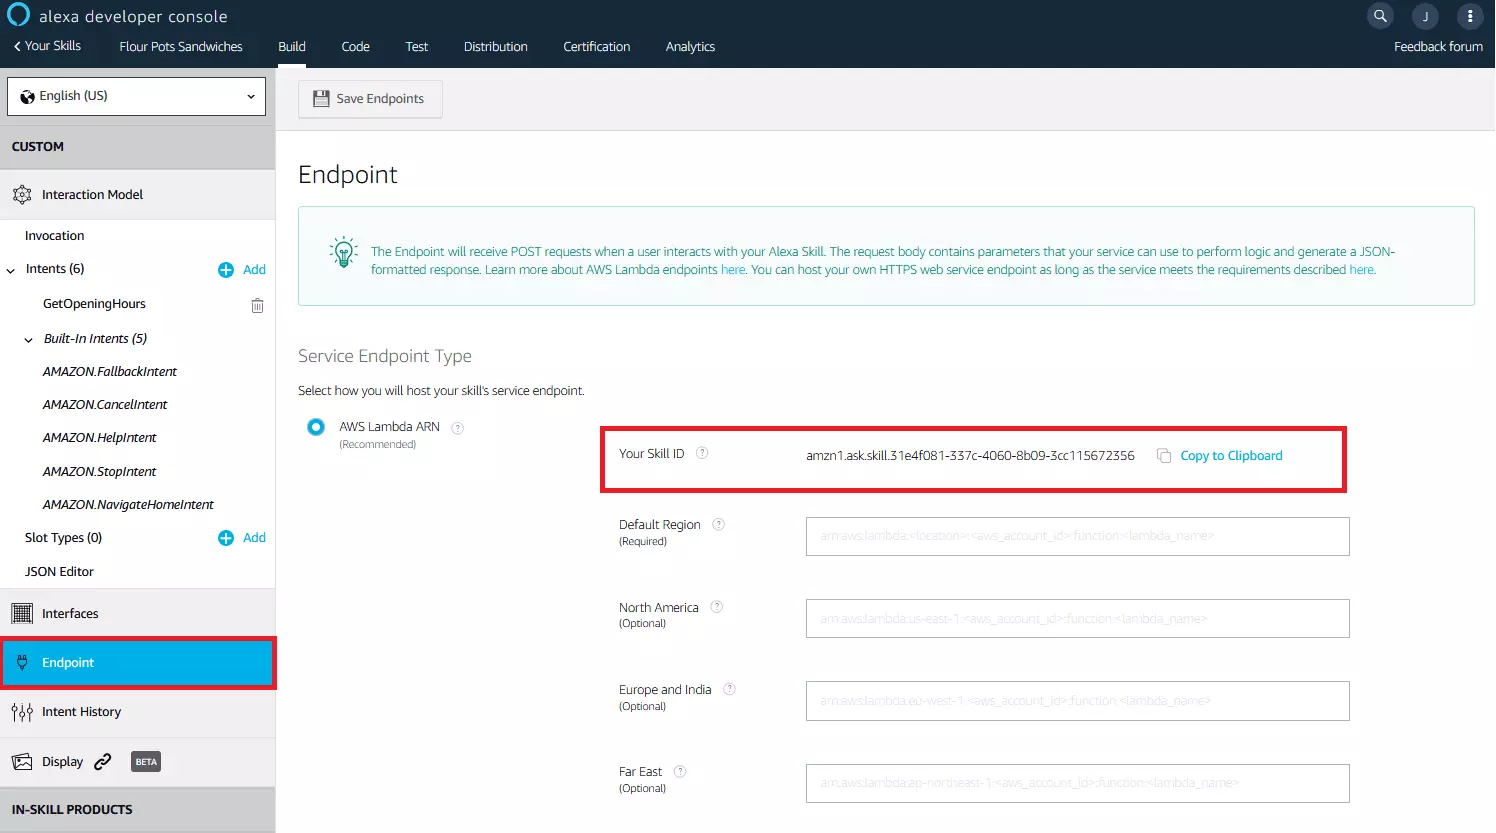
You will need the qualification ID of the interaction model created in the Alexa Developer Console. To determine this, switch to the Alexa Developer Console, and select “Endpoint” in the navigation bar on the left side of your browser window.
Copy the character string displayed under “Your Skill ID” to the clipboard and then enter it as the qualification ID of your Lambda function. Confirm the setting by clicking on “Add” and save your changes.
Enter Lambda function as end point
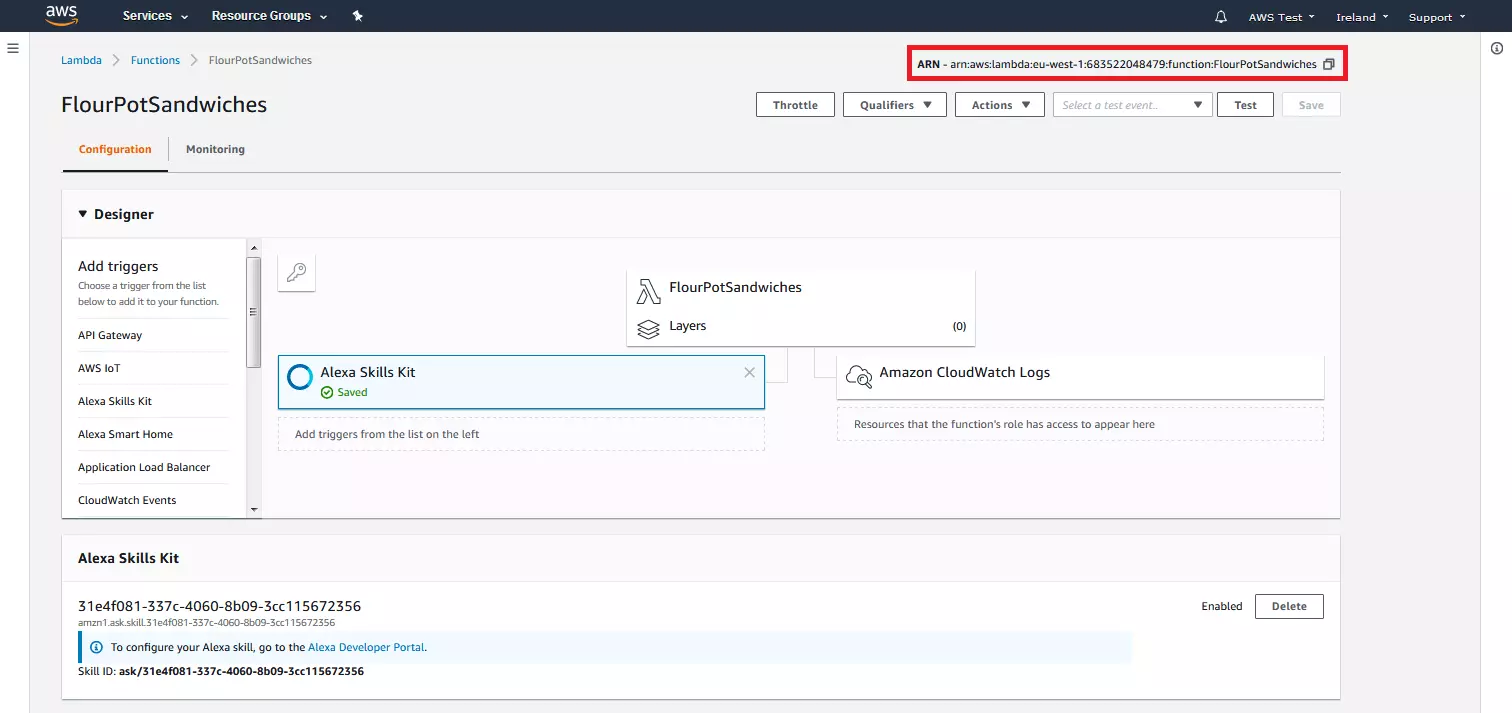
To define the web service endpoint for your skill, scroll up in the configuration overview or your Lambda function. Copy the ARN in the upper right corner or your browser window to the clipboard and switch to the Alexa Developer Console.
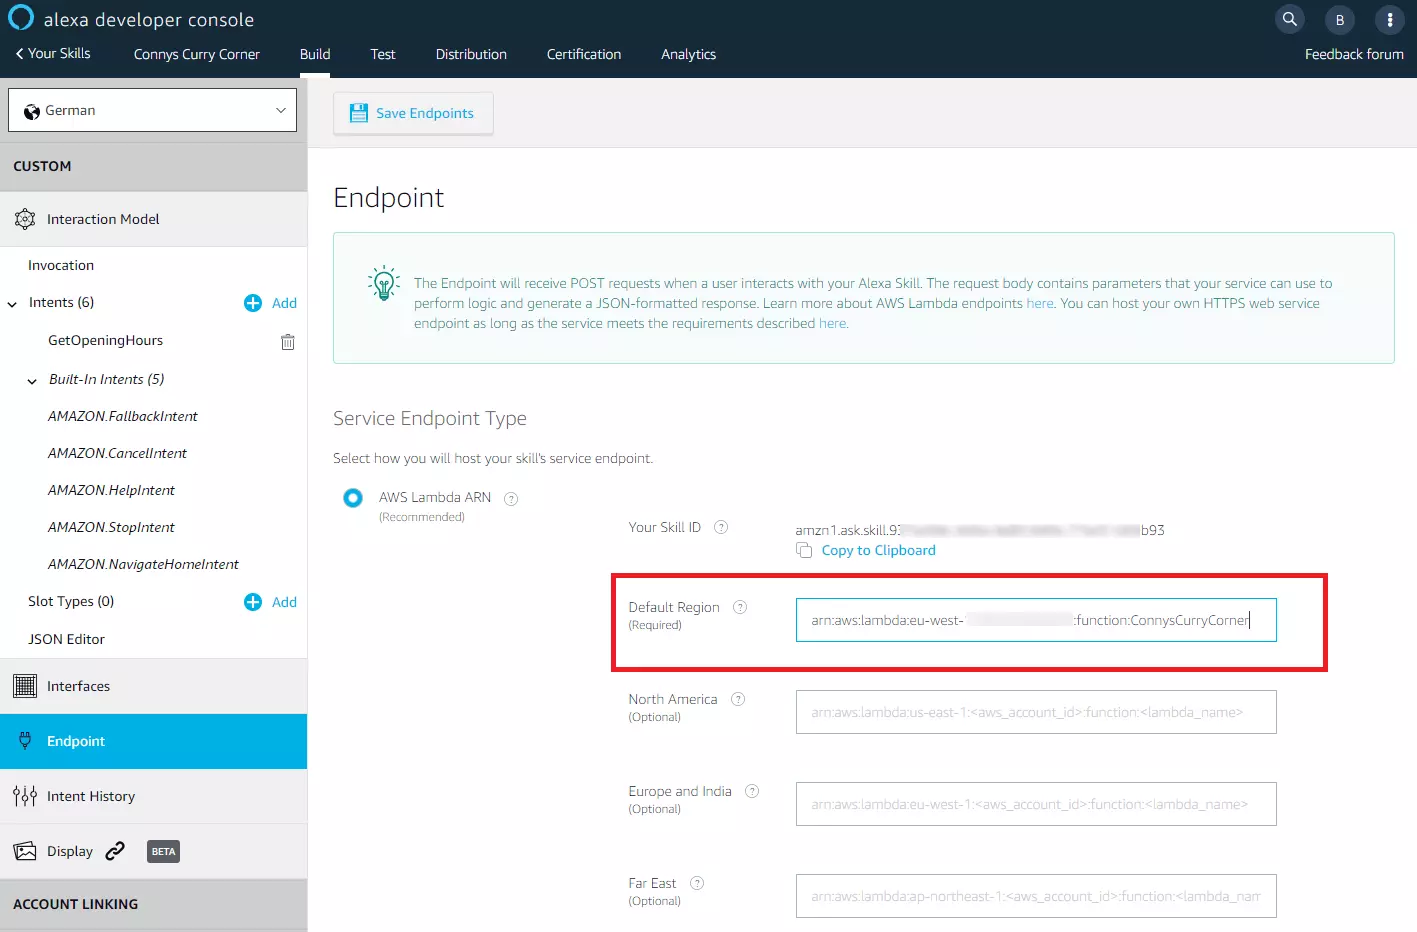
In the Alexa Developer’s navigation menu, select “Endpoint” again (if not already selected) and paste the copied ARN into the “Default Region” field.
You must define at least one default endpoint for your skill. You also have the option to specify alternative endpoints for the regions Europe and India, the Middle East, and the Far East. Save the settings by clicking “Save endpoints.”
Your Alexa skill is now ready for the first test run.
5. Test
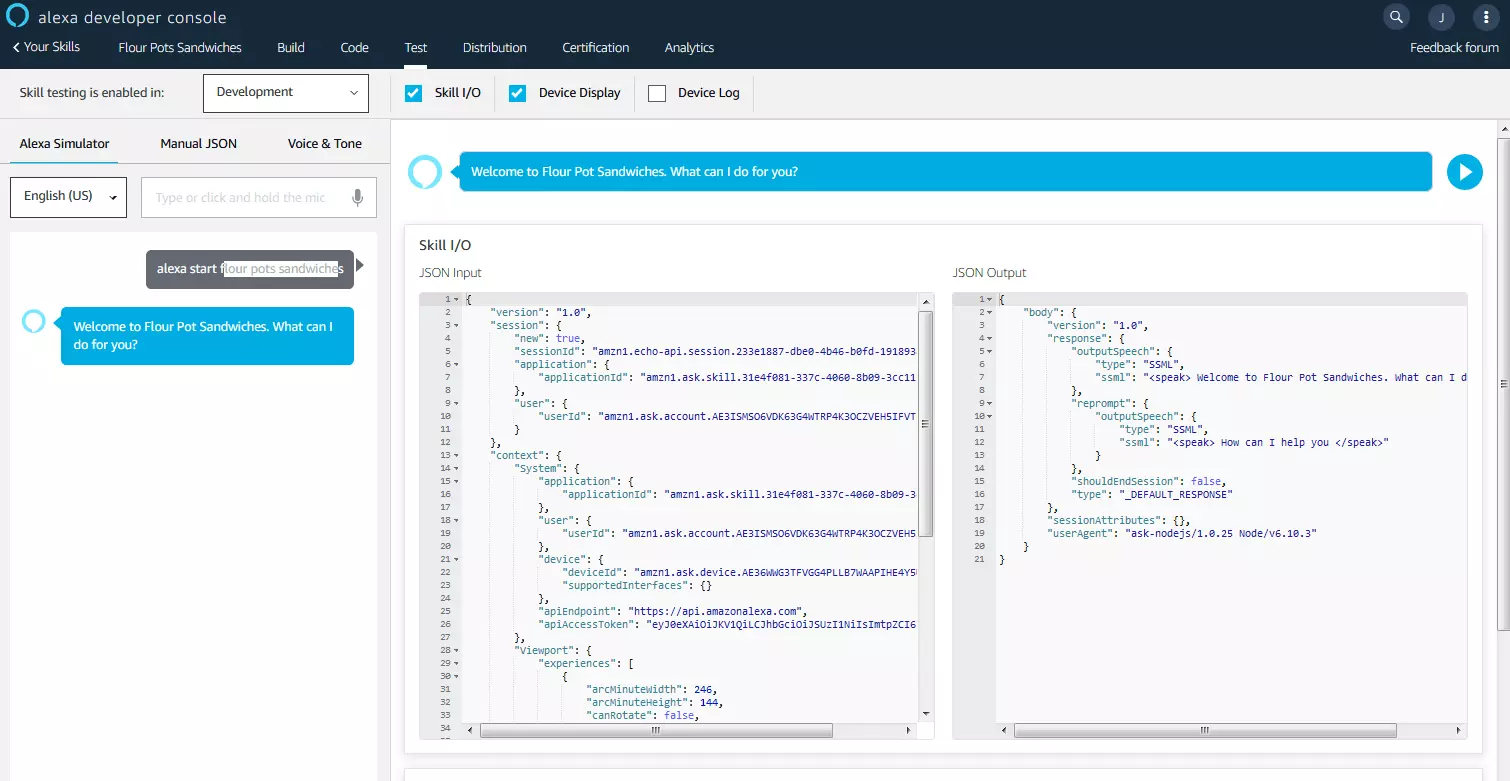
In the “Test” section, the Alexa Developer Console offers a complete test environment for self-programmed Alexa Skills, including an Alexa simulator with speech output. You can access the test environment by clicking on the “Test” tab in the menu bar at the top of the browser window.
By default, the test environment is disabled for newly-created Alexa Skills. Activate it by changing the drop-down menu from “Off” to “Development.”
You now have the opportunity to interact with your skill at the current stage of development to ensure that it works in practice the way you imagined it would.
Give the Alexa simulator access to a microphone or enter voice commands using the keyboard. Call up your newly developed Alexa skill using invocation and test a voice command that matches your defined intent.
Our example skill can be started with the invocation “flour pots sandwiches.” Alexa responds with the welcomeOutput defined in the program logic:
“Welcome to Flour Pots Sandwiches. What can I do for you?”
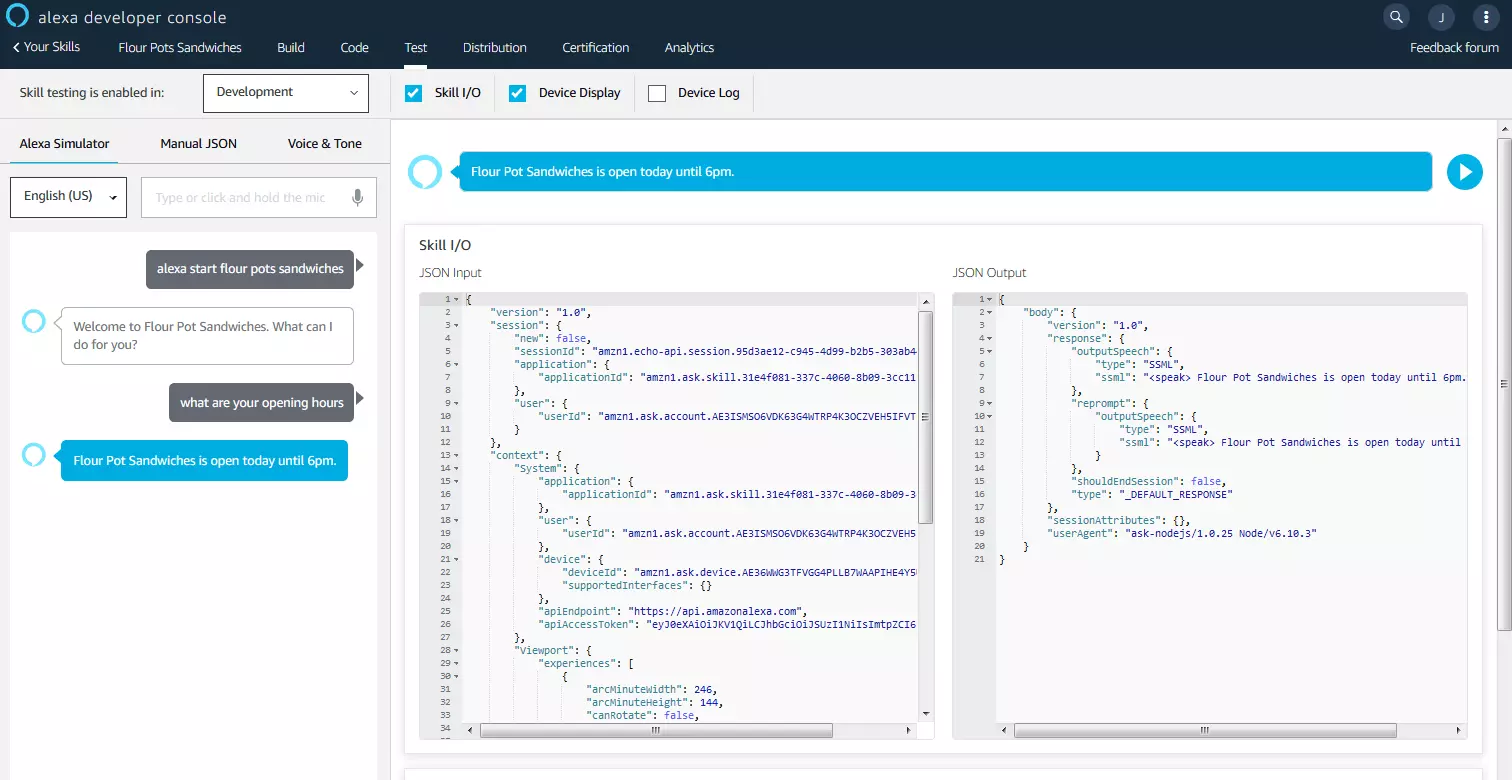
Access to the program logic works. Which input and output the Amazon language service processes within the scope of the query is displayed in the Skill I/O window in JSON format.
Now ask a question corresponding to the intent. In line with our example, we will inquire about the opening hours of the sandwich store:
“What are your opening hours?”
Alexa understands our question and gives us the information we need:
“Flour Pots Sandwiches is open today from 10 am until 6 pm.”
Alternatively, test newly-developed Alexa Skills on all devices connected to your Amazon Developer account even before release.
6. Publication
If you have tested your new Alexa Skill and found it works to your satisfaction, you can make it available to other users in the Alexa Skills Store. To do this, you must provide all the information required for publication.
To do this, go to the “Distribution” section by clicking on the button of the same name in the navigation menu of the Alexa Developer Console. Fill in all required fields under “Skill Preview,” “Privacy & Compliance,” and “Availability.”
Under “Skill Preview,” enter all information that should be displayed to users in the desired target country in the preview. The following information must be provided here:
- Skill name
- Brief description (max. 160 characters)
- Detailed description (max. 4.000 characters)
- At least three sample comments
- Skill icon (small)
- Skill icon (large)
- Category
You can also enter information about new features and, if necessary, links to the data protection provisions or terms of use for your skill.
You don’t have an icon for your skill? Then use the free Alexa Skill icon builder.
Under “Privacy & Compliance,” you specify whether users can use paid functions within the scope of their skill, whether you collect personal user data, and whether your skill is aimed at users under the age of 13 or includes advertising.
The activation of an Alexa Skill through the Alexa Skills Store is free of charge. Projects programmed with the Alexa Skills Kit can be monetized by in-skill purchases and subscriptions.
In addition, you must confirm that your skill meets export compliance for Alexa Skills. If the verification by the Alexa team requires you to follow certain instructions – for example, regarding hardware or software requirements – you can describe them in a text box provided for this purpose.
Finally, under “Availability,” define any restrictions for the availability of your skill. Should your skill be available to all users or only selected organizations? Should the beta tests be carried out by specific individuals? And in which countries and regions would you like to publish your skill?
Save your data in the “Skill Preview,” “Privacy & Compliance,” and “Availability” areas by clicking on “Save and continue.”
Your data will be validated as part of your skill’s certification.
7. Certification
Once you have entered all the information required for publication, you can validate your Alexa skill.
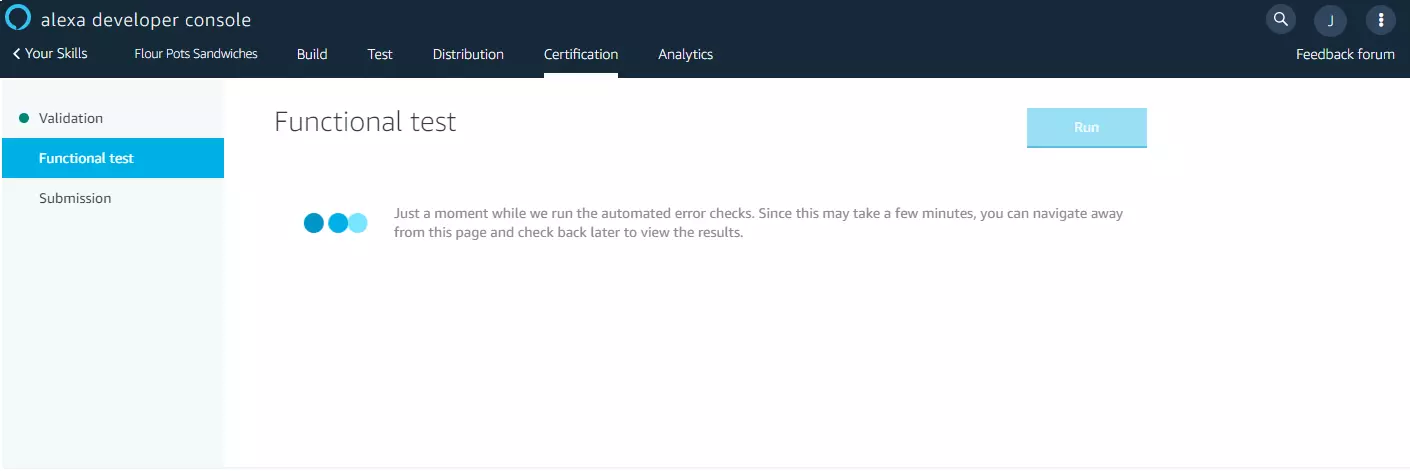
Once you have saved your publication details by clicking on “Save and continue,” you will automatically be redirected to the “Certification” area. The Alexa Developer Console checks your data and, if necessary, prompts you to revise incorrect information or supply missing data.
If the test report shows errors, you have the option of returning to the appropriate area, correcting the error, and performing a new functional test.
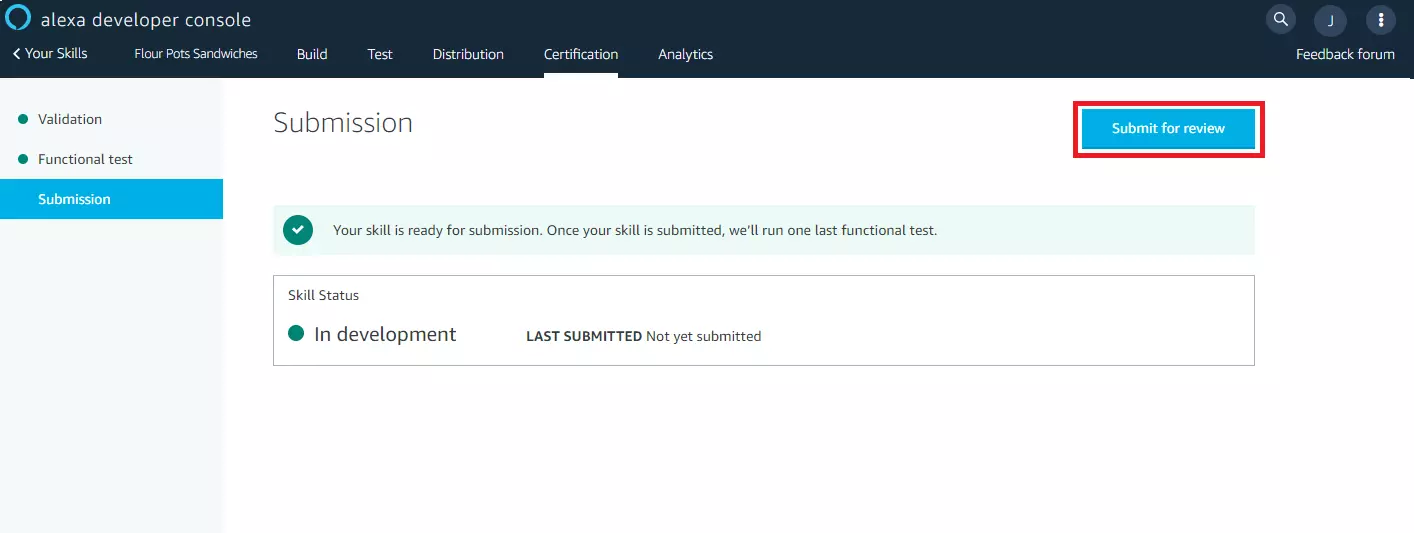
If the Alexa skill you have programmed has successfully completed the functional test, it is ready for the last step of the publication – the “Submission.” Click “Submit for Review” to submit your skill for certification. The next step is a review by the Amazon Alexa team.
The configuration of your skill cannot be adjusted during the certification process. However, you can cancel the verification at any time. Click on the “Withdraw from certification” button.
Once the Amazon review is complete, you will receive an e-mail to the account associated with your Amazon Developer account. There are basically two possible scenarios:
- Your skill has been successfully certified: In this case, you will be informed by e-mail when your skill is expected to be published in the Alexa Skills Store.
- Your skill has not been certified: In this case, Amazon has detected problems during the certification process. The e-mail will include a detailed report on what changes are required for successful certification. Once you have made the appropriate adjustments, you can resubmit your skill for certification at any time.
You can see the current status of all Alexa Skills you have created in the Alexa Developer Console in the skills overview of the Alexa Developer console:
- In development: your skill is in development
- Certification: your skin is in the certification process
- Live: your skill is available to users through the Alexa Skills Store
If your skill has reached the status “Live,” you cannot adjust its configuration afterwards. In addition to the live version, a developer version of the published skill is available in the Alexa Developer Console, which can be revised independently of the original. As soon as a revised version of your skill has been certified by Amazon, it replaces the previous live version, and a new developer version is automatically created.
Better user experience with the voice interface
Why should you, as an entrepreneur, create an Alexa skill? The reasons for this are obvious: Interpersonal interaction is largely based on spoken communication. When dealing with machines, however, we still resort to aids: inputs via keyboard, mouse, or touch screen lead to an output on the screen. However, that will soon change. With Amazon Alexa, Google Assistant, and Apple Siri, operation becomes a dialog. Objects become interlocutors and how we deal with them becomes more intuitive.
The technology is still in its infancy, but voice-as-UI is a trend that has the potential to fundamentally change the way we perceive and interact with machines. For you as an entrepreneur, a language service like Amazon Alexa offers a variety of opportunities.
Use Alexa Skills, for example, to show that your company is keeping up with the times. Present yourself as modern, technology oriented, and dynamic by offering your customers completely new interaction possibilities.
As an Amazon product, Alexa benefits from an enormous reach. Together with Google, the company dominates the smart speaker market. Consumers perceive the smart speaker as a revolutionary medium, i.e. the voice interface opens up a completely new communication channel for your marketing goals. In the area of customer service, for example, Alexa gives you the opportunity to personalize automated communication processes.
The focus of virtual language assistants is still on the advisory function. However, in the future, smart speakers will make various conversions possible – for example, purchasing by voice command. Your Alexa skill will then become a virtual branch directly in your customer’s living room. Already today, Amazon Prime members can make voice purchases through Amazon Pay.


