How to create a bibliography in Word
Word is not just useful for writing letters, invitations, and invoices: Academic work can also be performed with the help of Microsoft’s popular word processor. Here, it’s important to quote properly and not forget the references! To allow your sources and secondary literature to be checked, you need to add a bibliography to your document. In theory, you can do this manually. But for more extensive papers with many different citations, this typically involves a lot of work—especially if the bibliography also needs to be formatted. Fortunately, you can use specific features to have Word create the bibliography for you.
Why Do You Need Citations and a Bibliography?
Whether it’s an essay, report, a bachelor’s or master’s thesis or a dissertation, in academic papers you always refer to sources. These should be listed at the end of the paper, allowing the reader to delve deeper into the subject’s literature. Plus, citations enable you to clearly delineate which ideas and statements are your own and which come from other authors: it’s clear whose knowledge your work builds on. What’s more, a well-structured bibliography can help you do your research even while writing the document. It ensures that you don’t forget a certain reference.
Citations directly reproduce the wording from another author, and they are unambiguously marked so that you don’t commit plagiarism. A citation is followed by a reference. These references and the bibliography are closely linked: in general, every source of a citation is listed in the closing bibliography. Although a short reference is given to the original work in the text itself, the user can find more comprehensive details about the cited work in the bibliography (such as the date of issue and edition in addition to the author and complete title).
Especially in academia, the different disciplines also have different rules on which information should be included in the bibliography. Make sure to find out what the requirements are in your area of study before you create your bibliography in Word.
References in Word: Bibliography and Citations
The bibliography and function for citations are closely linked in Word. In both cases, you can benefit from creating your own database containing the necessary references in the word processor. You can then use the information entered here for the references of citations and for creating the bibliography.
Step 1: Managing References in Word
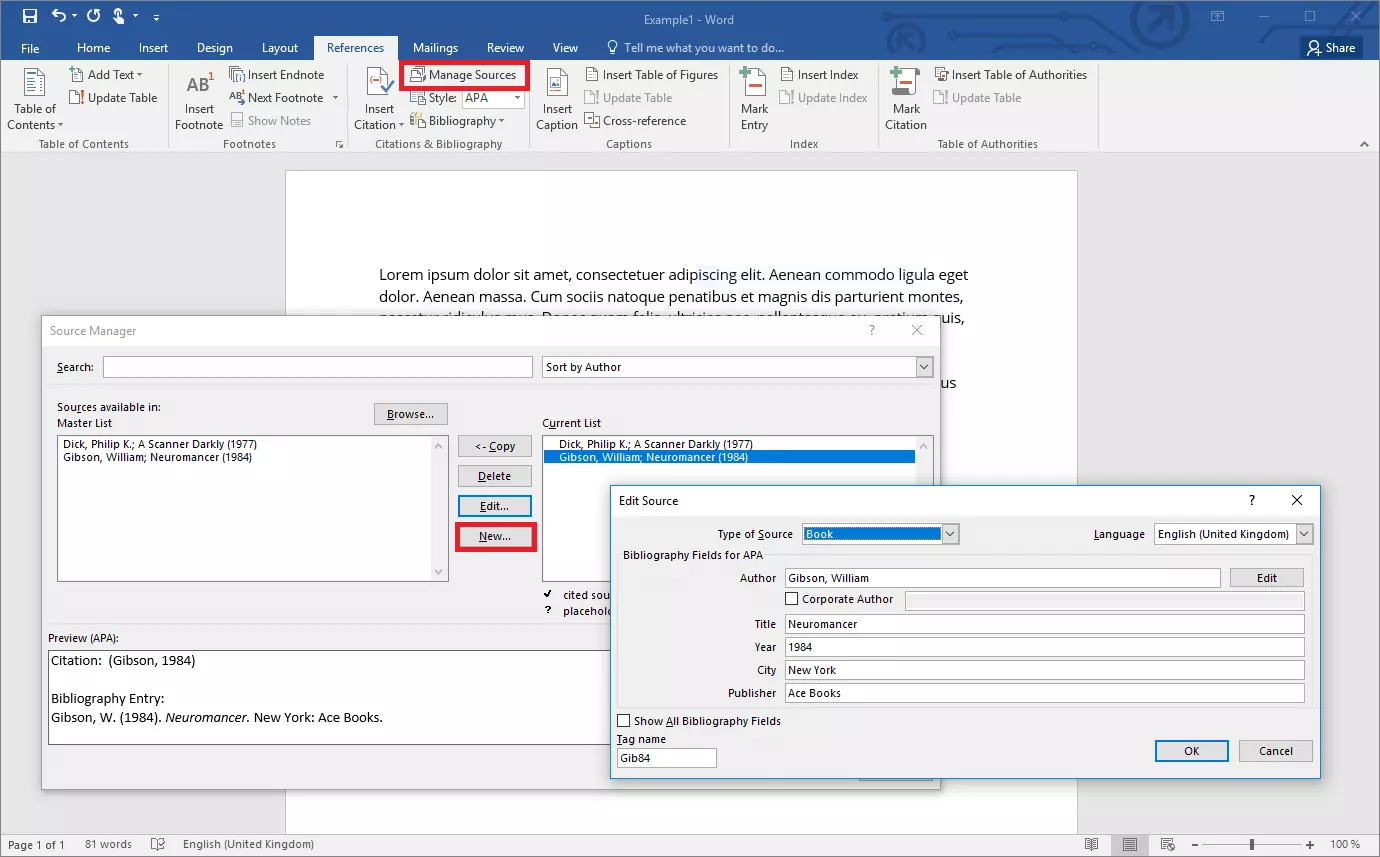
In order to work effectively with references in Word, a Source Manager is integrated in the program. You can open it in the “References” tab by clicking on the button “Manage Sources”. But you should choose the citation method beforehand. This way, you can be sure that no information is left out when entering the references. You can find this option directly under the option for sources. Word offers you a range of format templates.
If you’d like to use a different format for your references, you can also create your own format templates. But this can’t be done directly in Word. You’ll need to create a new file in XML format for this. Find out how that works in the extensive tutorial document for creating your own format templates.
In the Source Manager, click on “New” to create a new source. Here you can define the source medium. Besides the typical books and articles, you can also select websites, films, or artworks. Next, complete the fields. The software will also give your entry a unique tag name. After confirming your entry, the source will be added to the list. To improve order, Word works with two lists: The Master List contains all sources you’ve entered. This list can also be used for multiple Word documents. The second list contains the sources that you’re actually using in your current work.
Step 2: Insert Citations
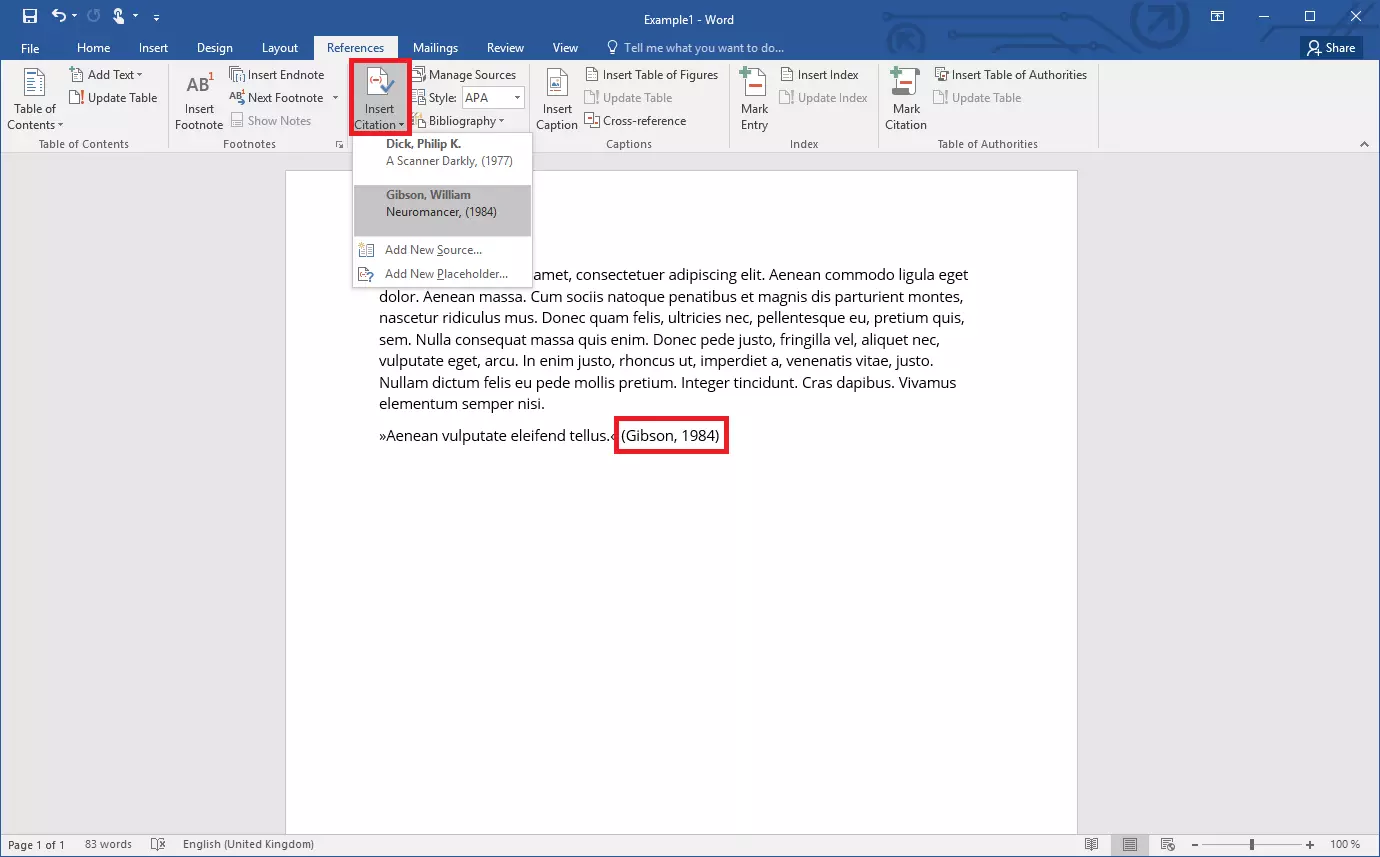
Once you’ve used a quote in your work, you can simply add the corresponding reference to the original. You’ll find the “Insert Citation” button under the “References” tab. When you click on it, Word will show you a list of all sources you’ve entered. Use the cursor to navigate behind the citation and click on the relevant source. The reference will now appear in the text (in the selected format). If you don’t want to enter citations directly into the text, you can also work with footnotes. To do so, first insert the footnote and then enter the reference.
You’ll also find two more options under the “Insert Citations” option: On the one hand, you can enter a new source directly into your list here. On the other, Word gives you the option to work with placeholders. If you don’t have the necessary information for the cited work immediately at hand, you can add a placeholder and provide these details later. To create a placeholder, simply enter a tag name. The entry will be saved under this name and can be adjusted at a later time.
A citation’s reference isn’t just a normal piece of text in your document: It’s an object that you can select and edit. To do so, click on the reference using the right mouse button. You’ll now have the option to adjust the reference. “Edit Citation” also allows you to edit the page number where the quote can be found in the original text. In addition, you can select information that shouldn’t be shown in the reference. The “Edit Source” option takes you to the corresponding entry in the Source Manager, where you can enter additional information on the work or change existing information.
Step 3: Create a Bibliography
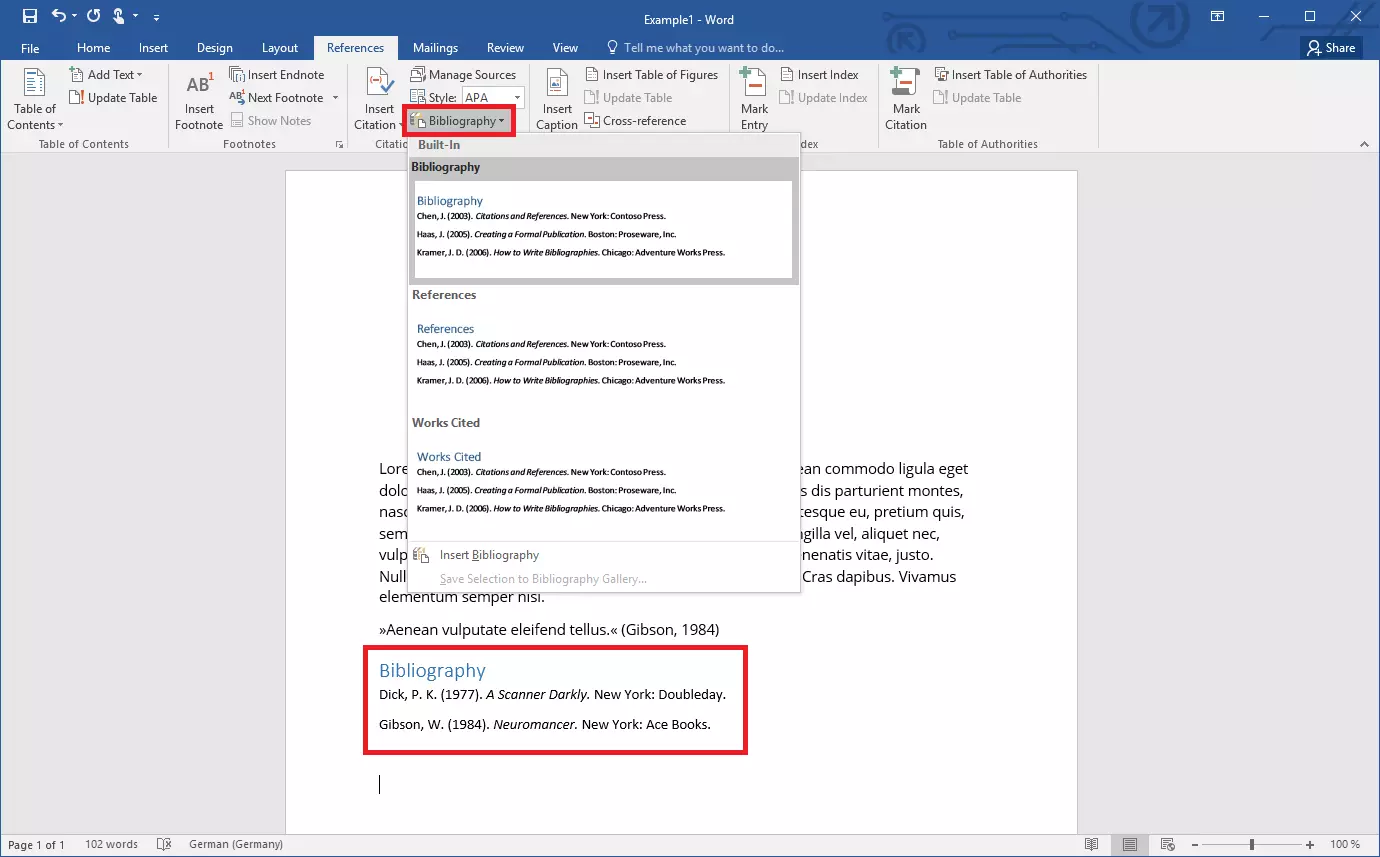
If you’d like to create a bibliography in Word, the program also provides you with a simple function that draws on your references. Word uses the information entered and compiles it into your selected format. If you want Word to create the bibliography for you, you also won’t need to sort the entries yourself. The program will list the entries in alphabetical order – even if you add new references later. To display new entries in your bibliography, click inside the bibliography section using the right mouse button and select “Update Fields”. This way, you can make sure that your list of references is always up to date.
Only the entries that you’ve added to the Current List in the Source Manager will appear in the bibliography. The Master List is irrelevant in this case. In the Current List, you’ll also see a symbol that indicates whether the respective entry already appears in the text as a citation. If it isn’t included in the text, you can consider removing the source from your bibliography.
Powerful Exchange email and the latest versions of your favorite Office apps on any device — get started with our free setup assistance.


