How to install and setup WordPress Multisite
WordPress Multisite lets you create and manage multiple websites on a single WordPress installation. It allows you to create a network of various WordPress websites which you can manage and support centrally with super administrator permissions. Find out how you can benefit from WordPress Multisite and how to set it up step by step.
What are WordPress Multisites used for and what are their advantages?
WordPress Multisite is always useful if you need to centrally manage multiple WordPress websites. Essentially, a WordPress multisite can create a platform for a range of different websites. The pages belonging to a multisite network often have a lot in common in terms of design and functions. The super administrator of a WordPress multisite decides which themes (i.e. design templates) and plugins will be installed centrally, making them available for each individual website. They can thus significantly influence the design and functions of the individual websites. They can also assign permissions to sub-administrators (referred to as “users” on WordPress).
Aside from being able to manage everything centrally, the main advantage of using a WordPress multisite network is how much time and money you can save:
- All websites in the network are on a single WordPress installation and use the same themes and plugins, thus saving disk space.
- All themes and plugins are managed centrally. You only need to update them once, not for each individual website in the network.
- The super administrator for the multisite network has a high degree of control, especially over the design (themes) and functions (plugins).
The following are some areas of application for a WordPress multisite:
- Companies or private individuals looking to design and operate multiple WordPress websites cost-effectively and efficiently (e.g. adding landing pages to the actual website or individual country websites)
- Large companies and corporations operating multiple websites since the ability to manage everything centrally and the uniform design elements make it easier to implement a corporate design
- Agencies that design, host and support WordPress websites for customers since WordPress Multisites present a relatively simple, cost-effective way to offer this service to a wide range of customers
Installing WordPress Multisite: preparation and requirements
A WordPress multisite can also be set up on an existing WordPress installation. You should take the following precautions before installing WordPress Multisite:
- Disable all plugins.
- Create a backup of your WordPress website to be able to restore it if need be.
- Make sure that you can modify the code for your WordPress pages via FTP access (e.g. directly through your provider or via an FTP client like FileZilla).
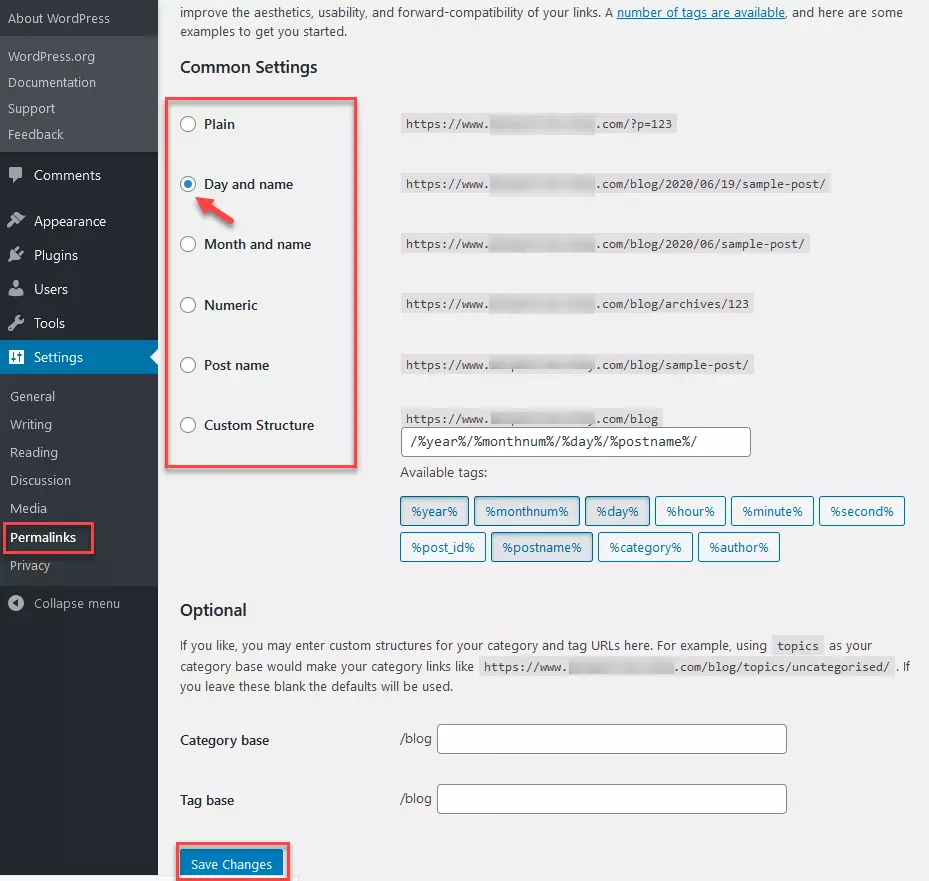
- Make sure that the permalink settings in your WordPress installation work.
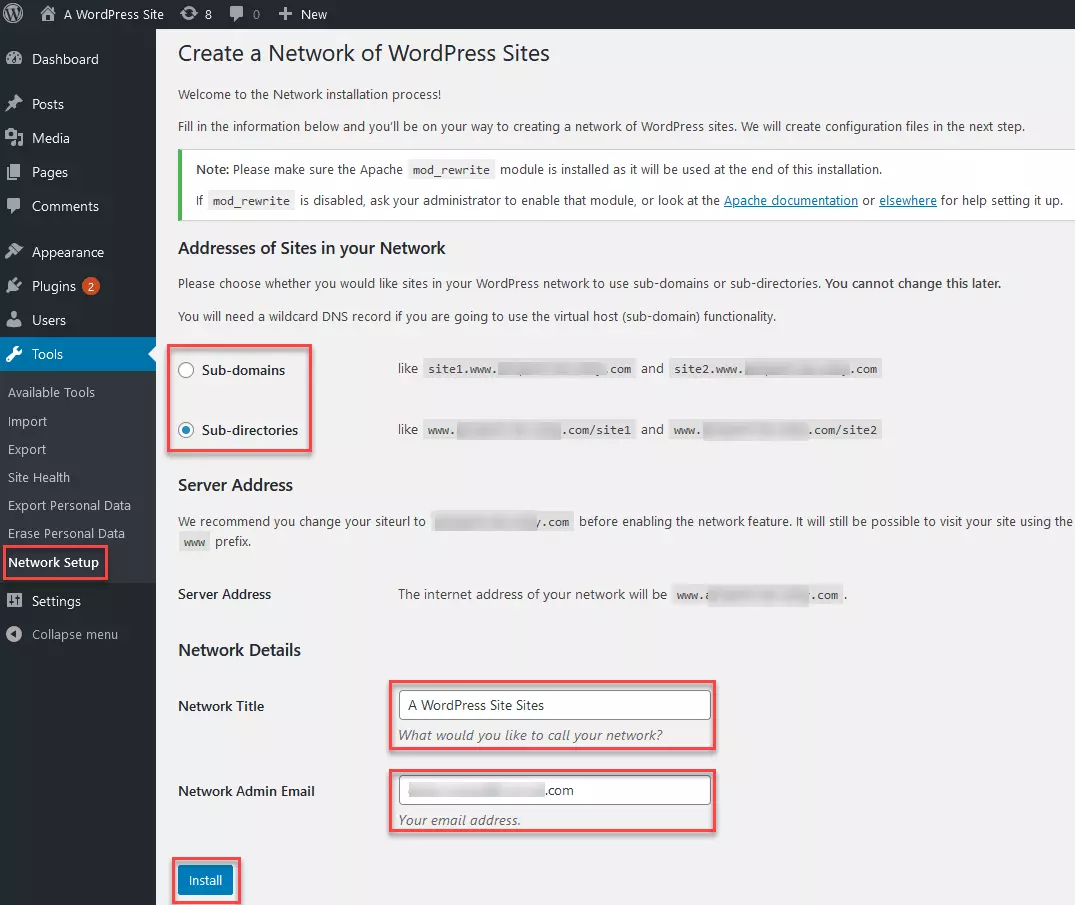
- Decide on the URL structure you want your WordPress multisite to have. During the installation process, you will have to decide on a subdomain structure or a subdirectory structure. It is not possible to change it afterwards.
We will provide more information about testing permalinks and about the URL structure of a WordPress multisite in the following sections.
IONOS has a comprehensive hosting offer for WordPress which allows you to create WordPress multisites relatively easily.
Testing permalink settings for functionality
You can find the permalink settings in your WordPress backend under the “Settings” section. In the permalink settings, you can define how the URLs for individual subpages of your website should be displayed (e.g. `https://examplepage.com/?p=123` vs. `https://examplepage.com/name-subpage`). It is important that the permalink change works within the system. If you are unsure whether it does, you should change the permalinks as a test. If you change something in the “Common Settings” for permalinks, the changed URL should also be reflected in the browser. You will most likely need to refresh the page for the changes to be displayed.
Defining the URL structure for your WordPress Multisite
Before installing your WordPress Multisite, you should decide on the URL structure you want to give it. You have the choice of either a subdomain structure or a standard subdirectory structure through which the different pages of your multisite can be accessed. During the multisite installation, you will have to decide which of these two structures you want to use. It will not be possible to change it afterwards.
Example of a subdomain structure: https://website1.my-maindomain.com; https://website2.my-maindomain.com; https://website3.my-maindomain.com, etc.
Example of a subdirectory structure: `https://my-maindomain.com/website1`; `https://my-maindomain.com/website2`; ´https://my-maindomain.com/website3`, etc.
The URL structure is a key factor in search engine optimization (SEO). If you use a subdomain structure, each individual subdomain (e.g. `https://website1.my-maindomain.com´) is basically treated by search engines as a separate website. If you opt for a subdirectory structure, all websites in your WordPress Multisite network will be treated as part of a single (large) website. When using a subdomain structure, you thus have multiple (often smaller) websites which are independent of one another. With a subdirectory structure, on the other hand, search engines will recognize a single (often relatively large) website in your multisite network. Both types have their advantages and disadvantages with regards to SEO, which you should familiarize yourself with in advance. Other than that, keep in mind that search engines like Google also change their rules from time to time.
Installing WordPress Multisite: step-by-step instructions
Once you have done everything mentioned above, you can install your WordPress Multisite using these step-by-step instructions. The following is a basic outline of how to set up a WordPress Multisite:
- Add a line of code to the WordPress file wp-config.php (WP Allow Multisite)
- Perform the setup in the WordPress backend – generates two code snippets
- Add the generated code snippets to the WordPress files wp-config.php and .htaccess
Add a line of code to the WordPress file wp-config.php
Step 1: Download the WordPress file wp-config.php to your computer and save it locally. For this purpose, you can either use an FTP program from your provider or an FTP client like FileZilla. Some providers also enable you to open, edit, and update the file wp-config.php directly in the system. If that is the case, you do not need to download it. Whichever you choose, the important thing is that no data is lost in the process.
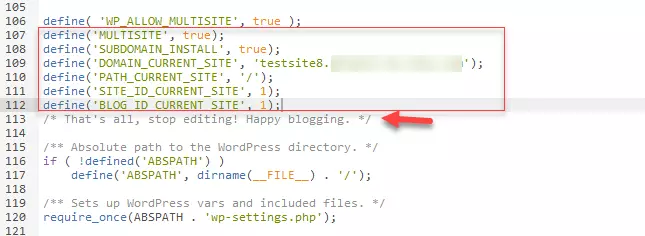
Step 2: Open the file wp-config.php and look for the following line in the code:
Directly above this line, enter the following snippet of code:
Step 3: Depending on how you performed step 1, upload the modified wp-config.php file back into the system from your computer. With certain providers, you can also save and update it directly in the system.
Perform modifications in the WordPress backend
Step 4: Once you have completed the previous steps, open your WordPress backend, which you may need to update. There, you will find the “Network Setup” option under “Tools”. Under this option, you can define whether the structure of your new multisite network will use subdomains or subdirectories. Then, enter a network title and your network admin email in this window. Finally, click “Install”.
- Create & customize your site with AI tools made for everyone
- 3x faster: SSD, caching & more
- Daily security scans, DDoS protection & 99.98% uptime
Add the code snippets to the files wp-config.php and .htaccess
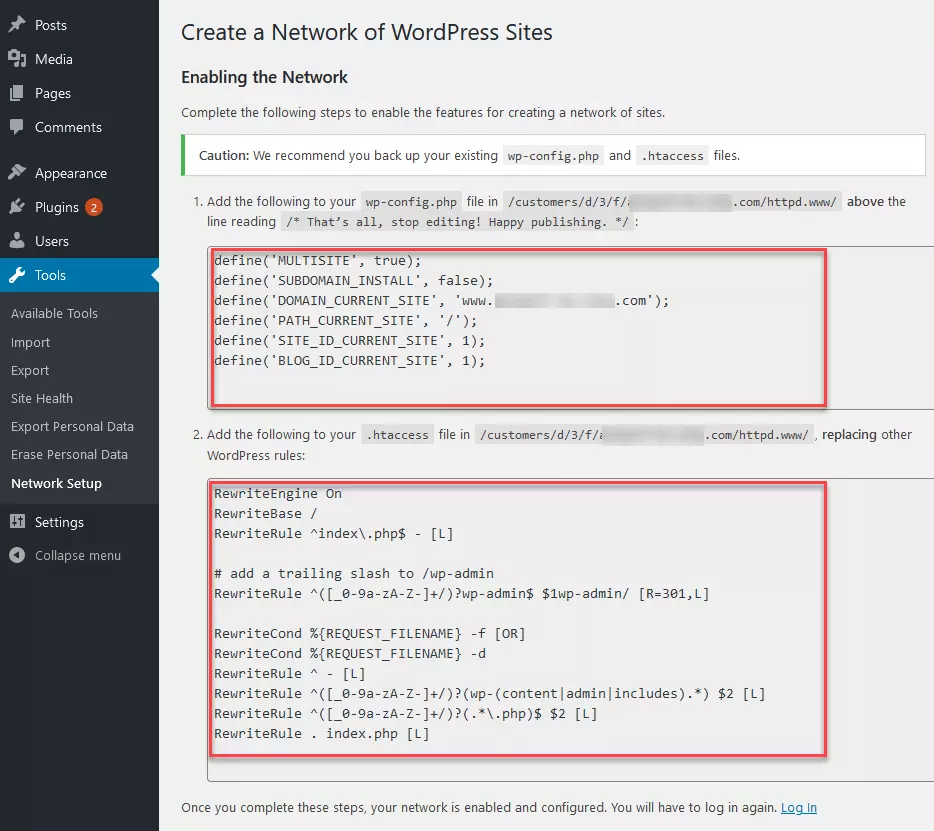
Step 6: Now, open the WordPress file wp-config.php just as you did before. Then, copy the top code snippet you received earlier in the WordPress backend and paste it into the code in the file wp-config.php. This should once again go above the following line in the code:
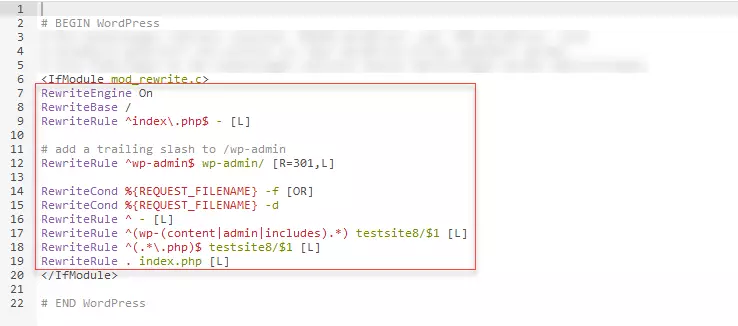
Step 7: Now, repeat the last step with the bottom code snippet from the WordPress backend and the file .htaccess. However, in most cases, you will be overwriting existing code with the code from the WordPress backend. An existing .htaccess file with code to overwrite may look like this:
Once the new .htaccess file has been updated or uploaded as required, you have finished installing your WordPress Multisite. You can now configure various settings in your WordPress Multisite network. To do so, you will need to log in to WordPress again.
WordPress Multisite: configuring settings
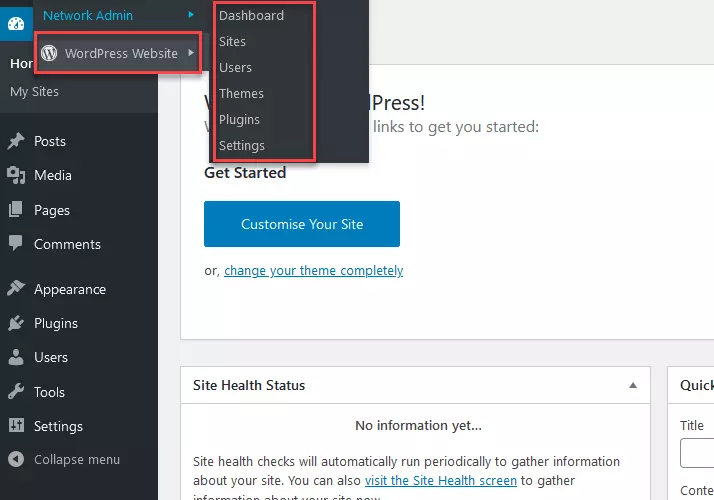
As a super administrator with full permissions, you can now configure a wide variety of settings on your new WordPress Multisite network. For example, you can add new websites to your network or install new themes and plugins. You can also add new users who will have limited administrator permissions for individual websites in your network.
For general information about WordPress, check out our article titled “Creating a WordPress website”. You can find important information about WordPress and security in our article titled “WordPress plugins to secure your website”. For the best designs for WordPress websites, check out our article titled “The most popular WordPress themes”.


