How to clear the Outlook cache step by step
The Outlook email client uses a cache for everyday routine processes, aptly named the Outlook cache. However, this can cause the software to run more slowly or folders and emails to disappear all of a sudden. If this happens, we recommend cleaning up Outlook by clearing the Outlook cache. We explain how to delete not only the cache but also the email cache and the Outlook auto-complete list.
How to clear the Outlook cache quick guide
- Enter %userprofile%\AppData\Local\Microsoft\Outlook in the Windows taskbar and open it
- Close Outlook
- Select the OST file(s) you want to delete > right-click > Delete
- Restart Outlook
These instructions apply to Outlook versions of Microsoft 365 as well as Outlook 2021, Outlook 2019 and Outlook 2016.
Why should you clear the Outlook cache?
The Outlook cache is an operational working memory that is hidden in the background to speed up working with the mail program and enable faster file access. For example, the software deposits email attachments in the cache, which are temporarily stored there for viewing.
In addition to mail programs, browsers also use a cache. It’s recommended to clear your cache regularly to ensure fast surfing.
Roughly speaking, the cache memory can be compared to the storage area of a desk, where the most important working material is stored for quick access. When materials are no longer required, they should be stored away to free up space. Failing to tidy up regularly can result in clutter and space shortages, hindering access to essential work materials.
It’s a similar process on the computer. Normally, the Outlook cache is emptied regularly, as the temporary files stored there are not intended to remain on the hard disk permanently and are deleted automatically. However, under certain circumstances, such as after opening an attachment (e.g. images, documents or PDF files), the files may remain in the cache permanently.
A cache is not intended for long-term storage. If you want to back up your emails, you should archive Outlook data.
An untidy cache accumulates “dead entries” over time, which can lead to longer read times. Damaged files can also negatively impact the performance of the mail client. If Outlook no longer operates as smoothly as usual when starting up and running, the Outlook cache should be cleared. This can free up valuable storage space and additionally improve data privacy by preventing unauthorized access to important files. Since cache files are not essential, nothing usually happens when they are deleted. In our tutorial, we will show you step-by-step how to clear Outlook caches.
How is the Outlook cache emptied?
First things first: if Outlook is open, you will need to close the program. Otherwise, you won’t be able to delete the Outlook cache. The rest of the procedure is not particularly complicated, you only need to perform a few steps to clean up Outlook.
How to delete the attachments cache
Step 1: Search for the cache folder
To clear the attachment cache, first activate the search box in the Windows taskbar at the bottom left of the screen (if it is not displayed, click the magnifying glass at the left edge of the taskbar). Now you need to enter the following path into the search box (step 1 in the screenshot below):
%userprofile%\AppData\Local\Microsoft\Windows\INetCache\Content.Outlook
Step 2: Open the cache folder
Next, click on Open (step 2 in the screenshot) or press the ENTER key on the keyboard:
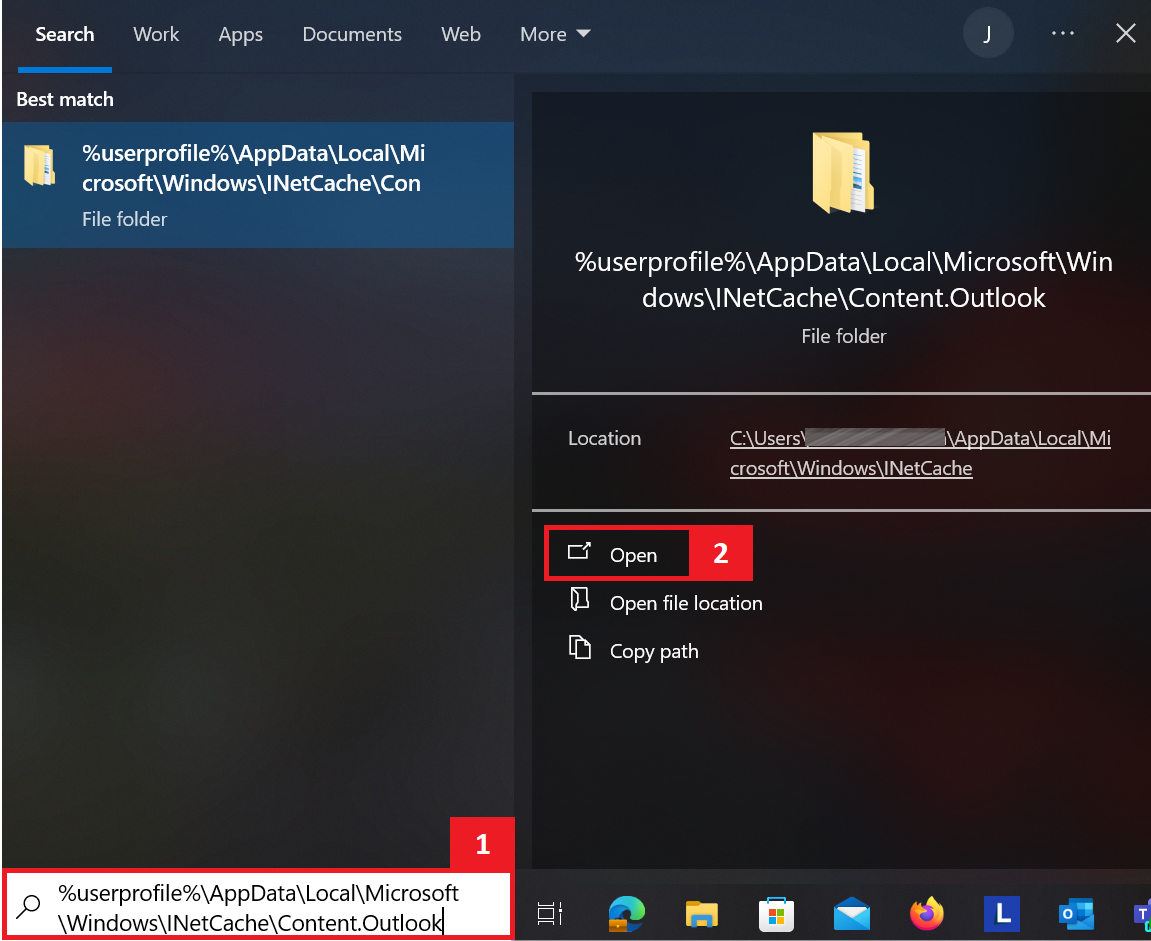
The user profile variable (%userprofile%) is a convenient way to abbreviate path entries. Windows independently replaces %userprofile% with the current user’s account data, such as “C:\Users\Peter\”. The full path to the cache for Peter’s user profile is: C:\Users\Peter\AppData\Local\Microsoft\Windows\INetCache\Content.Outlook.
Step 3: Delete the Outlook cache folder
Shortly after this, Explorer will open with the Outlook folder of your user profile. Here, you will find the cache folder. Outlook generates this folder automatically and gives it an individual name that differs on each computer. In our example a folder with the name “2E3R8BQM” was created. The folder can now be deleted. If there are several directories, you can also remove several folders to clean up Outlook thoroughly:
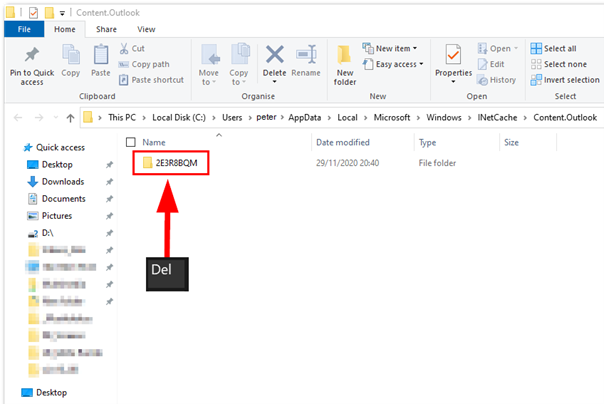
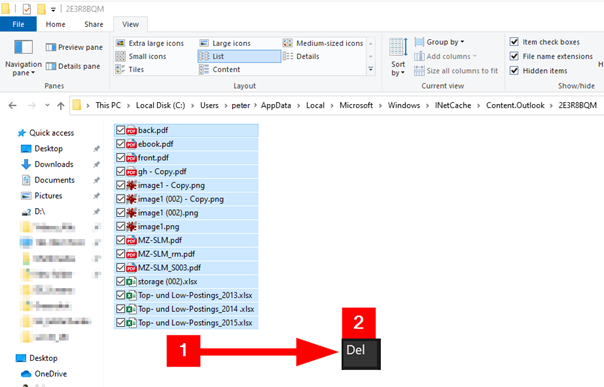
You can also selectively delete specific contents when clearing your Outlook cache by clicking the cache folder and selecting files with the mouse:
- 2 GB+ storage
- Sync across all your devices
- Spam filter and ad-free
How to delete the email cache
If necessary, there is a second Outlook cache that can be cleared, which is responsible for Outlook’s offline operation and ensures smooth working even when connections are slow or temporarily disrupted. Microsoft keeps this local cache up to date by means of regular synchronization processes between the mail client and server. The local cache is stored for each Outlook profile in the form of an OST file (offline storage table file).
In combination with Hosted Microsoft Exchange you can expand Outlook to a professional groupware solution. The collaborative software environment makes it easy to share work processes and integrate many additional cloud-based functions into your digital processes.
In some circumstances, this particular cache file causes problems. It is more prone to corruption the larger it becomes, affecting whether Outlook functions properly. For example, if Outlook doesn’t start up, an oversized OST file could be to blame. If several people use a shared email account and make changes (e.g., moving a bunch of emails while cleaning up), this can also cause problems. Outlook will delete and then automatically rebuild an OST file to ensure that folders or emails that have disappeared are displayed correctly again, for example.
It is generally fine to delete an OST file as it is only a client-side copy of server data and is recreated by Outlook. However, you can create a backup of the file or simply move the file to a backup directory to be on the safe side before you start cleaning up Outlook. Please note that OST files can become very large and that several GB are not uncommon.
These steps are essential to delete your email cache in the Windows AppData folder:
Step 1: Search for the email cache folder
First, enter the following path in the Windows Explorer address bar or in the Windows search bar:
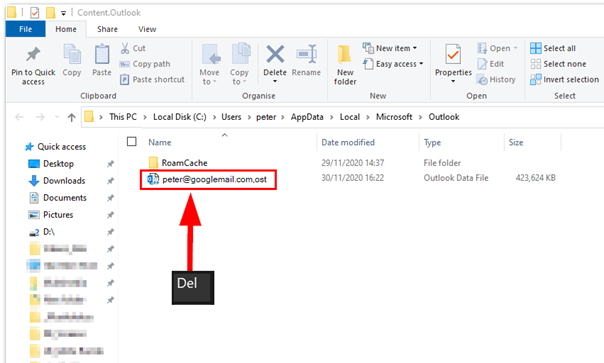
%userprofile%\AppData\Local\Microsoft\Outlook
Step 2: Delete the OST file
The folder with the OST file will open and you can delete it. Make sure that Outlook is closed during the cleanup process. If you manage several Outlook profiles from a single PC, you will find several files with the extension .ost. The OST file extension is preceded by the name of the Outlook profile (e.g., peter@googlemail.com.ost):
Step 3: Restart Outlook
After clearing the Outlook cache, you can restart the mail client. Depending on the size of the mail archive, it may take some time until the OST file is regenerated, and the original state of the profile is restored.
If you do not see the AppData folder, you need to first make it visible in Windows Explorer. In our tutorial, we’ll show you how to make the Windows AppData folder show.
- Store, share, and edit data easily
- Backed up and highly secure
- Sync with all devices
How to clear the Outlook auto-complete List
The auto-complete list makes using Outlook easier by reducing the amount of typing required and thus accelerating the email sending process. However, as it grows over time, its usefulness diminishes. The list can also store outdated or incorrect addresses caused by typing errors, which increases the risk of accidentally selecting the wrong recipients.
Use Outlook even more efficiently in the cloud-based work environment that is Microsoft 365. The Office suite comprises many useful Microsoft products that can optimize your daily workflow.
Individual suggestions can be manually removed directly from the complete list. To do this, simply click on the “X” to the right of a name entry, which appears when you hover over it with the mouse. This deletes the person’s name and email address from the auto-complete list. If the plan is for the list to be completely emptied and rebuilt after the Outlook cache has been emptied, you need to do the following:
-
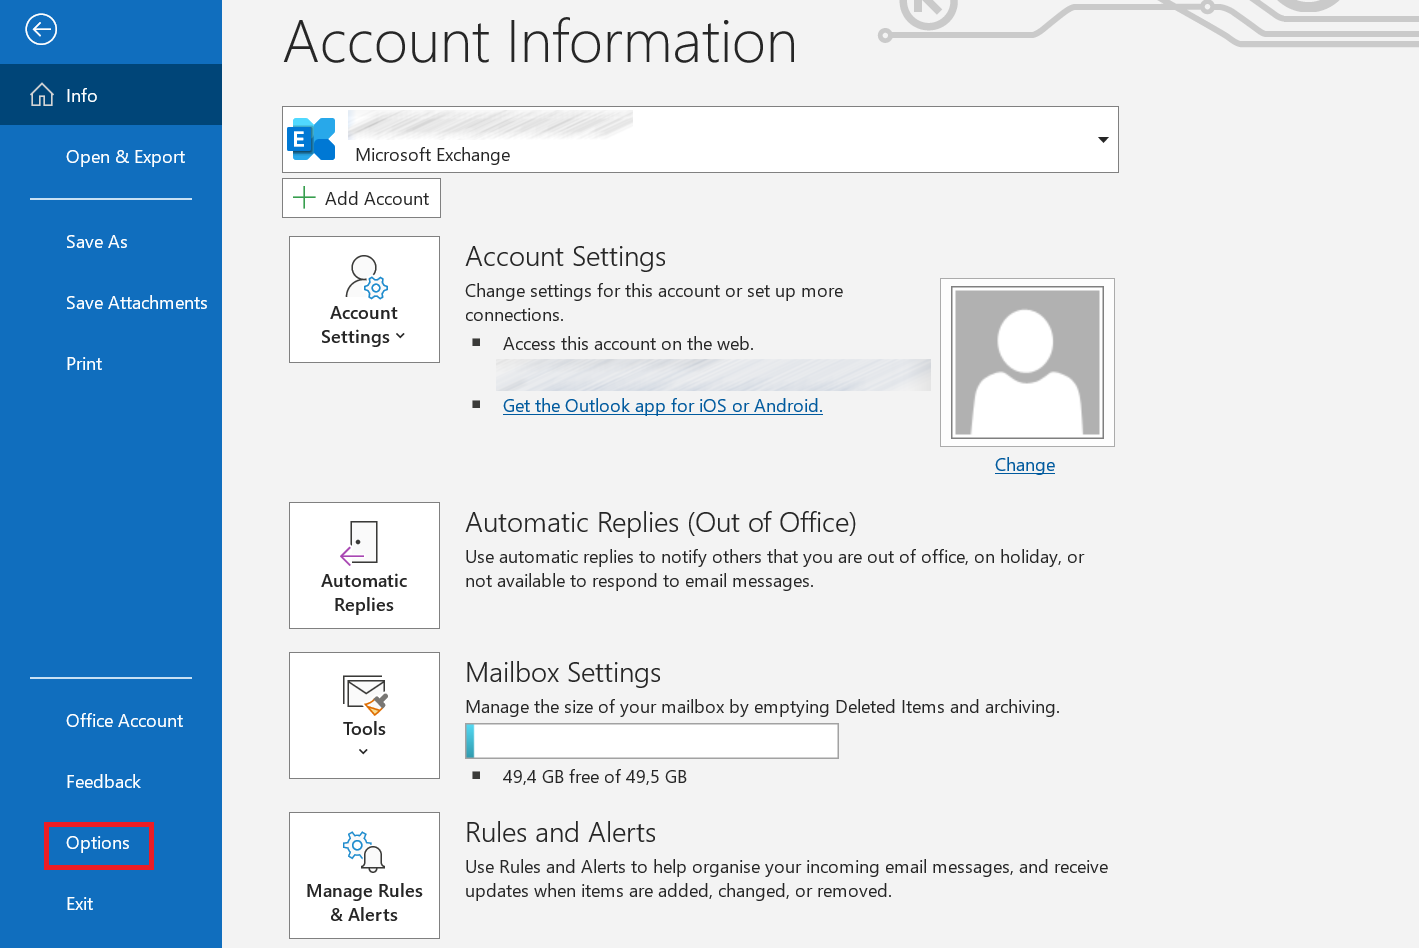
Start Outlook and select the menu item File.
-
Open the Outlook settings via the Options entry at the bottom left of the screen:
-
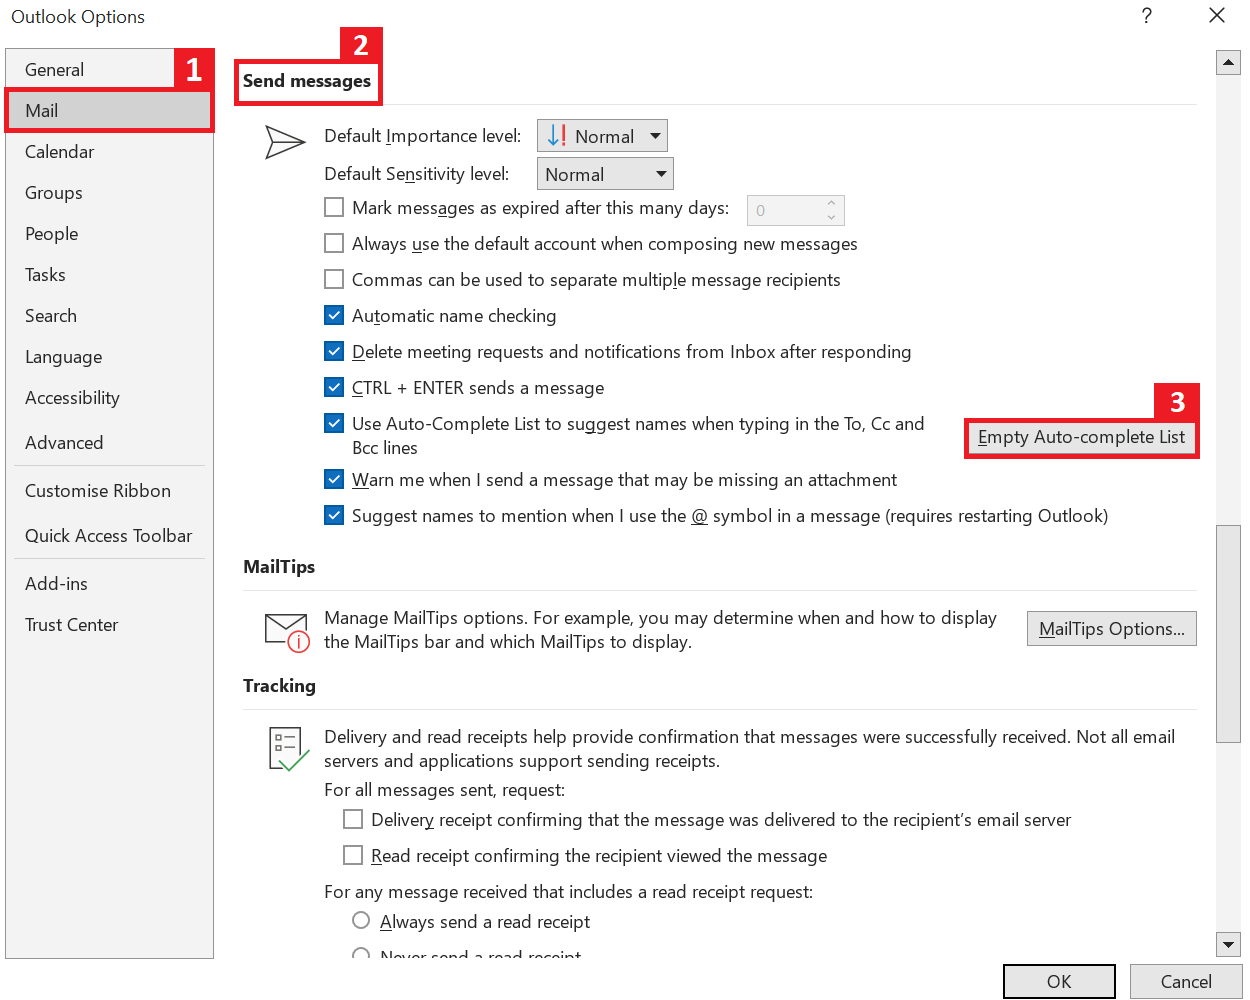
In the options menu that opens, select the entry Mail (see point 1 in the below screenshot).
-
The auto-complete setting is listed under the Send messages section (item 2 in the screenshot). (If it is not visible at first, please scroll.)
-
Then use the corresponding button to clear the Auto-complete list (item 3 in the screenshot):
- Finally, confirm you want to delete the auto-complete list by clicking on the Yes button.
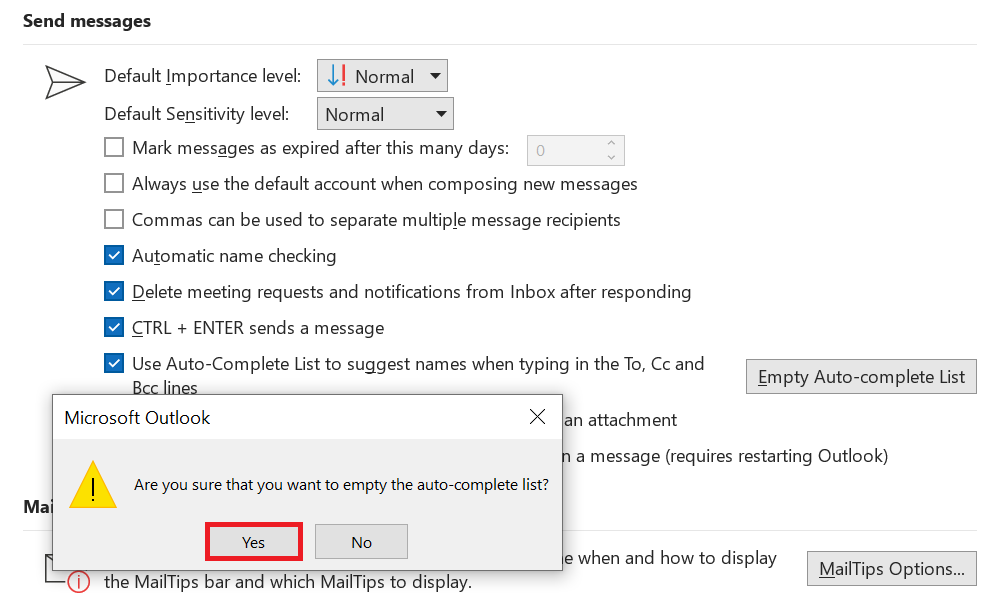
With this final step, you have cleared another Outlook cache.
- Fast drag and drop editing
- Simple personalization
- AI-powered text generation

