How to archive emails in Outlook step by step
Do you manage your email folders, calendars, and contacts with Microsoft Outlook? Then use Outlook archiving to archive old Outlook items such as messages, tasks, notes, or calendar entries in external archive files. This streamlines your email program, which is essential to keep Outlook running smoothly.
The program has two functions for archiving Outlook items:
- Outlook AutoArchive
- Archiving Outlook items manually
We’ll show you how this works in our step-by-step guide with helpful screenshots.
Reach out in your name every time you hit send — includes domain, 2 GB+ storage, and more.
What are archived Outlook files?
Archived Outlook files include messages, drafts, tasks, notes, or calendar information that have exceeded a user-defined aging period. These items are transferred from the email program to an external PST file (Personal Store).
The PST files stored on your local hard disk can be opened at any time with your email program, if required, to display archived Outlook items.
How to use Outlook AutoArchive
As an alternative to manually configuring Outlook archive settings, you can use the AutoArchive feature of the email program.
AutoArchive is enabled by default for some Outlook folders. Outlook items that exceed the predefined age are automatically moved to a PST file. Outlook’s default setting creates the PST file at the following location:
C:\User\IYourUsername\Documents\OutlookFiles\archive.pst
The following table shows all folders where Outlook AutoArchive is usually activated automatically, as well as the respective standard aging period.
| Folder | Standard expiry date |
|---|---|
| Inbox and Drafts | 6 months |
| Outbox | 3 months |
| Calendar | 6 months |
| Tasks | 6 months |
| Journal | 6 months |
| Sent Items | 2 months |
| Deleted Items | 2 months |
| Notes | 6 months |
If you don’t want to use AutoArchive, take the following steps to disable the feature:
Step 1: Open Outlook and go to the “File” tab.
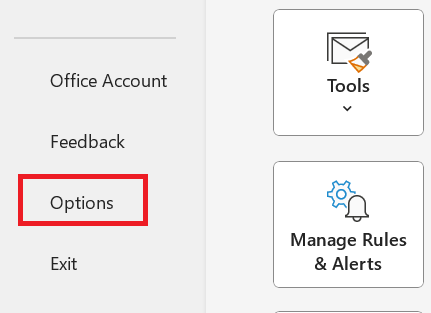
Step 2: In the left sidebar, select the menu item “Options”. Outlook Options will open in a new window.
- Professional, automatic email backup tool
- Powerful enterprise-wide search and eDiscovery
- Easy data recovery via one-click restore, download and migrate
Step 3: Navigate to the “Advanced” section and under AutoArchive, click the “AutoArchive Settings…” button.
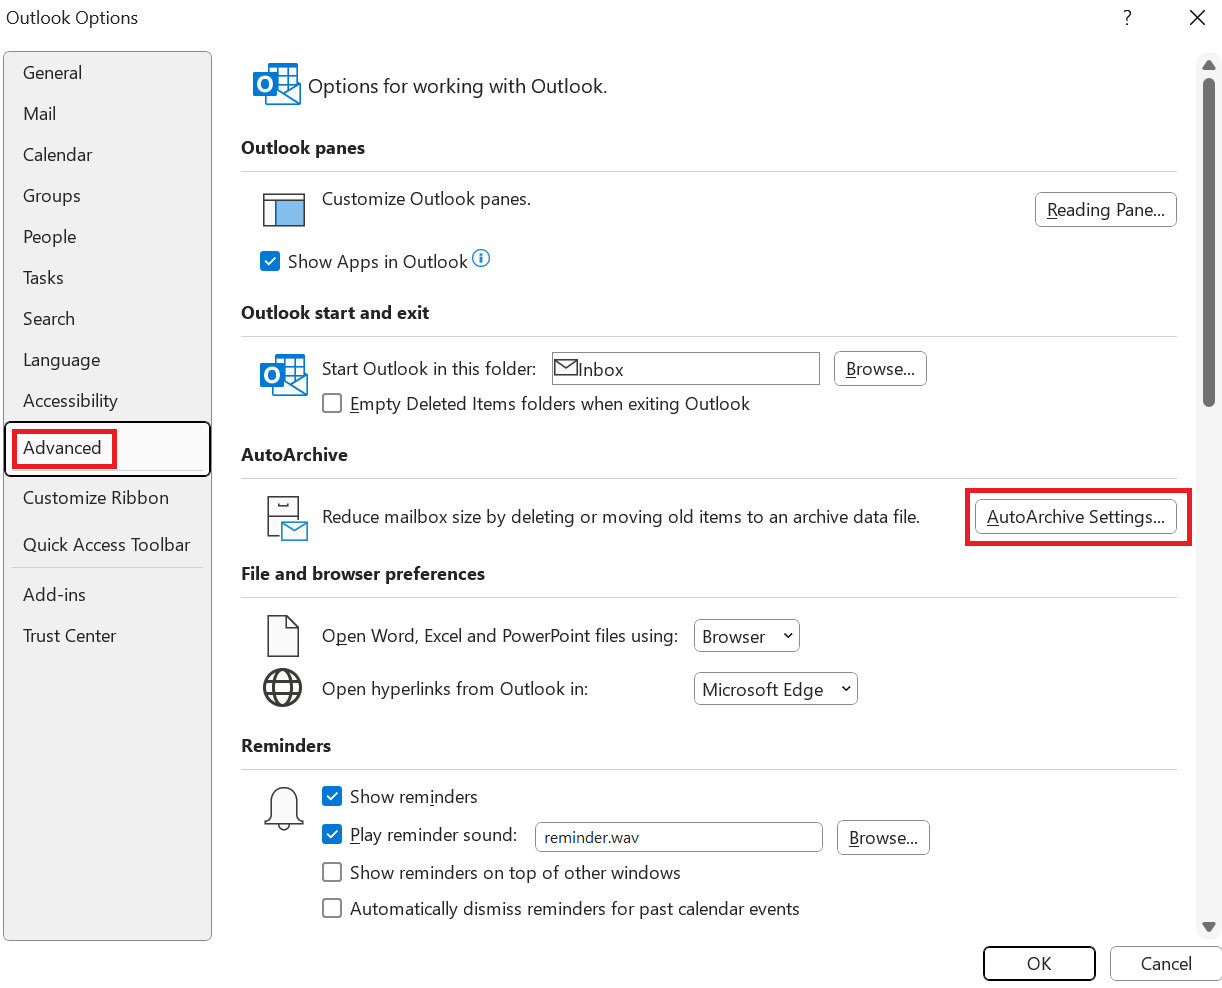
Outlook will open the “AutoArchive” window.
Step 4: Disable the “Run AutoArchive every x days” option to disable Outlook AutoArchive.
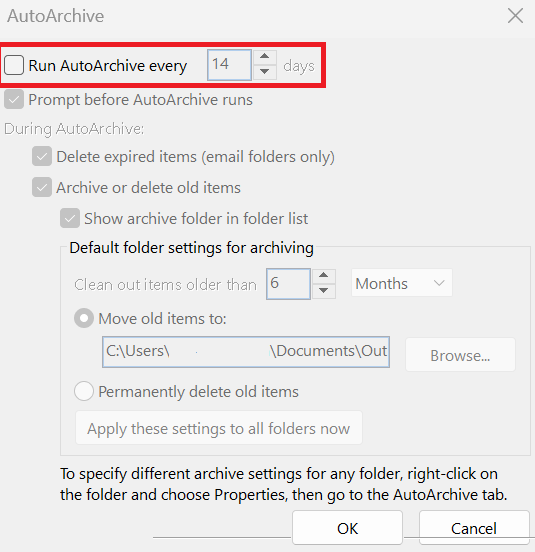
Alternatively, you can customize the default settings for Outlook AutoArchive to your individual preferences.
- Define the interval at which AutoArchive should be performed.
- Adjust the default period for Outlook items.
- Determine whether old Outlook items are archived or permanently deleted after the aging period.
How to manually archive Outlook files
If you want to selectively archive specific files in your mailbox, it’s recommended that you select them manually and save them as a PST file to a storage location of your choice.
The following steps show you how to manually archive emails and other Outlook items:
Step 1: Open Outlook and go to the “File” tab.
Step 2: In the left sidebar, select the menu item “Info”.
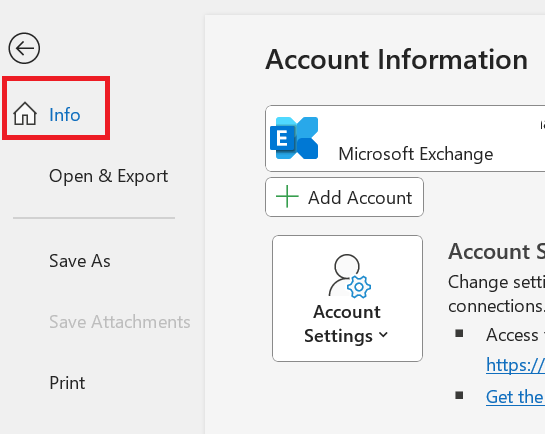
Step 3: Click on the “Tools” and then you’ll be presented with three options. Click on “Clean Up Old Items…”.
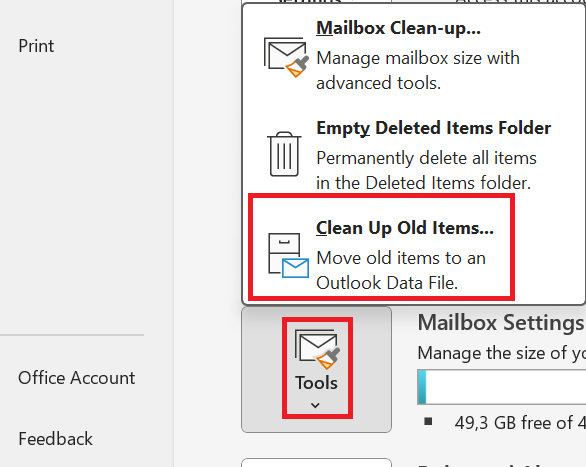
Outlook will open the “Archive” window.
If you use Microsoft in combination with an Exchange server and your organization uses the online archive for Microsoft Exchange, the “Archive” feature may not be available to you in your Outlook desktop app. The same applies if the feature has been disabled by your Exchange server’s administrator.
- The world’s leading email and calendar solution
- Secure hosting from a single source
- Anytime remote access with Microsoft Outlook
Step 4: Choose one of two options:
- Archive all folders according to your AutoArchive settings
- Archive this folder and all subfolders
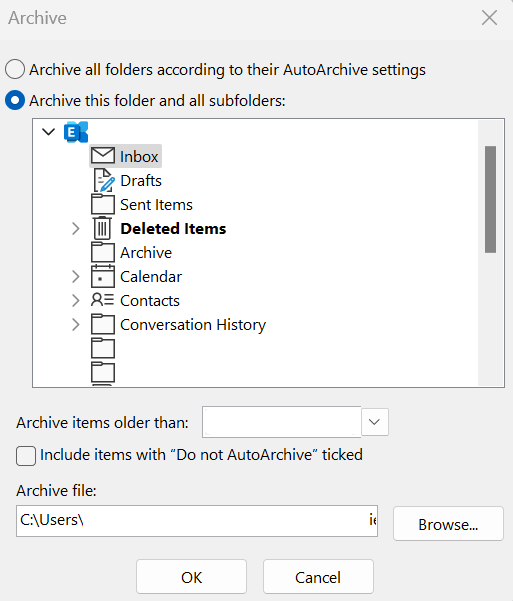
Step 5: Enter a date next to “Archive items older than”. Any Outlook items that you have created, sent, or received before this date will be archived.
By default, Outlook stores PST files in the “Outlook Files” folder under “Documents”. If necessary, amend the storage directory by clicking the “Browse…” button.
If you want to include elements in the archive that have the “No AutoArchive” option activated, simply check the corresponding box.
Step 6: Complete the configuration by clicking on “OK”.
Manual Outlook archiving will be performed just once using the settings you’ve entered. If you want to regularly archive selected folders, we recommend configuring Outlook AutoArchive accordingly.
- Intuitive drag and drop editing
- AI-powered text generation
- Multiple templates to choose from

